Photogrammetry Simplified
Bob McMicken
Copyright ©2016
See also the instructional videos on "Crime Scene and Evidence Photography"
Photogrammetry is the science of making measurements from photographs. That definition comes from http://www.photogrammetry.com where you will find links to other photogrammetry sites. Photogrammetry.com classifies photogrammetry as:
- Aerial, which is used for terrain-mapping from an aircraft.
- Close range, which is used for archeological, architectural, engineering and forensic purposes.
Our interest in this tutorial is limited to basic forensic photogrammetry using standard digital cameras and entry level photo editors. I'm indebted to Larry Barksdale for his Irfanview Photogrammetry PowerPoint and to George Reis for Chapters 15 and 16 in his excellent book Photoshop CS3 for Forensics Professionals, available as an e-book from http://www.wiley.com.
Although the title is Photoshop CS3 for Forensics Professionals, the techniques described by Mr. Reis work just fine in Photoshop CS6 and, with a little tweaking, in other advanced editors that you may already have.
The late Mike Byrd, in an article on Forensic Mapping available at https://www.crime-scene-investigator.net/forensicmapping.html, describes five methods of mapping crime and accident scenes.
- Rectangular Coordinates
- Triangulation Coordinates
- Secondary Reference Coordinates
- Transecting Baseline Coordinates
- Polar Coordinates
The required tools for photographing and mapping a crime scene by traditional methods include six and twelve inch rulers, ABFO scales for bite marks and fingerprints, Bureau scales for footprints, twenty-five and one hundred foot tape measures and assorted drawing and drafting supplies.
I have most of these tools from past barn-building and home renova-tion endeavors. Everyone should have a six inch scale and a twenty-five foot tape measure. You can buy a six inch scale, a twenty-five foot measure and a one hundred foot tape measure for less than forty dollars at Walmart.
To this basic list, I would add a six inch dial caliper when you need accuracy down to the nearest thousandth of an inch and a Fluke 424D laser rangefinder when you need to measure distances up to one hundred meters (330 feet) with an accuracy of +/- one millimeter. There have been days when I'd have killed for an accurate laser rangefinder.
I suggest that a forensic science student should become familiar with his camera and photo editor along with traditional crime scene mapping methods before venturing into photogrammetry.
Basic photogrammetry requires nothing more than a photo with a scale or ruler in the same plane as the subject and with the camera perpendicular to the subject. The subject can be anything from a tiny drop of high velocity blood spatter to a multi-story building. It doesn't work if:
- The subject is not a flat two dimensional target, such as a footprint or the front facade of a building.
- There is no object with known dimensions such as a ruler or a previously measured door opening in the same plane as the subject.
- The camera was not perpendicular to the subject, as in a canted or oblique view.
There are, to be sure, advanced forms of photogrammetry requiring specialized software and a trained operator that can cope with oblique views and three dimensional scenes. To accomplish this, the photo must contain at least one object of known size and the operator must know the focal length of the lens. Knowing the distance from the camera to the object of known size might be helpful.
We can safely assume that the operator must work from a full frame print using the entire image area. Cropping changes the effective focal length of the lens which in turn changes the effective angle of view.
Advanced photogrammetry involves geometric calculations based on one or more known dimensions and the camera's angle of view. If you know the camera's angle of view and the height of the teller's counter X feet from the camera, you can calculate the height of a bank robber Y feet from the same counter. Google 3D photogrammetry. Additional web sites of interest include:
- http://www.iafsm.org
- https://www.photomodeler.com
- https://www.cadzone.com
- https://www.iwitnessphoto.com
- https://www.panoscan.com
- https://www.acsr.org/journal-archives/rhino-photogrammetry
With that out of the way, let's get back to the basics that ordinary mortals without special training and software can master in an afternoon. First, you need an editor that includes a ruler that can measure the distance in pixels between any two points in a photo. This includes:
- All versions of Photoshop CS2 or later
- Irfanview
- Gimp
While Photoshop is the editor of choice for forensics professionals, Gimp and Irfanview are free. I elected to use the Irfanview ruler because Larry Barksdale teaching at the University of Nebraska created an Irfanview PowerPoint for his students. This tells us that the Irfanview ruler works in a classroom setting where students are using a variety of cameras and editors.
Now that Adobe is renting Photoshop on a subscription basis, Photoshop may not be the best choice for someone spending his or her hard-earned money. Unless cost is no object, use Photoshop only if your school or agency is footing the bill.
My workflow is based on FastStone and Photoshop as described in the Non-Destructive FastStone Workflow tutorial at Faststone Workflow. Before I retired, my specialty was surveillance photography. I never gave photogrammetry a second thought until Larry Barksdale sent me a copy of his PowerPoint.
Old School
I knew that there was such a thing as photogrammetry because the photographic grid method was described in an information package that I received from Case Western Reserve University back in the early Seventies, followed by additional references in Police Photography by Larry Miller and Crime Scene Photography by Edward M. Robinson.
Photographic grid measurements are based on a 24 x 24 inch target placed in the scene perpendicular to and in line with the camera. The photo is enlarged to the largest size allowed by the printer. Lines are drawn on the photo following perspective convergence, allowing objects in the scene to be located within a foot or so.
As far as I know, the only comprehensive description of this technique can be found in Photographic Grid for the Perspective Mapping of Evidence 2nd edition by J. Stannard Baker of the Northwestern University Traffic Institute, published in 1977.
New School
Today, with readily available laser rangefinders and total station map-ping systems in every well-equipped CSI's truck, photographic grid mapping using paper and pencil methods is no longer state of the art. The techniques herein described below are pure digital.
At the basic level, there are two methods that you should be familiar with. One is creating a 1:1 print and taking your measurements from the life size print. The other is calculating the number of pixels per inch, foot, yard or mile and using this to find your unknown dimensions.
If you have a letter-size printer using 8.5 x 11 paper, the 1:1 method will only work with small objects such as a fingerprint with an ABFO #2 scale in the frame or a small pocket knife with a six inch scale in the frame.
It will not work for shoe prints. My wife's size 10 boot is eleven inches long. My size 18 New Balance sneaker is fifteen inches long. I shop at Kaufmann's Big and Tall in Englewood, Colorado. They carry up to size 22 in stock. I have no idea how large a printer you'd need to print a 1:1 photo of a size 22 shoeprint. A printer capable of making a 12 x 18 inch print on 13 x 19 inch paper might be marginal.
If you're interested in the 1:1 print method, see Chapters 15 and 16 in Photoshop CS3 for Forensics Professionals. Your forty dollars will be well-spent even if you don't use this particular technique. If you're planning a career in forensics, you will eventually be confronted with Photoshop.
The pixels per inch method for small objects and the or pixels per foot method for large objects is more versatile in that it doesn't depend on the capabilities of your printer.
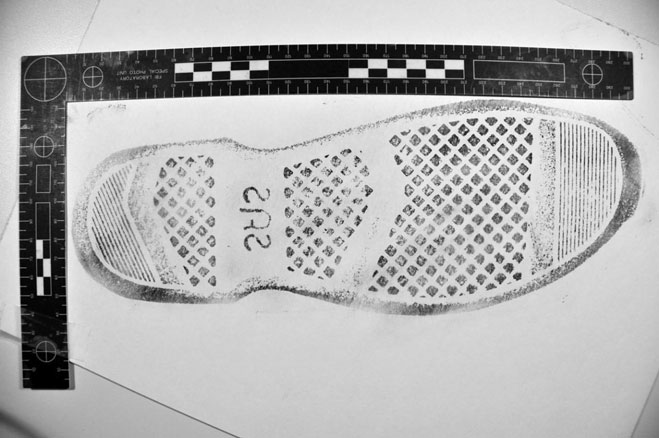
Regardless of the method that you decide to use, you must start with a sharp, distortion free photo. This highly distorted photo provided by Hayden Baldwin is not suitable for any forensic purpose, other than as an example of how not to take evidence photos. If your P&S camera is taking pictures like this, you need a new camera. If your interchangeable lens camera is taking pictures like this, you need a true macro lens or at least a high quality prime with Close Range Correction, not a close-focusing zoom.
This is an example of complex barrel distortion, so complex that it could not be corrected using the lens correction tools in Photoshop CS6 . Many zoom lenses exhibit barrel distortion at the wide angle setting and pincushion distortion at the telephoto setting.
This reinforces the advice found in the better textbooks and in the SWGIT standards to test your equipment under operational conditions before using it in the field or committing yourself to an expensive purchase.
I've owned lenses this bad if not worse back while Nixon was in office, but not recently. Nikon started incorporating a system known as Close Range Correction in their professional lenses in 1967. My Nikon lenses manufactured after 1972 incorporate CRC and the newer Nikon cameras such as my D7000 automatically correct for common forms of distortion when you're shooting with a supported Nikon lens.
In addition, editors such as Photoshop, Lightroom and DXO Optics Pro will correct for distortion if you're using a supported lens and camera. You can't work with distorted photos if you're going to use the photos in lieu of rulers, scales, micrometers and laser rangefinders to obtain critical meas-urements. A good defense attorney will have your liver on a stick.
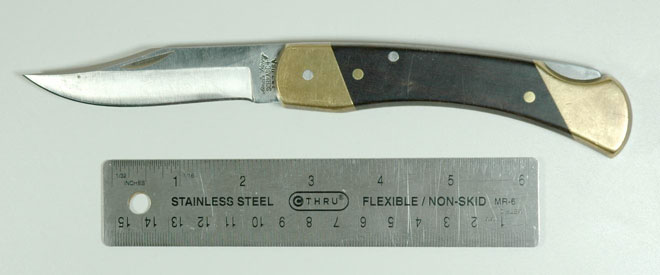
This photo, a copy of the camera original and cropped to fit the page, was taken with a Nikon D70 camera with a Nikon 60 mm f/2.8 macro lens on a Kaiser copy stand. I used a two dollar scale from Walmart. A perfectionist would use a twenty-five dollar Starrett machinist's scale calibrated in 32nds and 64ths on one side, 10ths and 100ths on the other side.
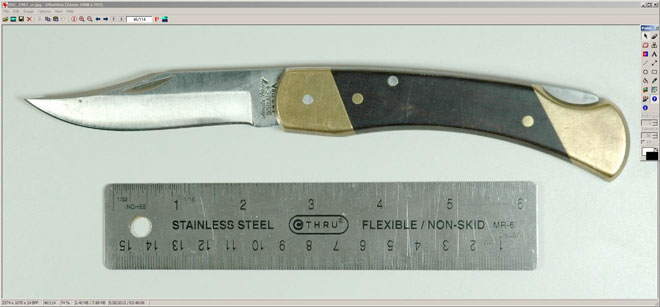
Start Irfanview and open a photo that includes both a scale and an unknown. In this case, the unknown is the length of the blade from the bolster to the tip. Hit F12. This will open the Paint toolbar.
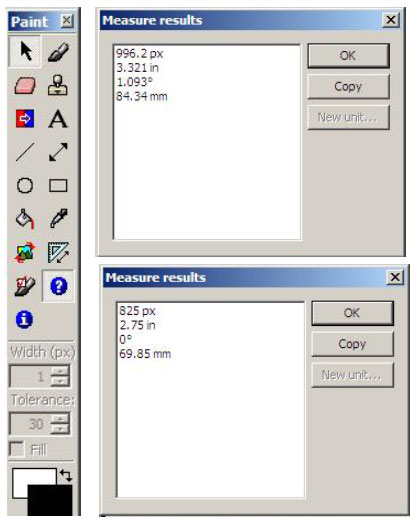
The triangle icon on the Paint toolbar is the ruler tool. It works exactly like the ruler tools in Gimp and Photoshop.
The top result box is the distance between the 3" and 6" marks on the scale.
The bottom measure result box is the distance between the bolster and the tip of the blade.
We now have both our known and our unknown. Simple arithmetic will give us our answer.
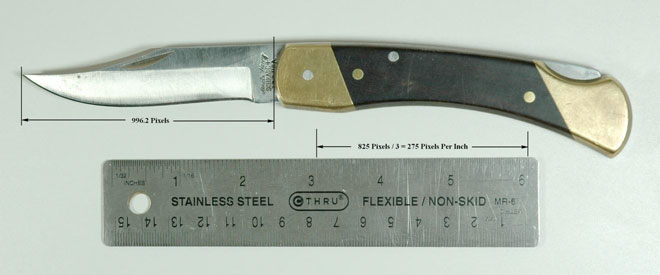
I think it's important to provide an annotated copy of the unmodified camera original photo to let interested parties know what you measured. Some people might think of the blade as being only the sharpened edge. Most folks think of a bolster as being a type of cushion or a form of enhancement. Google knife bolster for definitions of knife terminology.
An Irfanview advantage is that you get nice, big result boxes that lend themselves to screen shots using the twenty dollar FastStone Capture utility. Authors and instructors cherish the ability to get good screen shots.
Once you have your measurements, close Irfanview without saving unless you intend to annotate in Irfanview. I closed without saving because I intended to annotate in FastStone. FastStone is my primary JPEG and TIFF editor so I'm familiar with FastStone's text and drawing tools.
I could have use the text and drawing in Photoshop, Elements, Gimp or any other editor that can draw text, lines and arrows. That's an advantage of using pixels per inch and pixels per foot calculations. You can use your preferred editor once you have your measurements.
The top measure results box gives you the distance in pixels between the three and six inch marks on the scale. Divide 825 by 3 and you get 275 pixels per inch. Use the largest known dimension that you can conveniently measure. The bottom result box gives you a distance of 996 pixels between the tip of the blade and the leading edge of the bolster.
Divide 996 by 275 and you get a blade length of 3.621 inches. The blade measured 3 11/16ths inches using a stainless steel ruler, which translates to a decimal value of 3.688 inches.
Unhappy with this discrepancy, I went out to the garage, turned on the 600 watt light over my reloading bench so I could see what I was doing and measured the blade length using an accurate dial micrometer which reported a blade length of 3.70 inches.
I recall that the original Shrade factory specs called for a blade length of 3.75 inches but thirty-odd years of repeated sharpenings could easily account for the difference between 3.75 and 3.70. A difference of .05 inches is probably well within manufacturing tolerances. Shrade went out of business in 2004 so we can't ask people who would know for sure.
In court, I'd be willing to testify to a blade length of approximately 3.7 inches plus or minus a nominal 0.1 inches because, if a defense consultant examined the knife with his own dial caliper, 3.7 inches is more than likely the answer that he'd come up with as long as I don't use the knife or have the blade sharpened in the meantime.
The key words are approximately and nominal. No matter how care-fully I measure, I've never come up with precisely the same result down to the last pixel. I would not expect a twenty-five dollar machinist's scale to yield the same results as a two dollar office scale. My micrometer was purchased forty years ago. I know that it accurately measures bullet diameters between .358 and .452 inches because Speer and Hornady are nice enough to label their boxes but I can't be sure that it will accurately measure a knife blade because I don't have a set of laboratory-grade gage blocks.
My $200 monitor has a nominal screen resolution of 96 pixels per inch. Again, the key word is nominal. A $2,000 graphics monitor might have a nominal screen resolution of 106 pixels per inch, permitting more accurate measurements.
According to EXIF data, this particular picture was taken on June 28, 2012. It was taken to illustrate scale placement with respect to the blade. While the scale does have a non-slip cork backing to raise it above the level of the substrate, I can't say with absolute certainty that scale is in the same plane as the blade to the nearest fraction of a millimeter.
If knowing the blade length down to the nearest gnat's whisker is important, a prudent investigator would send the knife off to an accredited forensic laboratory where a firearm and tool mark examiner court-qualified as an expert witness could take measurements using instruments calibrated to National Institute of Standards and Technology (NIST) standards.
In my blissful ignorance, I would presume that a measurement taken with a Starrett machinist's scale would suffice for courtroom presentation. You can always pull a six inch scale out of your shirt pocket if an attorney wants you to demonstrate how your arrived at a measurement.
With that out of the way, let's deal with a pixels per foot measurement using Woodland Park's Rampart Range Library as our target.
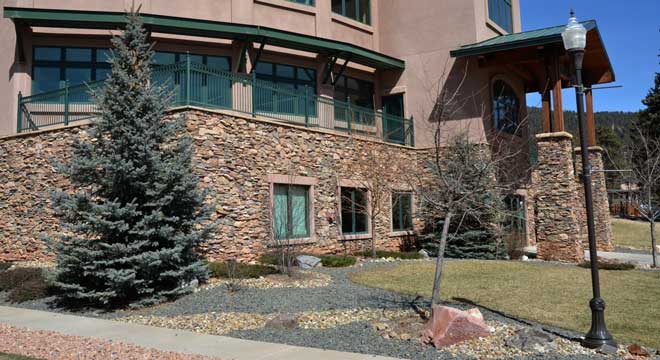
I wanted to measure the width of the building on the facade facing US 24, Woodland Park's main drag, but the entrance is ten or twelve feet in front of the main facade so I couldn't use the width of the door as my known.
Well, actually I did but I came up with a width of 88 feet while I knew the building to be approximately 100 feet wide. Consequently, I measured the width of the window more or less in the center of this photo, that being the only window that I could reach without damaging the landscaping.
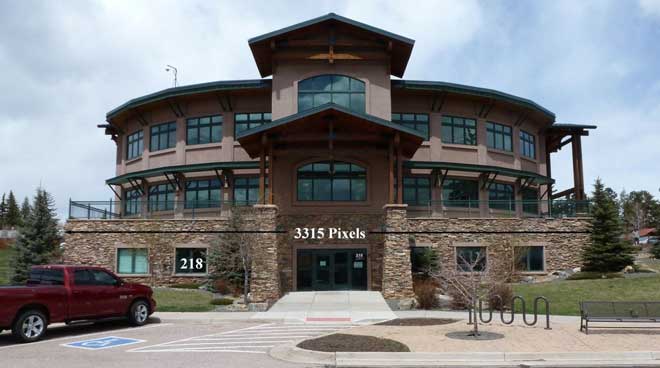
Our known is a window to the left of the entrance measuring 78 3/8" inches wide inside edge to inside edge. 78 3/8 fractional inches = 78.375 decimal inches. Irfanview reports the width of the window as 218 pixels.
- 218 / 78.375 = 2.7815 pixels per inch, giving us our known.
Irfanview reports that the width of the building is 3315 pixels roughly eight feet above ground level, that being the height at which I could see both corners of the building through the shrubbery. Since the ground slopes, the height above ground level would depend on where you're standing when you take the measurement. (I eyeballed it from the camera position.)
- 3315 / 2.7815 = 1,191.8 inches.
- 1,191.8 / 12 = 99.32 feet, giving us our unknown.
Being a suspenders and belt guy, I measured the width of the building along the sidewalk using a 100' tape measure and came up with a width of approximately 100'. I won't say exactly 100' because landscaping and architectural details precluded measuring the building itself corner to corner and the walls slope from the second floor deck to the ground.
Since our library was built within the last ten years and is something of a local landmark with the town's only clock tower, a diligent investigator should have no trouble coming up with a complete set of architectural and engineering drawings, known as A&Es to the trade.
If the width of this building down to the nearest millimicron is important, a prudent prosecutor would subpoena the architect. An architect can be qualified as an expert witness and copies of his drawings are probably on file with the county's building code compliance officials.
Conclusion
Photogrammetry at the basic level is a useful skill, easily mastered in an afternoon. However, if you have access to the object itself, be it a knife blade or a public library, it might be faster and more convenient to take critical measurements using a scale, a tape measure or a laser rangefinder while you're still on the scene.
Photogrammetry might save your bacon if you have a usable photo-graph containing a reliable known when you do not have convenient access to the object in question. Usable means an undistorted photo with a scale in the same plane as the unknown object. An attorney might fairly question your competence if you use a coin or a bill in lieu of a proper scale.
I'd be leery of using photogrammetry to measure knife cuts and bullet holes in articles of clothing. Fabric stretches, so it might not be easy for a defense consultant to duplicate your results at a later date. Getting a good, well-centered overhead shot of the deceased's dried garments laid out on an examination table might take a few gymnastics.
Hence, measurements taken with a common scale and paper and pencil drafting methods might be the best and most repeatable method. Any method that yields a result that cannot be easily duplicated by a skilled practitioner is subject to courtroom challenge.
Using 3D photogrammetry to determine the height of a bank robber is merely an aid to identifying potential suspects and excluding individuals who are clearly too short or too tall. Using a total station mapping system can appreciably reduce the time required to map a large outdoor scene, allowing bodies to be removed and opening the road to traffic that much soon-er. These are legitimate objectives in the public interest.
 Photogrammetry Simplified Copyright: © 2016 by Bob McMicken. Copyright for this article is retained by the author, with publication rights granted to the Crime Scene Investigation Network. This is an Open Access article distributed under the terms of the Creative Commons Attribution-NonCommercial-NoDerivatives 4.0 International License which permits
unrestricted noncommercial use, distribution, and reproduction, provided the original work is
properly cited and not changed in any way.
About Bob McMicken's Book
Mike has written the e-book Practical Police Photography, a 280 page ebook covering everything that an entry level police photographer or forensic science student needs to know, with links to many sites providing additional information.
Article submitted by the Author
Article posted: April 1, 2016

