

Visualizing Bloodstain Patterns on Dark or Multi-colored, Multi-designed Clothing using Luminol and Adobe Photoshop® Layers
Tom Hill
Introducion
Bloodstains on clothing or its absence is important evidence in any forensic investigation. The patterns can provide valuable information to a bloodstain pattern analyst. Once blood is located it needs to be documented utilizing notes and photography. Documentation can be difficult when bloodstains have been deposited on dark or multicolored fabric. Additional problems exist with fabrics that have been stained by liquids other than blood. The use of Photoshop® to create composites is an excellent way to assist with note taking and documentation of bloodstains on clothing or any other object. Exhibits can also be created to assist with trial testimony.
This documentation process can be achieved by the use of luminol photography and then creating a composite photograph in Photoshop®. The steps outlined are aimed at an analyst with previous Photoshop® skills. Photoshop® CS4 was the version used for the examples presented in this paper.
Materials
Dark trousers
Multicolored shirt
Equine (horse) blood
Luminol preparation:
- 3.5g Sodium Perborate
- 25.0g Sodium Carbonate
- 0.5g 3-Amino-Phthalhydrazide, 98% (Luminol)
- 500ml distilled water
-
Add 1 to 4 and shake for at least one minute.
Add 2 and 3 to 4. Mix until dissolved.
Allow un-dissolved sediment to settle to bottom of container.
Pour off liquid into a dark container.
Known scale:
-
Two copper pennies glued six inches apart onto a hard surface. They will be seen very clearly as copper will luminesce when luminol is applied.
Camera utilized:
-
Nikon D300
Nikon 24-120 VR lens
Tripod
Camera Settings for Luminol Image:
-
F-5.6
15 seconds
ISO 800
White Balance auto
10 second shutter delay
Quality: JPG Fine, RAW or TIFF. (I use JPG Fine)
Creating the Bloodstain Patterns
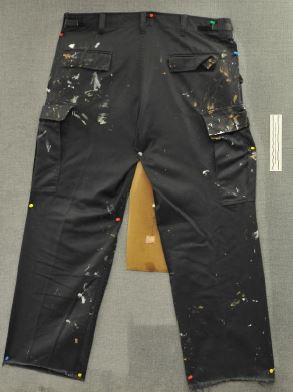
Example "A" was created with cast off and swiping of a bloody hand.
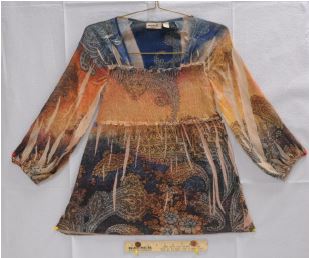
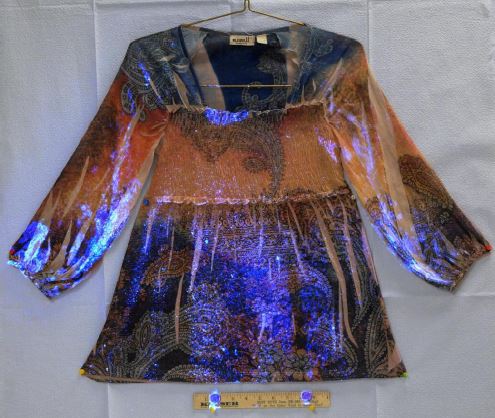
Example "B" was created by pooling blood into a cupped hand and slapping multiple times with the other hand. The hands were then dragged down the sleeves and the neck line grabbed.
Methodology
Photographic steps
- Place the penny scale next to the target surface.
- With camera mounted on the tripod, aim so that lens is 90 degrees to the target surface. Adjust the zoom so that target fills frame. Once set in this position it must not be moved. Both images will be taken using the tripod mounted settings.
- Image #1 is taken using settings that produce a correctly exposed image. You must decide on the settings and lighting (Figures 1 and 4).
- Do not move the camera for the next photograph.
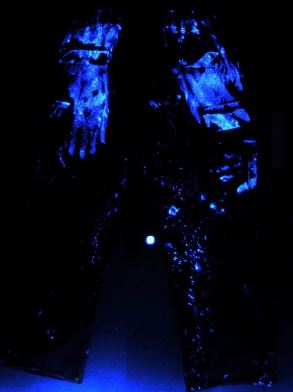
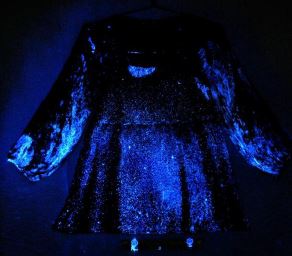
- Image #2 is taken using the settings described above for CAMERA SETTINGS FOR LUMINOL IMAGE. This will be done in a blackened environment. Your shutter should be on a delay setting. On the target surface begin spraying a fine mist of luminol one second before the shutter opens. Do not overspray the Luminol solution since drips may be produced. The camera will record much more information than we can see (Figures 2 and 5).
Transferring Images to the Computer
Image #1 should be a correctly exposed image. Image #2 will appear black with blue areas of luminescence. Transfer both images to a new folder on your computer. Rename them Image #1 and Image #2. Copy and paste the images into the same folder. You should now have a second set of images with the word copy written within the file name. Digital imaging protocol requires that image processing will only be done on a copy of the original. The copied images will be the ones worked on from this point.
Creating the Composite
- Open Photoshop®.
- Open Image #1.
- Make adjustments to the exposure. For this example the appearance of the trousers was adjusted to a lighter color and the different paint stains were adjusted to a black color. This was achieved by going into CALCULATIONS using the following settings. Source 1 red invert. Source 2 red. Blending Light Color. Opacity 100.
- Open IMAGE SIZE. Record the width, height and resolution.
- Create a NEW canvas. Use the dimensions from the recorded values in step 4. Name the new canvas \Composite of image #1 and #2..
- Copy and paste Image #1 onto the new canvas you just created. Close out Image #1. Save changes if desired.
- Open Image #2. Adjust color using LEVELS (or mode of your choice). You want to have a black background with the luminescence having a bluish white color. Be careful not to over-adjust as that will create noise. Copy and paste onto the new document. Image #2 should be layered above image #1. Close image #2. Save changes if desired.
- Make image #2 the active layer. Adjust opacity to 50%. Use the MOVE tool to fine tune the position of layer #2 over layer #1 by making sure the pennies overlap properly.
- Readjust the opacity of layer #2 to achieve the desired visual result.
- Each layer can be individually adjusted if need be to create the best visual combination of the two images.
- Save the completed composite back into your folder as a TIFF or PSD file. Saving in either of these file formats preserves the layers in the event you want to make adjustments in the future. Once saved in either of these file formats you can save again as a high quality JPG for printing or easy viewing (Figures 3 and 6).
Conclusions
Using Photoshop® can be daunting to many novice users. It contains hundreds of tools and combinations of tools within the program. Becoming comfortable using layers and the adjustment tools is simply a matter of using the program and experimenting on different images. Someone with a minimal amount of experience with the program should be able to follow the steps outlined above to achieve the desired results. The use of Photoshop® to visualize bloodstains specifically on dark clothing that have been processed with luminol enable the Bloodstain Pattern Analyst to create very detailed court exhibits, and notes for case work.
Example A: Back Side of Trousers Stained with Paint and Blood
 |
 |
 |
Example B: Front Side of a Multi Color, Multi Design Blouse
 |
 |
 |
References
-
James, S. H., Eckert, W. G., Interpretation of Bloodstain Evidence at Crime Scenes, Second Edition, CRC Press 1998, and Chapter 6 pp. 139-149 Chapter 7 pp. 153-161.
Reis, G., Photoshop CS3 for Forensic Professionals, 2007, Wiley Publishing Inc, Chapter 14 pp. 141-143.
King, L. S., Photoshop CS4: The Missing Manual, O’Reilly Media 2008 First edition, pp. 69-122, 268-276, 363-390.
Lefebvre, G. Sgt, A Method for Photographing Luminol Reactions at Crime Scenes, IABPA News, Vol. 21. No., 2 June 2005, p. 4.
Tom Hill
Forensic Analyst
Broward County Sheriff’s Office
201 SE 6th Street
North Wing, Room
Fort Lauderdale, Florida 33301
Article from the International Association of Bloodstain Pattern Analysts (IABPA) Journal of Bloodstain Pattern Analysis
![]() Open Access: The International Association of Bloodstain Pattern Analysts Journal is an Open Access publication with all accepted and published manuscripts available at www.iabpa.org to members of the International Association of Bloodstain Pattern Analysts and the general public with permitted reuse. Prior to publication, the Journal will obtain a Creative Commons Attribution (CC BY) license for all accepted manuscripts. This license allows for the distribution of published manuscripts provided proper credit is given to the author(s).
Open Access: The International Association of Bloodstain Pattern Analysts Journal is an Open Access publication with all accepted and published manuscripts available at www.iabpa.org to members of the International Association of Bloodstain Pattern Analysts and the general public with permitted reuse. Prior to publication, the Journal will obtain a Creative Commons Attribution (CC BY) license for all accepted manuscripts. This license allows for the distribution of published manuscripts provided proper credit is given to the author(s).