

Optimized Development of Latent Fingerprints on Unfired and Fired Brass Cartridge Casings
Katie Jo Sullivan
Marshall University Forensic Science Program
Abstract

Cartridge casings found at crime scenes may contain fingerprint evidence to introduce or help convict a suspect; however, there are few articles on the subject of the best method to develop fingerprints on cartridge casings. The purpose of this research was to compare the best development methods for unfired casings found in previous research along with other commonly used development methods. After the most effected method was determined, that method was then applied to fired brass cartridge casings. Five different methods and five hundred unfired .40 caliber brass cartridge casings with one fingerprint on each were used. The two techniques that yielded the best results were cyanoacrylate fuming followed by gun blue followed by BY40 and cyanoacrylate fuming followed by BY40 followed by acidified hydrogen peroxide. The technique that produced the highest average of fingerprints of comparison value was cyanoacrylate fuming followed by gun blue followed by BY40; this method was the method chosen to be applied to the fired cartridge casings. Phase II consisted of firing fifty .40 caliber bullets from a .40 caliber handgun after one sebaceous fingerprint was placed on each casing. Although cyanoacrylate fuming followed by gun blue followed by BY40 yielded clear fingerprints with unfired casings, this method did not produce any clear fingerprints on fired cartridge casings due to the factors a casing sustains during the firing process.
Introduction
Fingerprint comparison and examination has been used to connect suspects to evidence and crime scenes since 1892, when a trial in Argentina used a bloody fingerprint found at a crime scene to convict Francisca Rojas of murdering her two children (Lee and Gaensslen 2001). The science behind fingerprint examination involves the patterns of ridges and furrows found on the palms of the hands and the soles of the feet. These ridges have pores that secrete perspiration, and when a finger comes in contact with an object, the perspiration can leave an impression of the ridges. The use of fingerprint comparison to convict a suspect relies on the concept that ridges of a fingerprint remain the same over the course of one's lifetime, and that no two people have the same fingerprint (Lee and Gaensslen 2001).
The National Institute of Justice describes three different levels of detail used to describe the characteristics of a fingerprint. First level detail describes the overall direction of ridge flow in a print. A print described using first level detail would be classified as a loop, arch, or whorl. First level detail is a class characteristic and cannot be used for individualization. Second level detail describes the path of an individual ridge. Ridge endings and bifurcations, where one ridge splits into two, can be seen if second level detail is present. Second level detail can be used for individualization. Third level detail includes the morphology of a ridge. The texture and position of pores of the ridges can be seen if third level detail is present (NIJ 2011).
An example of evidence that could contain fingerprints is cartridge casings. Before a bullet and its casing are loaded into a gun, it is presumably handled and marked with fingerprints. After the bullet has been fired, its casing is ejected from the gun. If not retrieved, this casing is left at the scene. Fingerprints left on casings found at a crime scene could be evidence to introduce or help convict a suspect. However, there are few articles on the subject of the best method to develop fingerprints on brass cartridge casings.
Fingerprints are rarely recovered from fired cartridge casings due to the factors a casing sustains during the firing process. One factor affecting the likelihood of developing a fingerprint from a casing is the friction between the casing and the gun through the firing process. Friction occurs between the magazine and casing as the casing is loaded into the magazine. Friction also occurs when the casing enters the chamber before firing and when the casing is ejected from the chamber after firing. The casing is exposed to high temperatures and combustion gases during the firing process that can affect the oils and sweat from a fingerprint on a casing that would be used in development (Champod et al. 2005).
One article, published by Dominick and Laing in 2010, is part of the foundation this research is based on. Dominick and Laing looked at six different fingerprint enhancement techniques on six different sizes of unfired brass cartridge casings. These methods included cyanoacrylate fuming followed by brilliant yellow dye staining (BY40), cyanoacrylate followed by gun blue followed by BY40, gun blue only, cyanoacrylate followed by palladium deposition, palladium deposition only, and powder suspension. The methods they discovered worked the best on unfired cartridge casings were cyanoacrylate followed by gun blue followed by BY40 and cyanoacrylate followed by palladium deposition. There was no statistical difference found between the two techniques (Dominick and Laing 2010). Although cyanoacrylate fuming followed by palladium deposition was found to be a useful method, many forensic laboratories do not have the capability to use metal deposition to develop latent fingerprints because of its monetary demands. It is important to discover successful fingerprint development techniques that any forensic laboratory can use.
This research is also based on an article published by Edmiston and Johnson in 2009 when research was conducted on six fingerprint development sequences with four chemicals including cyanoacrylate, black powder, Rhodamine 6G, and acidified hydrogen peroxide. They discovered the best method to develop latent fingerprints on unfired brass cartridge casings was cyanoacrylate followed by black powder followed by acidified hydrogen peroxide followed by Rhodamine 6G, a dye stain.
The purpose of this research was to take the best methods for unfired casings found in previous research and compare them to each other and to other commonly used fingerprint development methods. Once the most reliable method was discovered, that method was tested to determine the likelihood of developing fingerprints of comparison value on fired casings.
Materials and Methods
There were two phases involved in this research. Phase I involved experimenting with five different fingerprint development methods to discover the method that produced the best results on unfired brass cartridge casings. Phase II involved using the best method discovered in Phase I to find the likelihood of recovering prints on fired brass cartridge casings. A rating system was designed for the purpose of this research, and each fingerprint could be given a rating of numbers 0-3. A rating of 0 was given if the print had no visible ridges and was only a smudge. A rating of 1 was given if the print was of poor quality with only a few ridges present. A rating of 2 was given if a partial print was present and first level detail could be seen. A rating of 3 was given if first and second level detail was present, and the print was of comparison quality that could be used for individualization.
Phase I
Five hundred fired .40 caliber brass cartridge casings obtained from the Rapid City Police Department were used to test the five different fingerprint development methods. The casings were submerged in methanol and wiped with a paper towel to remove any previous fingerprints. One fingerprint composed of sebaceous and eccrine secretions was placed on each casing. The nose, chin, and eyebrow regions of the face were rubbed with the finger used to make the fingerprint, and the finger was rolled onto the casing to produce a latent print. Fingerprints were obtained from two people, using various fingers. The casings were placed on a test tube support rack and set in a Cyanosafe Ductless Cyanoacrylate Fuming Chamber by Sirchie Fingerprint Laboratories. Sixteen drops of Lynn Peavey Company Peavey Print Superglue were placed in a small aluminum bowl and placed inside the chamber. The casings were fumed in the superglue chamber for thirteen minutes. The powder used in this research was magnetic latent print powder in midnight black by Sirchie.
Method 1 tested was cyanoacrylate fuming (CF) followed by Basic Yellow 40 followed by powder. Once cyanoacrylate fuming was complete, 100 casings were rinsed with Basic Yellow 40, (BY40) a dye stain composed of two grams of basic yellow powder and one liter of methanol. Each casing was rinsed with water after BY40. The basic yellow mixture was tested for quality assurance. Once dry, the casings were observed under an alternate light source at 450 nm with orange goggles. Each casing was observed, given a rating, and photographed with a Promaster Orange YA2 filter on a Nikon D300s camera. The next step in Method 1 was powder. Each casing was dusted with magnetic black powder and given a rating.
Method 2 tested was cyanoacrylate fuming followed by gun blue followed by BY40. Once cyanoacrylate fuming was complete, 100 casings were submerged in a gun blue solution of 30 mL water and 30 mL Birchwood Casey Perma Blue Liquid Gun Blue for 30 seconds. The casings were then submerged in water. Once dry, the casings were rinsed with BY40, then water, and placed on a test tube support rack to dry. Each casing was observed under an alternate light source at 450 nm with orange goggles.
Method 3 tested was cyanoacrylate fuming followed by powder. Once cyanoacrylate fuming was complete, 100 casings were dusted with magnetic black powder.
Method 4 tested was cyanoacrylate fuming followed by powder followed by acidified hydrogen peroxide (AHP) followed by BY40. The acidified hydrogen peroxide was made by combining 352.5 mL of 5% vinegar with 500 mL of 3% hydrogen peroxide. Once cyanoacrylate fuming was complete, 100 casings were dusted with the magnetic black powder. After dusting, the casings were submerged in the acidified hydrogen peroxide solution for 30 seconds and then submerged in a water bath for 2 minutes. The casings were allowed to dry overnight. The casings were rinsed with BY40, then water, and placed on a test tube support rack to dry. Once dry, the casings were observed under an alternate light source at 450 nm with orange goggles.
Method 5 tested was cyanoacrylate fuming followed by BY40 followed by acidified hydrogen peroxide. Once cyanoacrylate fuming was complete, 100 casings were rinsed with BY40 followed by a water rinse. The casings were allowed to dry. Each casing was submerged in the acidified hydrogen peroxide solution for 30 seconds and then submerged in a water bath for 2 minutes. The casings were allowed to dry and then examined under an alternate light source at 450 nm with orange goggles. A summary of the methods used in this research can be seen in Table 1.
Method 1 |
Cyanoacrylate (CA), BY40, Powder |
Method 2 |
CA, gun blue (GB), BY40 |
Method 3 |
CA, powder |
Method 4 |
CA, powder, acidified hydrogen peroxide (AHP), BY40 |
Method 5 |
CA, BY40, AHP |
Phase II
Fifty .40 caliber bullets with brass cartridge casings were used in Phase II. The casings were wiped with a towel, and one mixture of one sebaceous and eccrine sweat fingerprint was placed on each casing. The bullets were fired from a Glock .40 caliber handgun. After firing, the casings were collected for testing. The method used on the fired casings was cyanoacrylate fuming followed by gun blue followed by BY40. Once cyanoacrylate fuming was complete, the fired casings were submerged in a gun blue solution of 30 mL water and 30 mL liquid gun blue for 30 seconds. The casings were then submerged in water for 30 seconds. Once dry, the casings were rinsed with BY40, then water, and placed on a test tube support rack to dry. Each casing was observed under an alternate light source at 450 nm with orange goggles and given a rating.
Results
Phase I tested five methods with 100 casings per method. The rating system previously described is subjective on the part of the examiner but was kept consistent by using the same examiner for the rating of each casing. Table 2 gives the total number of each rating for each method, and Table 3 displays the average of the ratings for each method.
Rating |
Method 1: CF-BY40-Powder |
Method 2: CF-GB-BY40 |
Method 3: CF-Powder |
Method 4: CF-Powder-AHP-BY40 |
Method 5: CF-BY40-AHP |
0 |
4 |
0 |
40 |
15 |
19 |
1 |
45 |
27 |
46 |
21 |
37 |
2 |
26 |
34 |
12 |
27 |
23 |
3 |
25 |
39 |
2 |
37 |
21 |
Method 1: CF-BY40-Powder |
Method 2: CF-GB-BY40 |
Method 3: CF-Powder |
Method 4: CF-Powder-AHP-BY40 |
Method 5: CF-BY40-AHP |
1.72 |
2.12 |
0.76 |
1.86 |
1.48 |
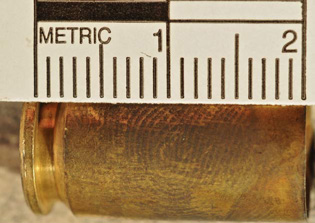
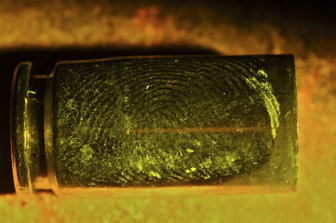
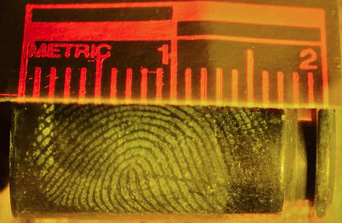
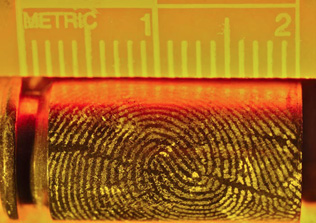
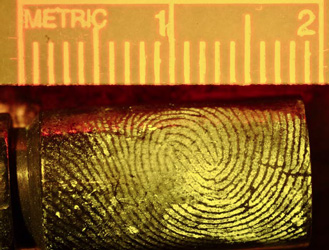
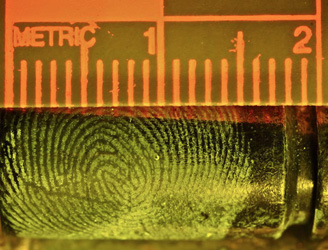
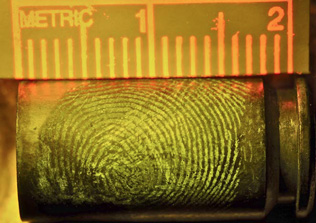
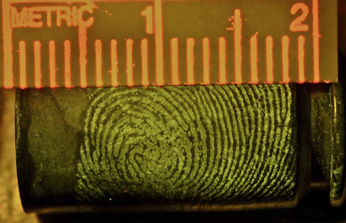
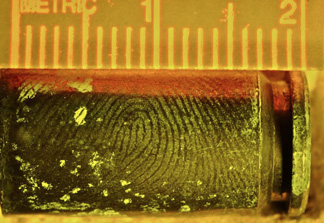
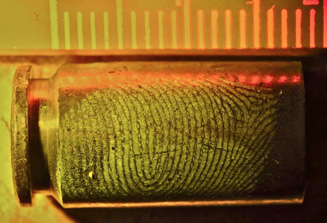
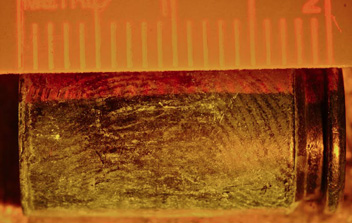
The first method tested was cyanoacrylate fuming followed by BY40 followed by powder. All 100 casings were rated before and after they were dusted with powder. Dusting each casing with powder did not help in visualizing the fingerprint, and cyanoacrylate fuming followed by BY40 was discovered to be a better development method than cyanoacrylate fuming followed by BY40 followed by powder. Figure 1 is an example of cyanoacrylate fuming followed by BY40 followed by powder. Because cyanoacrylate fuming followed by BY40 without powder was discovered to be a better development method, this was the method used when determining the average of ratings and total number of each rating for the development methods. As seen in Table 1, a rating of 1 was given to the majority of the fingerprints developed with cyanoacrylate fuming and BY40. Figure 2 is an example of a latent fingerprint developed with cyanoacrylate fuming followed by BY40 given a rating of 2, and Figures 3 and 4 are examples of latent fingerprints given a rating of 3 using method 1.
 |
 |
 |
 |
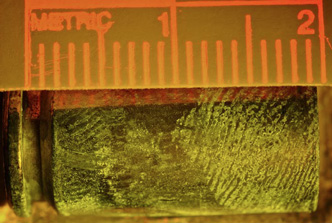
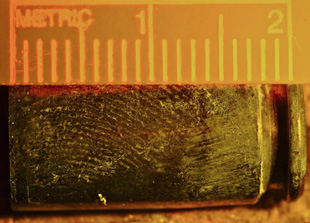
Method 2 tested was cyanoacrylate fuming followed by gun blue followed by BY40. As noted in Table 1, no fingerprints were given a 0 rating, and the majority of fingerprints were given a rating of 3. As a result, this technique was discovered to be the most successful development method and was used for Phase II of the research. Figures 5 and 6 are examples of latent fingerprints developed with method 2 and given a number 3 rating.
 |
 |
Method 3 tested was cyanoacrylate fuming followed by magnetic black powder. The majority of fingerprints were given a rating of 0 or 1, and only two fingerprints were given a rating of 3 (Table 1). As a result, this technique was found to be the least successful development method. Figure 7 is an example of a fingerprint given a 0 rating, and Figure 8 is an example of the clearest fingerprint developed with this method.
 |
 |
Method 4 tested was cyanoacrylate fuming followed by powder followed by acidified hydrogen peroxide followed by BY40. The majority of fingerprints developed with this method were given a rating of 1. Figures 11 and 12 are examples of fingerprints given a rating of 3 developed with method 4.
 |
 |
Method 5 tested was cyanoacrylate fuming followed by BY40 followed by acidified hydrogen peroxide. The majority of fingerprints developed with this method were given a rating of 3, but there were 15 fingerprints that were given a rating of 0 (Table 1). Figures 9 and 10 are examples of fingerprints given a rating of 3 developed with method 5.
 |
 |
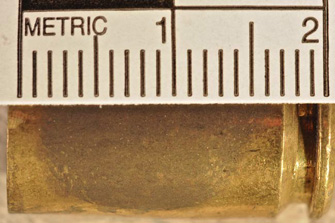
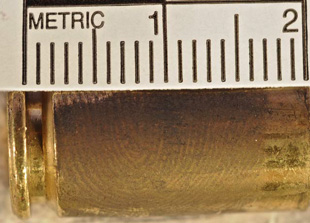
Because the most detailed fingerprints were recovered using method 2, this method was tested on fired casings. Out of 50 casings, six were given a rating of 1 and the remainders were given a rating of zero. No identifiable fingerprints were recovered using method 2 on fired casings. Figures 13, 14 and 15 are examples of latent fingerprints developed with cyanoacrylate fuming followed by gun blue followed by BY40.
 |
 |
 |
Discussion
Dominick and Laing concluded that cyanoacrylate followed by gun blue followed by BY40 and cyanoacrylate fuming followed by palladium deposition were the best development methods to recover latent fingerprints from cartridge casings (Dominick and Laing 2010). The method that recovered the most detailed fingerprints in this research was cyanoacrylate fuming followed by gun blue followed by BY40. This information follows the conclusion of the study by Dominick and Laing. Methods chosen by Edmiston and Johnson were also researched. They discovered cyanoacrylate fuming followed by black powder followed by acidified hydrogen peroxide followed by dye stain, known as method 4 in this research (Edmiston and Johnson). Method 4, however, received the fourth lowest average and does not support the conclusions by Edmiston and Johnson.
It is not surprising that no fingerprints of comparison value were recovered from the fired casings. Factors such as pressure, environment, and oil and sweat on fingers must combine to produce clear and detailed latent prints. Even in excellent conditions, fingerprints of comparison value are rarely found. When heat, gas, and friction are added, it is even less likely that a detailed fingerprint will be recovered.
Future research could test method 5 on fired casings. Although method 2 had the highest mean of prints of comparison value, method 5 also gave a high average. Other research considerations could include testing metal deposition to develop latent fingerprints on both unfired and fired casings. Because it is often not available to forensic laboratories, metal deposition could be compared to more accessible methods to discover if its benefits outweigh the cost.
Additional considerations include other evidence that may need to be taken from the casing. Destruction of DNA can occur with certain fingerprint development methods. If DNA testing on the casing is necessary, the most optimal method may have to change to avoid destroying any DNA evidence. The casing may also need to be examined for tool marks. Gun blue etches the surface of the casing while acidified hydrogen peroxide cleans the surface. Acidified hydrogen peroxide might be a better development method if firearm examination is needed (Swofford et al. 2013).
Conclusion
In conclusion, five development methods were tested to determine the optimal development method on unfired casings, and the best method was then tested on fired casings. One method, cyanoacrylate fuming followed by gun blue followed by BY40, was discovered to be superior and was tested on fired casings. Although no prints of comparison value were developed with method 2 on fired casings, this method can be used on unfired casings to develop latent fingerprints with clear detail.
Acknowledgements
The following people should be acknowledged for their help in this study:
-
Kimberly Gerhardt, internship supervisor from Rapid City Police Department
Mrs. Catherine Rushton MSFS, technical advisor from Marshall University
Dr. Pamela Staton, topic advisor from Marshall University
Dr. Lauren Richards Waugh and Dr. James Denvir from Marshall University for statistical analysis assistance
Investigator Ryan Cook from Pennington County Sheriff’s Office for providing fired casings
References
- Champod C, Lennard C, Margot P, Stoilovic M. Fingerprints and Other Ridge Skin Impressions. Florida: CRC Press LLC; 2004.
- Dominick A, Laing K. 2010. A Comparison of Six Fingerprint Enhancement Techniques for the Recovery of Latent Fingerprints from Unfired Cartridge Cases. Journal of Forensic Identification 61(2): 155-165.
- Edmiston K, Johnson J. 2009. Determining an Optimal Sequence for Chemical Development of Latent Prints on Cartridge Casings and Shotgun Shells. Journal of Forensic Sciences 54(6): 1327-1331. Available from: interscience.wiley.com.
- Lee H, Gaensslen R. Advances in Fingerprint Technology. 2nd ed. Florida: CRC Press LLC; 2001.
- [NIJ] National Institute of Justice. 2011. The Fingerprint Sourcebook. Washington, DC: U.S. Department of Justice. 9-9.
- Swofford H, Paul L, Steffan S, Bonar D. 2013. Development of Latent Fingerprints of Fired Brass Cartridge Cases: Impact of Latent Print Development Using Acidified Hydrogen Peroxide on Forensic Firearm and Toolmark Examinations. Journal of Forensic Identification 63(4): 359-368.
The Crime Scene Investigator Network gratefully acknowledges the author for allowing us to reproduce the article .
Article posted May 21, 2018