

Creating Luminol Photographs with Digital Imaging
A Method for Photographing Luminol Reactions at Crime Scenes.
Gord Lefebvre
See also the instructional videos on "Crime Scene and Evidence Photography"
Introduction
 One of the major problems encountered when photographing luminol reactions is getting just the right amount of light in the photograph to assist with the position of the area of interest but not permitting so much light that the intensity of the reaction is lost. I have found a very simple method to accomplish this utilizing digital imaging. The scene and luminol reaction are photographed with a digital camera and the digital images are brought into Adobe® Photoshop® where a composite image is created. By combining the two images a type of double exposure is created. The opacity of one of the images can be adjusted so that the details in the other image can appear. This composite image may better assist the court or investigators in understanding the relationship of the luminol reaction to its surroundings.
The equipment and procedure that I use to create the composite image are outlined. As with most computer applications there will be several ways to create the same image. I have tried to be as exact as possible. However, there may be alternate methods that will work equally as well. The particular technique utilized is the choice of the investigators and their level of experience with digital imaging and associated software.
Equipment
- Nikon D1X Digital SLR camera with an 18-35mm f/ 3.5-4.5 D lens
- Nikon SB-80DX Flash
- Nikon Sync Chord
- Tripod
Method of Image Capture
The methodology involves capturing two images of the area. The first image is a timed exposure of the luminol reaction; the second image (flash image) is of the same area with the assistance of a flash to properly expose the surface. A tripod is necessary so that adjustments can be made to the camera without moving it. The Nikon D1X camera records exceptional luminol reactions. The images are captured at the highest (RAW) resolution setting. They are 12 bit with a 3008 X 1960 image size. These files are quite large but the detail is excellent. The nicest feature of this camera is the LCD screen on the rear of the camera that allows a quick view of the captured image.
As previously described, two images are taken: the first being the positive luminol reaction, the second being the flash image. I have found that the following settings work very well for capturing the luminol reaction; manual shooting mode, manual focus, 30sec. f/4.5 exposure (with synch cord) and the ISO at 400. For the flash image simply switch the camera to Program shooting mode and turn on the flash. The flash is set to Auto, D-TTL, and front curtain sync.
Once the area of interest is determined the camera is set up on the tripod. The synch cord is attached along with the flash unit. To capture the reaction the camera is set to the manual mode using the settings as described above. Ensure that the field of view is in focus and the flash is off. The area is darkened and the luminol is sprayed onto the surface of interest. Once a positive reaction is observed, the shutter is released using the synch cord. Additional spraying of luminol can be applied to the area if the reaction begins to lose its intensity. The issues of dilution of the sample and subsequent DNA issues will not be discussed in this report. However, these issues must be considered. Once the image is captured you can view the result and determine if the image was successfully captured.
Luminol Reaction Image
After the luminol reaction has been recorded, it is necessary to set the camera in program mode and turn the flash on. It is essential to do this without disturbing the camera or tripod. A scale should also be placed in the field of view. Once this has been accomplished another image is captured.
Flash Image
This two-step process is carried out throughout the scene as often as is necessary to properly record the reactions.
Adobe Photoshop
Once the images at the scene have been captured and have been entered into the computer the imaging process begins using Adobe® Photoshop® to create the composite image. When an image is opened in Adobe® Photoshop® it consists of a single layer. Additional layers can be added to the image, and each layer can then be edited as a separate piece of the final image. This permits unlimited flexibility in composing and revising the image. The composite image is created by using the layers feature.
Begin by opening the flash image and check the image as to its tonal range and color balance using the Levels tool. Make any necessary adjustments to balance the image. Most digital images can also benefit from some sharpening using the unsharp filter. Once the image has been adjusted and you are satisfied with the results, the file is resaved as a new image. It is always important to preserve the RAW file data (image) and create a working copy. The file is saved in a psd. format (Photoshop®) at this point. After this has been done open the luminol photograph and adjust the levels and sharpness. Since this image is mostly black or very dark watch the image as you adjust the levels and stop before you get a noise effect characterized by little flecks of red across the image. Once the image is acceptable use the Select – All command to select the entire image, after this is done use the Edit – Copy command. Return to the flash photograph and select the Edit – Paste command. The luminol reaction image will be pasted into the flash image. The pasted image will be on a new layer and should be above the flash image. This can be seen on the layers palette. As mentioned earlier each image will be on a separate layer and you have total control of each image without affecting the other. At this point be sure that you are working on the luminol reaction image. Click the mouse cursor on the luminol layer in the layers palette. The section should be blue and will have a paintbrush icon next to the eye. Using the opacity level tool you can lighten the darkness of the luminol reaction layer allowing the flash image to appear. The intensity of the luminol reaction remains while the darker areas fade.
Once the intensity of the luminol reaction is adjusted it to your satisfaction, go back to the Levels tool and see if you can adjust the tonal range and color balance any further. A little tweaking at this point can provide further detail in the luminol reaction areas. Once this step has been completed re-save the image as a JPEG file for printing and sharing as needed. I also save the original Photoshop® psd. format for future use. The Photoshop® file could be used in court to show how this process was completed. It is quite impressive when you use the opacity tool and slide back and forth between the two images.
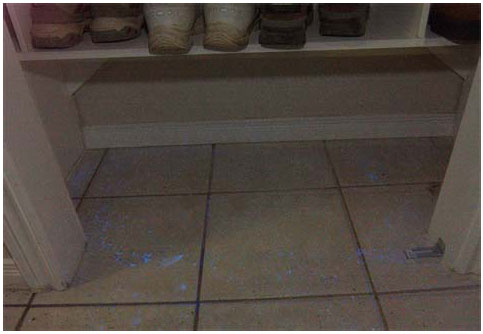
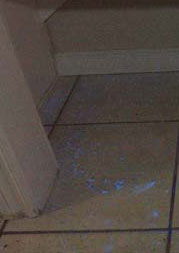
Figure 1. Composite image of scene and luminol reaction on floor of closet.
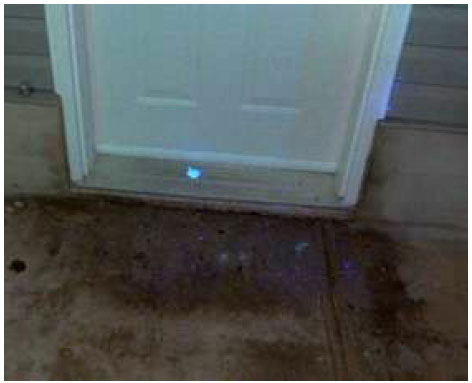
Figure 2. Composite image of scene and luminol reaction on door and floor.
I hope you may find this method of assistance. The use of layers can also be helpful in physical comparisons. I have put together a step-by-step presentation with screen shots to assist anyone who may be interested. Please contact me and I will send you a copy of the presentation.
About the Author
-
Sgt. Gord Lefebvre
Unit Commander
Forensic Identification Services
East Unit - Eastern Region OPP
1 Mille Roches Rd. Long Sault, Ontario
Canada K0C 1P0