

Bullet Trajectories at Crime Scenes
Don Penven
Recommended Procedures for Documenting Bullet Trajectory
 Crime scenes involving the use of firearms present unique challenges for the crime scene investigator, but using relatively simple techniques it is often possible to reconstruct the events that give some indication as to what occurred during the actual discharge of the weapon. By this I mean it is possible to determine the actual path or trajectory of the bullets, and using this information, determine the location of the shooter.
A number of factors must be taken into account including the position of cartridge cases ejected from automatic and semi-automatic weapons. It is therefore essential that the exact position of spent casings be marked and documented before any other investigative procedures are followed.
Document (Photograph & Sketch) Positions of Spent Cartridge Casings
Photography is the first necessity so it is imperative that the crime scene be afforded absolute security. Until spent cartridges are properly recorded-all foot traffic must be banned from the area.
Each spent casing should be marked using standard crime scene evidence identifiers such as "evidence tents," placards, or similar devices.
Typically, overall scene photos are taken first, followed by medium distance and close-ups. Be certain to include other nearby objects in these photos to better establish the true position of each object photographed.
It is also imperative that a crime scene sketch be prepared once photography is completed. Each spent casing should be located on the sketch that includes either triangulation or coordinate methods of measurement.
The physical location of spent casings may tell a unique story of their own. Placement of these objects results from normal ejection by the weapon and may provide limited data as to the location of the shooter, the direction of shots fired and possibly the path taken by the bullet(s). Ejected casings may also substantiate or refute statements from witnesses, victims or suspects.
Methods For Determining Bullet Trajectory
Historically, the technique of "stringing" a crime scene may date back over 70 years. Stringing has been, and continues to be used at crime scenes for the purpose of determining the source of blood spatter and the path of bullets.
Normally speaking, a firearms examiner would be called upon to render expert testimony with regard to the physics and trigonometric calculations regarding bullet travel. But experts with these qualifications are often few in number. It is therefore incumbent upon the crime scene investigator to provide this "expert" with the documentation needed to draw his conclusions.
While other factors may contribute to a determination of bullet trajectory-the most important fact required for there to be even the slightest degree of accuracy is for the bullet(s) to have passed through at least two objects. This will include:
- A door and a wall
- A two-sided wall
- A window and/or a wall, door or victim, etc.
While stringing the crime scene has been the most frequently used method for documenting bullet travel, it does have its short-comings. When a bullet passed through a window, sharp edges are created, therefore if string is used it must be protected (tape or drinking straw). If more than just a few feet of travel is involved, string is susceptible to droop or sagging. It is therefore advisable to use a strong nylon or other synthetic string rather than cotton string.
Alternatives to Using String
An ideal alternative to use are rods of different diameters. With the exception of hollow aluminum rods, most metals like steel, copper or brass may tend to be too heavy. Also consider wooden dowels or plastic and fiberglass rods.
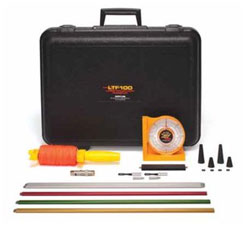
Tools and Equipment Needed for Determining Bullet Trajectory
- String (if this is all that is available) Nylon (or equivalent synthetic)
- Plastic or fiberglass rods (preferred), multi-colored if possible)
- Adhesive tape (duct tape, surgical tape, even fingerprint lifting tape)
- Measuring tapes (25-100 ft. w/metric scale)
- Photo ID tape or stick-on labels
- Evidence collection kit containing sterile swabs and collection containers
- Evidence marking labels (adhesive-type)
- Protractor (clear plastic) or,
- Inclinometer - for measuring angles and slopes
- Directional compass (camping-type with aiming sight)
- Graph paper for sketching
- Marking pens
- Carpenter's or brick mason's string (bubble) level. This device is only used if an inclinometer is not available.
- Laser pointer
Crime Scene Investigation Guidelines
Due to the variety and complexity of crime scenes, it is impractical to publish specific guidelines. The following guidelines are offered as a starting or reference point. The actual methods and procedures followed will be dependent upon the experience, judgment and training of the crime scene investigator.
Interior Structures and/or Motor Vehicles
The procedures followed when investigating shootings that occurred in a structure or motor vehicle are quite similar. Again, these suggestions are meant to be a starting point and the investigator should-first and foremost-follow departmental guidelines and procedures.
- Shot or shots fired through a glass window: By examining the bullet hole, determine if the bullet was fired from outside or inside the window.
- Using a sterile swab, collect any possible gunpowder residue from around the bullet hole from the outside. Repeat this procedure, using a fresh swab, on the inside of the window.
- Locate any bullet holes inside the structure or vehicle.
- Photograph all bullet holes found in the structure and vehicle. Be certain to include a scale and visible marker (stick on label) adjacent to each bullet hole:
- Overall, wide angle photos
- Medium distance photos
- Close-up photos showing scale to determine bullet hole size
- Determine if the bullet is lodged in the wall or object it struck. Locate the exit hole, if any.
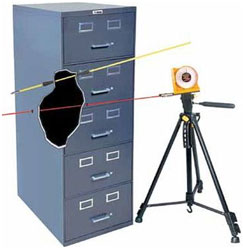
- If string is used, run the string from the bullet hole in the glass to the interior hole. Anchor the string outside of the window by tying it to a pencil, pen, etc., for support. Protect the string with tape or a drinking straw where it passes through the glass. Fasten the other end of the string to the wall or object adjacent to the bullet hole using tape. Photograph the string from a distance, attempting to get the entire run of the string.
- If rods are used (preferred method) insert the rod into the entrance hole and through to the exit hole. Photograph the rod in place. Use the inclinometer to determine the angle of the rod to the wall and photograph it.
- Prepare sketches as needed with all measurements required to give a full understanding of the reconstruction.
Note: If cartridge cases are found inside the structure, this will indicate that shooting also occurred inside. A thorough search of the room(s) involved is needed to locate additional bullet holes. Repeat the steps above as they apply to the indoor situation.
At no time during this preliminary evidence collection procedure should any attempt be made to recover the spent bullets that may be lodged in walls, ceilings, doors or furniture. Not until all of the above procedures are completed and photos and sketches finished should spent bullets be recovered.
Obviously extreme care must be taken to recover spent bullets. The area where the bullet is lodged (wall, door, furniture, etc.) must be cut out using hand tools. Despite the methods often shown on TV, this is not the time to dig out the bullet using a pocket knife. What is needed is a hand drill to make lead holes and then a keyhole saw to cut around the bullet hole. A sharp knife will be needed to cut into cloth furniture.
Laser Usage
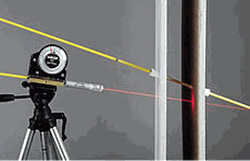
A small laser or laser pointer is also very useful at certain crime scenes for determining bullet trajectory. The laser has, in many instances, replaced the use of string. Some crime scene kits contain a laser that has been modified so that it can be directly attached to the rod protruding from a bullet hole or attaching it to an inclinometer. One drawback of the laser is that the light beam is often invisible in well-lighted interiors.
This factor can be overcome by using "canned laser (aerosol) smoke." The alternative is to darken the room and taking time exposure photos.
Conclusion
Stringing the crime scene during reconstructing is a relatively simple, inexpensive, and accurate method of demonstrating bullet trajectory. It must be emphasized, however, that this determination is not precise, but it is more of a general, or relative, position-fixing method. The use of string is still valid and remains as only one of several methods of determining the point of origin of a gunshot. When feasible for use in court, it remains an excellent demonstrative tool.
About the Author
Don Penven has more than 35 years direct and indirect experience in law enforcement. He currently serves as a technical support representative and technical writer for Sirchie Finger Print Labs.
Article submitted by the Author
Article posted: October 11, 2018