

Sample Handling Considerations for Biological Evidence and DNA Extracts
Theresa F. Spear
California Department of Justice
California Criminalistics Institute
Introduction
This article will make recommendations for handling biological evidence from sample collection to sample storage. Depending upon the type of biological evidence, it may be very difficult to detect certain types of samples. Saliva and semen stains are often not visible. Even bloodstains may be difficult to find if they are on a dark substrate. Although specialized, forensic light sources are sometimes helpful in visualizing these stains, they cannot always be relied upon to find all biological stains. It is especially difficult to detect saliva or semen on some dark colored fabric with any of the widely used forensic light sources. Thus, a stereomicroscope or chemical mapping techniques may be required to improve the chances of finding all biological evidence. After a sample has been detected, steps must be taken to insure that the sample integrity is maintained and the chances of contamination are minimized.
Sample Collection in the Field
Once a sample has been located and a decision has been made to take the sample, issues arise as to how to collect, dry and package it for transportation to the laboratory. Considerations relevant at this stage include the ability to obtain as much sample as possible, to minimize degradation and finally to insure that samples are not inadvertently contaminated with other biological samples.
See also the instructional videos on "Evidence Collection"
The standard recommendation for collecting biological evidence is not to remove the stain from an object but rather to collect the object with the stain. The advantages of this strategy are that the entire stain is obtained, it is not necessary to collect an “unstained control” sample and there are no further manipulations required that might negatively impact the sample. If the stain is on a smooth, non-porous surface (i.e. it can be easily “flaked” off), it will be necessary to protect the stain from contact with other objects. Depending upon the nature of the evidence, a stain can be protected by immobilizing the evidence item in a cardboard box (e.g. with pieces of wire) or by taping a piece of paper over the stain (if this will not destroy other evidence, such as fingerprints). Provided that the stain can be adequately protected, this is the optimum collection procedure.
Given that some stains are found on immovable objects, it is not always possible to collect the object with the stain. Some samples will need to be collected in the field. If the entire object cannot be collected then the next best way to collect biological evidence is to remove the stain by cutting it out (e.g. from a piece of carpet). Remember to use clean scissors and to cut out an “unstained” control. Scissors or tweezers can be cleaned by rinsing with clean water and then drying with tissue. Repeat this cleaning process twice prior to each sampling.
It is not necessary to clean tools with bleach. Improperly used, bleach could destroy biological evidence.
There will be occasions when it is not possible to collect a stain by cutting it from an object (e.g. stain is on a concrete floor). The two methods traditionally used to collect these stains are: (1) to use a dampened cotton swab, thread or piece of gauze to collect the stain or (2) to use a clean implement (e.g. razor blade) to scrape the stain into a clean paper bindle. With these two methods, it will typically be necessary to take an “unstained” control sample. Scraping is practical only when the stain is in the form of a crust and it can be lifted from a smooth, non-porous surface. The most significant problem encountered while scraping stains is that samples tend to “powder” when scraped and it may be difficult to control the retrieval of the entire sample. The “powdered” stain, which is not retrieved, may contaminate adjacent stains. Given these considerations, most samples will not lend themselves to the scraping technique and will need to be collected by swabbing.
The best method for swabbing a stain is to use a minimum amount of distilled water to dampen an appropriate, clean substrate (e.g. cotton swab or cotton gauze) and then absorb the stain onto the slightly dampened substrate. An unstained control is taken in the same manner as the stain and is taken from an unstained area as close as possible to the biological evidence sample. It may be useful to test the “unstained” area with an appropriate presumptive test to see if it contains a biological sample. In an effort to keep the stain as concentrated as possible, the size of substrate used to absorb the stain is important. Ideally, the smaller the stain, the smaller the substrate used to collect that stain. Thus one might choose to use a small piece of cotton gauze rather than a swab to collect a small blood spatter (1 or 2 mm in diameter). In order to protect the integrity of a small sample, the dampened gauze should only be handled with clean tweezers. If a stain is not very small, swabs are probably easiest to use since they do not require the use of tweezers or any other intermediate object.
Cotton swabs have traditionally been used to collect biological samples. They are readily available in sterile packages and they are very absorbent. Do not use “calcium alginate” swabs for sample collection since these swabs interfere with many of the DNA extraction procedures. Cotton gauze, which does not have any additive (e.g. fabric sizing), is also an acceptable substrate.
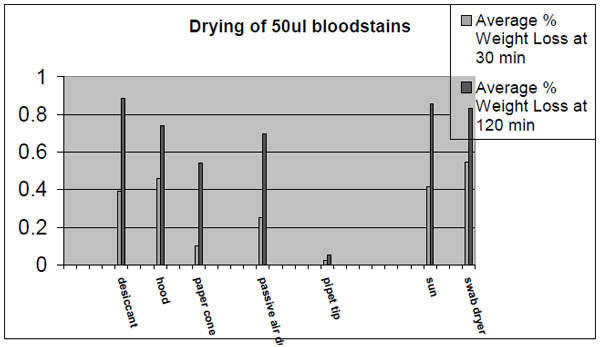
Once a stain is collected, the next consideration is drying the swabbed sample. Drying biological samples is critical to preserving these samples because water is necessary in most of the biochemical reactions that result in degradation. Try to dry this sample as fast as possible to minimize degradation of the sample. Packaging a wet swab into a plastic tube with holes or a pipet tip will considerably slow the drying process. Samples placed into devices such as these frequently take more than 24 hours to dry. A drying process that extends over many hours may jeopardize a marginal or small sample. Saliva samples placed onto swabs and then into swab containers with small holes show more degradation and yield less DNA than saliva samples placed on swabs and then into paper envelopes. Ideally, samples should be left open to the atmosphere and allowed to air dry before they are packaged in paper envelopes. In all but very humid climates, they should be dry enough to package into paper envelopes in two hours. The use of desiccants should be considered in humid environments. The following graph illustrates drying rates of 50ul bloodstains using a variety of different techniques.
One last consideration is collecting a sample with a minimum amount of surrounding material. This should be done to minimize the contact of the biological sample with potentially deleterious material. For example, it has been found that cigarette ashes tend to inhibit the PCR reaction resulting in a failed DNA test. Therefore, when collecting cigarette butt(s) from ashtrays, it is a good idea to only collect the cigarette butt and not the accompanying ashes. This also applies to collecting biological samples from soil. To the extent that it is possible to separate the sample from the soil matrix, there will be a greater chance of a successful DNA test.
Packaging Materials
After the sample has been collected, it should be placed into paper packaging that will protect the item against loss and contamination. This packaging can also be used to record the chain of custody and to describe the evidence item. The most important feature about this aspect of evidence packaging is that paper is a porous material and will allow air exchange with the atmosphere. This property will allow samples the chance to completely dry, even when they are not entirely dry at the time of initial packaging. Paper envelopes or bags are the easiest way to accomplish this goal. If the evidence is a heavily bloodstained garment, it should be allowed to dry. A piece of clean paper can then be placed over the top of the item and the item can be folded so that the paper helps to prevent direct contact between separate stains. Depending upon the stained item, more than one sheet of paper may be required. Ideally, each evidence item should be packaged in a separate, paper container. Choose a paper container large enough to easily accommodate the evidence item so that it is not necessary to “stuff” the object in the package. As long as paper bags and envelopes are not reused, they will not be a source of contamination. Once the item is ready for storage, it needs to be sealed according to agency policy.
Sample Handling Considerations in the Laboratory
Before Analysis
If it was not possible to completely air-dry samples in the field, they can be dried upon return to the laboratory. Make sure evidence is clearly labeled before it is placed into a laboratory hood or swab dryer to finish the drying process. If the item is large, try to dry one evidence item at a time in the hood. The dried evidence can then be returned to paper envelopes or bags. The next decision that will likely need to be made is: How should the evidence be stored until it is analyzed? Some types of evidence may require that the biological sample be removed from the surrounding material before storage. This would be done to minimize contact of the biological sample with potentially harmful material. For example, leather substrates may contain compounds that tend to destroy biological samples and inhibit PCR reactions. For this reason, it may be wise to remove a bloodstain from leather by swabbing the stain as soon as possible rather than cutting out the stain for analysis. Certain plant materials and soil are examples of other materials that might need to be separated from biological samples as soon as possible.
The next issue that needs to be addressed is: Where will the evidence be placed until it can be analyzed? This type of storage can usually be regarded as “short-term” storage. Three possibilities exist: (1) room temperature, (2) refrigeration or (3) frozen. If the evidence is on a smooth, non-porous material (e.g. plastic/glass/metal) or requires fingerprint processing, it should be stored at room temperature. Room temperature storage avoids the problem of condensation that is typically seen with large temperature changes that occur when the evidence item is removed from the freezer.
In general, DNA in biological samples is very stable and can tolerate room temperature storage conditions very well. However, over an extended period of time, frozen storage is generally considered to be the optimum storage condition for biological samples. This means that evidence, such as bloodstained clothing, should be held frozen. Liquid blood samples, stored in glass or plastic containers, should be held in the refrigerator since these samples can break in the freezer. Liquid blood samples containing preservatives (e.g. EDTA) are stable for a very long period of time in the refrigerator.
During Analysis
Once analysis begins, an analyst needs to decide where to sample and how much sample to take. Evidence stains are not always uniform and it may be necessary to sample in more than one area to obtain all relevant information. Since each stain is unique, it is always a judgment call on how much sample to consume in order to optimize the chance of getting a clear result. Another simultaneous consideration is attempting to leave a sufficient amount of sample so that a second test can be conducted by the defense. If there is not enough sample to achieve both goals, it may be necessary to consult with the local district attorney's office on how to proceed.
After a sample is selected and placed into a tube for analysis, it is important that consideration be given to maintaining the quality and quantity of the evidence. Once water is added back to a sample, bacteria can begin to degrade DNA. Thus, if it is necessary to soak a sample in phosphate buffer saline to remove the cellular material, this step should be done in the refrigerator to minimize degradation by any bacteria. Certain buffers (e.g. those containing EDTA) are designed to inhibit the activity of nucleases that can breakdown DNA and these can preserve DNA in liquid form better than other liquid extractants. Another variable to keep in mind is that the efficiency of DNA extraction techniques, or how much DNA is obtained, vary with the method and the analyst. It is important to spend time to optimize each extraction method so that reasonable yields of DNA can be routinely obtained.
With respect to issues of contamination, the most at-risk samples are small stains. These samples may consist of old and degraded samples or very small volume stains. With these stains, it may be advisable to take special precautions to insure the integrity of these samples. Contamination can be minimized by preventing contact of evidence samples with any other form of biological sample. Sample tubes and reagents should be autoclaved before use. Any implement or glove that contacts the sample should be clean. It may also be important not to talk over evidence samples. Finally, when working with marginal samples it may be advisable to work in a biosafety hood.
After Analysis
Frequently, DNA extracts or amplified products are generated during the analysis of evidence. The labeling information on these samples should be traceable to the original evidence item. This can be accomplished by assigning “sub” item numbers that correspond to the original evidence item but also reflect the exact stain.
It may not always be possible to preserve all of the extracted DNA remaining after a sample has been typed. Extracted DNA can be lost from tubes held frozen. Some of this DNA may bind to the sides of the storage tubes or be destroyed by nucleases. Recommendations that help preserve extracted DNA include using an appropriate TE buffer to store extracted DNA and keeping the extracted DNA as concentrated as possible. Dilute DNA solutions (e.g. 0 .1ng/ul), even made in the appropriate TE buffer, do not appear to be very stable over time. Finally, consider using storage tubes that seal well so that samples do not dry to a residue in the freezer.
If at all possible, keep biological evidence in the freezer for long-term storage. Although it has been possible to successfully analyze biological evidence that has been stored at room temperature for more than 25 years, the resulting STR profiles show degradation effects. In addition, relatively small amounts of DNA are usually obtained from samples held for long periods of time at room temperature indicating that DNA loss has occurred over time. Although freezing biological samples does not prevent all DNA loss or degradation, it slows DNA degradation down much more than room temperature storage. There is some anecdotal information to indicate that dry biological samples might benefit from being stored in sealed plastic bags in the freezer. The final reason to consider frozen storage is that small or marginal samples that are maintained at room temperature could degrade so that little or no typing information can be obtained.
Summary of Recommendations for the Collection of Biological Evidence for DNA Analysis
Goals of Biological Evidence Collection
- Collect as much sample as possible from a single source.
- Insure that the sample is not inadvertently mixed with other biological samples.
- Handle the sample in a manner, which minimizes deterioration of the sample.
-
Keep biological evidence stain concentrated/do not spread a small stain over a large substrate.
-
Wear gloves. Make sure that nothing contacts the evidence samples which contains another biological sample. Do not talk over biological evidence.
-
Air-dry the sample as fast as possible.
Recommended Methods for Collection of Biological Evidence
Listed in Order of Desirability
- When feasible, take object with stain. Do not remove stain. If stain can be easily dislodged (e.g. stain is on non-porous surface), protect it from contact with another object. One way this can be done is by immobilizing the evidence item in a cardboard container.
- If evidence stains are found on objects that can be cut (e.g. a rug), the evidence stain can be removed by cutting it out with a pair of clean scissors. Remember to also take an “unstained” control cutting (e.g. the substrate without the stain) from the object.
- If object cannot be moved, use a slightly dampened substrate (cotton swab or piece of plain, cotton cloth or gauze) to collect stain. Remember to collect an unstained control by swabbing an unstained area of the evidence object as very few stains can be safely collected by scraping them.
- The size of the stain should influence the size of a substrate used to collect the stain. Thus, use a small part of a swab or a small piece of cotton cloth or piece of gauze to collect a small stain. Do not smear a small stain over a large surface
- Use a minimum amount of distilled water to dampen the swab or cloth/gauze substrate.
- To keep the stain concentrated, collect the stain on the smallest area of the swab or cotton cloth.
- Because of the attached wooden applicator stick, cotton swabs are easiest to use (tweezers are not needed).
- Use a pair of clean tweezers to manipulate cotton cloth/gauze; do not handle stain with bare hands.
- Allow all samples to air-dry as quickly as possible. The longer an evidence stain is kept wet, the more it can deteriorate.
Other Considerations
- To avoid contamination, do not allow the biological evidence stain to come into contact with any other biological sample.
- Each individual stain should be collected separately. Do not collect or package two separate stains together in the same container.
- Do not allow evidence samples to come into contact with any surface, which contains residue from another biological sample (e.g. dirty tweezers, bloodstained glove, contaminated work surface).
- Use tweezers with smooth, easy-to-clean working surfaces.
- Tools (e.g. tweezers, scissors) can be cleaned by thoroughly rinsing with a stream of distilled water and drying thoroughly with paper tissue. Repeat this process twice before using tool to manipulate another sample.
- Do not talk or cough over biological evidence.
- Working surfaces (that could contact other samples) should be cleaned with a freshly made 10% solution of bleach. Insure that any bleach residue is thoroughly removed by wiping it down with another clean paper towel.
- Small biological evidence (e.g. 2-mm size bloodstain or hair) is most susceptible to contamination.
- Put on a new pair of gloves before handling these small stains. Consider wearing a mask.
- Work on clean surfaces. If possible, work in a biosafety hood.
- Package all biological evidence in paper bags or envelopes. Do not use plastic.
- Allow stains to air-dry before placing in paper bag or envelope.
- Work on one evidence item at a time.
- Insure that paper containers used to package biological evidence are sufficiently large to allow some air circulation around evidence item.
- “Unstained controls” must be packaged separately from the evidence stain.
- Package different evidence items in separate paper containers.
- A piece of clean paper can be placed over a garment with a number of bloodstains. The garment can be folded so that the paper helps to prevent contact between different stains
Storage of Biological Evidence
- If evidence sample is at risk, it might be desirable to remove it from the evidence item before storage
- A crust of blood on a smooth, non-porous item may be easily dislodged and lost
- A biological sample on a potentially harmful substrate like leather should be removed
- In general, the DNA in biological samples is relatively stable at room temperature. Short-term, some evidence should be held at room temperature:
- Any evidence item that requires both fingerprint processing and DNA typing should be held at room temperature conditions until analysis is completed.
- Biological evidence on smooth, non-porous surfaces where condensation from large temperature changes might be a problem
- Liquid blood samples (with preservatives) are stable in the refrigerator for extended time periods. For long-term storage, frequently bloodstains are made from these liquid samples and the stains are held frozen.
- Over any extended period of time, biological evidence is best preserved in the freezers. Freezers that do not routinely go through a defrost cycle are preferable to freezers that are “frost-free”. Clothing with biological stains should be held frozen.
- DNA extracts should be kept as concentrated as possible, stored in TE buffer and held frozen in airtight tubes.
References
Kobilinsky, L. Recovery and Stability of DNA in Samples of Forensic Science Significance. Forensic Sci. Rev 4:67, 1992.
Gialamas, D. and Stockwell, D., Forensic Biology Sample Collection and Handling Techniques: A Look at Methods Utilized by California Crime Labs, CAC News, Summer 1995.
Article posted February 3, 2015