

Exposure Basics
Bob McMicken
Copyright ©2016
Exposure is governed by five related factors. You need to understand these factors and how they relate to each other to deal with difficult lighting problems. These factors are:
- The intensity of light falling on the scene, known as incident light.
- The intensity of light reflected by the scene, known as reflected light.
- The sensitivity of your camera's image sensor, known as the ISO value.
- The aperture of your lens, known as the f-stop.
- The duration that the shutter is open, known as the shutter speed.
The good news is that despite many lighting variables, people have been taking well-exposed photos long before the first practical light meter was introduced in 1932.
Incident Light
Outdoors, the intensity of incident light falling on the scene can vary from 100,000 lux in full sunlight to 0.0001 lux in weak starlight. Lighting levels on an overcast day or stadium lighting for televised professional sports might run from 2,000 to 3,500 lux.
Indoors, the intensity of light can vary from 0.0 lux in Carlsdbad Caverns with the lights out to 50 lux in a dim suburban living room to 600 lux in a well-lighted office or a television studio.
Outdoors, the intensity of incident light can vary minute by minute as clouds move in front of the sun and the sun moves across the sky.
Reflected Light
We use reflected light to capture photographic images. The amount of incident light reaching the camera sensor via the lens depends on the scene's reflectance. The average scene will reflect 12 to 18% of the incident light, the exact number depending on who you ask. The difference is more theoretical than practical.
A scene composed almost entirely of freshly fallen snow might reflect 90% of the incident light. A scene composed almost entirely of anthracite coal dust might reflect 2% of the incident light.
Important variables are the angle at which the incident light falls on the scene (the angle of incidence) and the angle at which this light is reflected back to the camera (the angle of reflectance), and whether your subject is front-lighted, side-lighted or back-lighted.
You can prove this to yourself by walking around a car with camera in hand. Even though the intensity of incident light falling on the scene is uniform, you'll get a different meter reading depending on whether the subject is front-lighted, side-lighted or back-lighted. If your subject is not large enough to fill the frame, set your metering pattern for spot or center-weighted to avoid picking up background light.
ISO Value
Cameras deliver their best picture quality at their base ISO, typically ISO 100. Advanced DSLR cameras will provide good picture quality at ISO 800 - 1000, fair picture quality at ISO 1600 - 3200, and picture quality that will suffice in a pinch at ISO 6400 and above. The latest high end cameras can reportedly beat these numbers by a stop or two.
Given the large number of discontinued Canon and Nikon cameras still in service, you'll have to test your camera at various ISO values to see what's the highest ISO value you can shoot at and still get photos that are adequate for the intended purpose.
In marginal light, shooting above base ISO will let you use a faster shutter speed and/or a smaller aperture, or extend the range of your flash to cover a larger area. While all modern cameras have an auto-ISO feature, I usually leave my Nikon D7000 set for ISO 100, manually cranking up the ISO as needed to cope with marginal lighting conditions.
Shutter Speed
Shutter speed govern the length of time that the shutter is open. An advanced camera will let you shoot at shutter speeds from thirty seconds to 1/8,000th of a second. Thirty seconds will give you good photos in the light of a full moon. I can't recall ever shooting faster than 1/1,000th of a second even with a 500 mm telephoto lens mounted on the camera.
Consider using flash or a tripod if ambient lighting conditions call for a shutter speed slower than 1/60th of a second. Higher shutter speeds are desirable to minimize camera shake and to freeze subject motion.
Modern cameras incorporate vibration reduction (Nikon) and image stabilization (Canon) systems that will let you shoot handheld at shutter speeds somewhat slower than might otherwise by the case. While VR/IR systems can effectively dampen camera shake, they do nothing to control subject motion.
Lens Aperture
Wide open, your lens controls your ability to focus and compose in dim light. Your shooting aperture controls the amount of light reaching the sensor along with sharpness and depth of field. To understand depth of field, visit toothwalker.org/optics/vwdof.html.
Lenses are typically sharper when stopped down to an intermediate aperture between f/5.6 and f/11 on a general purpose zoom. Even with best quality primes, experienced photographers prefer to stop down a stop or two from wide open and avoid the smallest marked aperture.
On the following page, you will find an aperture diagram of a 50 mm f/1.4 lens drawn to scale and photos of a 50 mm f/1.8 lens.

Nikon 50 mm F/1.8 AF-D Lens Photos

What's an F/Stop?
In photography, we use the term stop or f/stop rather loosely. Depending on context, it can be a noun or a verb. It can mean the lens aperture, the shutter speed or the ISO value. The value of each whole stop is twice that of the next lower value and half that of the next higher value.
Depending on context, stopping down a stop could mean using a faster shutter speed, a lower ISO value, or a smaller aperture. Opening up a stop could mean using a slower shutter speed, a higher ISO value or a larger aperture.
See http://www.scantips.com/lights/fstop.html for as much as a person really needs to know about f/stops, including the fractional values.
Reciprocity
Assume that you meter a daylight scene at ISO 100 in the Program mode and the camera suggests an exposure of 1/125th at f/16. Do you have to shoot at 1/125th at f/16. No! All of the following combinations will yield exactly the same exposure:
- 1/60th at f/22
- 1/125th at f/16
- 1/250th at f/11
- 1/500th at f/8
- 1/1000th at f/5.6
- 1/2000th at f/4
- 1/4000th at f/2.8
- 1/8000th at f/2
Unless I needed f/16 for maximum depth of field, I'll shoot at one of the three intermediate aperture settings for maximum sharpness combined with good depth of field. The listed cameras will let you replace "exposures remaining" in the viewfinder with the ISO value using Custom Setting D3, letting me see my ISO value, the shutter speed and my aperture along with the focus confirmation indicator as I'm shooting.
Know Your Camera
Some cameras are conservatively calibrated, yielding camera-original JPEGs that may appear somewhat dark in the interest of preserving highlight detail. This is of no consequence because you can always pump up the shadows but you can't salvage blown highlights.
Other cameras are likely to yield an image that requires no tweaking in moderate contrast situations with the concurrent risk of blowing the highlights in high contrast situations. This too is of no consequence. If you prefer the conservative approach, dial in a little exposure compensation.
Folks obliged to use school loaners or department-issued cameras are at a real disadvantage. A bog-standard Glock has three controls - the trigger, the slide release and the magazine release. An advanced camera suitable for serious crime scene and accident investigation work has twenty-plus buttons, dials and switches on the camera body plus one hundred or more userprogrammable options buried within the menu systems.
Anyone familiar with the original Glock 17 introduced in 1982 can pick up a new Gen-4 Glock and come up to speed in a few hundred rounds because all of the controls are in the same place and function in the same manner as those on the original Glock. Cameras are infinitely more complicated than pistols with more opportunities for things to get moved off your preferred settings.
RTFM: Read The Freaking Manual. In particular, learn how to reset your camera to the original factory defaults.
Know Your Scene
You're the photographer. You should know what is relevant and what is irrelevant. Cameras are calibrated to satisfy the needs of photographers concerned with the overall scene, not just critical elements within the scene.
It gets complicated when there are several areas of interest and the ambient illumination is not sufficient to capture everything you want to record in a single exposure. You'll inevitably waste a lot of time and energy learning to recognize problem scenes by trial and error.

The camera metered this snow-shrouded pickup as gray because that's how light meters work. Consequently, the camera-original JPEG was underexposed by 1. stops. Since this is a low contrast scene, a correction using the Faststone Levels command yielded a satisfactory print.
You might have the reverse problem at a fire scene where the camera tries to expose black soot and ash as middle gray, again because that's how reflected light meters are designed to work.
Fortunately, today's cameras have large LCD displays letting you see a thumbnail view of your picture and a histogram showing the distribution of light and dark tones. Keep shooting until you get it right.
A good camera will have an exposure compensation button letting you dial in more or less exposure as dictated by the scene and ambient lighting. The amount of compensation, if any, is visible in the viewfinder.
Middle Gray
We see the world in terms of color as well as light and shadow. Exposure meters see the world in shades of gray. Exposure meters are calibrated on the assumption that the average reflectance of a typical scene will average out to middle gray.
For years, instructors taught that middle gray was the 18% reflectance found on a Kodak gray card. We now know that exposure meters are calibrated in accordance with ANSI standards, variously reported as 12% to 14% reflectance. Instructions accompanying the Kodak R-27 gray card specify opening up half a stop to compensate.
18% Gray Card
Every photographer should have a Kodak gray card in his kit. The white side can be used to set a custom color balance. The gray side can be placed in the scene to give Photoshop operators a color reference of known value. A gray card can be used to take a substitute meter reading when an incident meter is not available.
How Exposure Meters Work
Your camera's exposure meter reads the intensity of light reflected from the scene and comes up with a preliminary exposure value based on the often unwarranted assumption that the reflectance of all important elements in the scene will average out to middle gray. The meter then determines the range of suitable exposure values based on the ISO preset.
In the Program mode, the camera comes up with an exposure based on rules coded into a memory chip. These rules take focal length and distance into account, just as you would using a handheld exposure meter.
In the Auto mode, or in the Program mode with ISO set to Auto, the camera's computer will crank up the ISO within predetermined limits to ensure an optimum combination of shutter speed and aperture.
This works fine as long as the scene is composed of light and dark values which average out to middle gray which, to be fair, most of them do. You will have to apply exposure compensation if the overall tone values within the scene average out to appreciably more or less than middle gray.
Metering Patterns
Modern cameras give you a choice of metering patterns. Matrix patterns read the entire scene. Center-weighted patterns read the entire scene but concentrate sensitivity in the center of the viewfinder. In the spot mode, the meter reads a small portion of the scene indicated by a circle in the viewfinder.
Matrix serves most purposes nicely. Unfortunately, the camera isn't smart enough to figure out which portions of the scene are important. You have to be smart enough to decide whether matrix metering will properly expose the area of interest without regard for areas devoid of relevant detail.
Spot metering can give you good results in difficult lighting situations. Center-weighted metering might be your best bet when shooting with flash, particularly if the foreground and background are of no interest.
Shooting Modes
The Program mode will give you a supposedly optimum combination of shutter speed and aperture. Most of the time, this works well. You can always tweak your settings or switch to one of the other modes if you want a faster shutter speed to freeze motion or a smaller aperture to increase depth of field.
- Use Program most of the time but check the shutter speed and shooting aperture in the viewfinder to make sure that the shutter speed and aperture is within your preferred range.
- Use Shutter Preferred when you want to shoot at a particular shutter speed to freeze motion regardless of depth of field.
- Use Aperture Preferred when you want to shoot at a given aperture to capture sufficient depth of field regardless of camera shake and subject motion at slow shutter speeds.
- Use Manual when you want maximum control over both the shutter speed and lens aperture.
Amateur cameras have scene modes that are supposed to bias Auto exposure values for closeups, portraits, landscapes and so forth. These are a handy crutch for snapshot photographers but, if you're going to work at the professional level, you need to be smarter than your camera.
Exposure Compensation
There are several ways to compensate for an invalid meter reading:
- Check the histogram and dial in exposure compensation as needed.
- Take a meter reading from an important part of the scene that's close to middle gray and lock in the reading before shooting.
- Use spot or center-weighted metering to eliminate possible errors likely to result when an irrelevant part of the scene is either significantly brighter or darker than the area of interest.
Bracketing
Bracketing is a crutch for the inept and a parachute for the expert. You will eventually run into a situation where you can't trust your meter and you can't afford to miss the shot. The solution? Bracket your exposures two full stops over and two full stops under the metered exposure.
Expose To The Right
Expose To The Right means using your histogram to verify that you are giving the scene the maximum possible exposure without blowing highlights or clipping color channels, thus preserving maximum detail. Click HERE, HERE and HERE to see three excellent tutorials.

The Faststone histogram for the snow-covered truck pictured above indicates 1. stops of under-exposure, just what you'd expect because the camera interpreted the white snow as middle gray.


Dialing in 1. stops of exposure compensation moved the histogram to the right without blocking up the highlights, indicating that we've captured all of our highlight detail without losing any of our shadow detail.
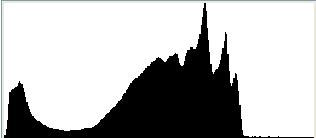
This fire scene, courtesy Speckin Forensics, contains a preponderance of dark tones with only two hot spots devoid of relevant detail. The color of the smoke and flames was accurately captured. This is important because these colors can reveal the presence an accelerant.


The histogram shows a preponderance of dark tones which is exactly what you'd expect to see. The firefighters in the foreground are rendered as silhouettes which again is exactly what you'd expect. Reading histograms takes a little practice.
Focus on Infinity
During the film era using AI-S and AF-D prime lenses, (some of which are still available brand new from B&H), we took depth of field scales and hard infinity stops for granted. You merely turned the focus ring until it hit the infinity stop and you were automatically focused on infinity. Modern lenses to not have depth of field scales and hard infinity stops.
Why focus on infinity? Suppose you're shooting an outdoor scene on a dark night, too dark for your camera's auto-focus system to focus on a distant subject. Simply focus on infinity, stop down to an aperture providing enough depth of field to bring the foreground into sharp focus and adjust your shutter speed and ISO to provide the correct exposure.
The most useful definition of hyperfocal distance found in Wikipedia is: The hyperfocal distance is the distance beyond which all objects are acceptably sharp, for a lens focused at infinity.
You should be able to focus on a subject of interest within 100 feet or so with a good flashlight such as the 1075 lumen Coast HP550 ($60.00 at Walmart). Given a subject beyond the range of your flashlight, manually focus on a distant light source such as the moon or a street light.
Alas, some subjects are too far away to permit focusing with a flashlight. Some scenes do not provide a light source that you can focus on.
Today's zoom lenses are designed to focus at a distance beyond infinity because the focus mechanisms built into these lenses are incompatible with a hard infinity stop. Hayden Baldwin ran into this problem teaching in a Central American country with students on a shoestring budget.
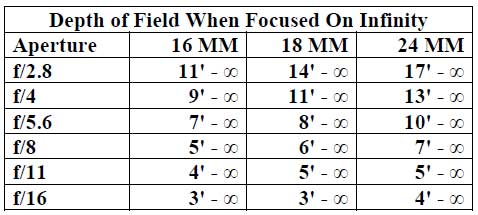
I took the liberty of expanding on the Baldwin Method using the Nikon 16 - 80 and the 18 - 140 on an APS-C camera and the 24 - 85 on a full frame camera as my benchmarks. This gives us only three focal lengths to worry about at the wide angle settings at a theoretical value of f/1:
- 16 mm - 45 feet
- 18 mm - 55 feet
- 24 mm - 65 feet
To start with, focus your lens at its shortest focal length on a point beyond the theoretical infinity distance at f/1 on a sunny day. Make a witness mark spanning the focus ring and the lens barrel so you can return to this setting at any time. I used an an extra-fine point Sharpie oil-based paint pen, available at office supply stores. Oil-based paint is less likely to rub off than the water-based paint in standard Sharpies.
Even if your camera will meter under low light conditions, exposures must be fine-tuned by chimping each shot and using your histogram to make sure you're capturing maximum detail without blowing the highlights. Unless you're shooting with a professional flash, you'll need a sturdy tripod because shutter speeds of thirty seconds or more may be required to avoid cranking up the ISO to the point that image quality goes down the tubes.
I ran the following numbers using Paul van Walree's VWDOF.EXE, which is permanently installed on my hard drive. If you're interested, download the VWDOF21.ZIP file and open it with the free 7-ZIP utility. VWDOF.EXE lets me run eight stops from f/1.4 to f/16 on a single screen.
High Contrast Situations
How do you handle situations where you have a brightness range of ten or twelve stops? One approach is to shoot manual. Set an aperture sufficient to ensure adequate depth of field. Take meter readings from the brightest and darkest areas in the scene, plus a representative mid-tone. Record the shutter speeds.
Use a tripod and a cable release. Focus and compose as usual. Use the metered aperture to avoid changing the depth of field between shots. Take one exposure at each of the three calculated shutter speeds. You can merge these photos into a composite using the Photoshop HDR Merge tool.

Another solution, described HERE by Ken Rockwell, is to modify the light to control contrast. I shot this picture of my ferocious poodle puppy waiting to bark at her friend the garbage man by simply popping up the flash on my D7000 and letting the camera's internal circuitry do the heavy lifting. Otherwise, the pooch and the furniture would have been an under-exposed silhouette. While hardly an epic work of art, it illustrates the technique.
The Sunny 16 Rule
During the film era, the Sunny 16 Rule was insurance in the event that your in-camera exposure meter failed. In fifty-odd years as a photographer, I've had an exposure meter fail exactly once, on a thirty year old Nikon FM. When they go, modern digital cameras usually die completely. The solution is a backup camera. I have a Canon G15 in my Nikon D7000 camera case and I often carry a second case with a Nikon D70.
Shutter Speeds For Handheld Exposures
Back when Tri-X ruled the roost and photos were rarely printed larger than 6 x 9 inches on 8 x 10 paper, it was commonly believed that it was always safe to shoot at a shutter speed in fractions of a second equal to the reciprocal of the focal length in millimeters.
Thus, you could supposedly get away shooting at 1/60 of a second with a 50 mm lens, 1/60th being the shutter speed nearest to but not less than 50 mm. Now, when many photographers are shooting 24 megapixel APS-C cameras and photos are routinely enlarged to 20 x 30 inches, twice the reciprocal of the focal length is a better guide.
Lens Apertures For Depth of Field
The easy way to understand depth of field is to play around with http://www.dofmaster.com/dofjs.html and http://dofsimulator.net/en/. Using the VWDOF calculator, I ran the numbers for the 16 - 80 mm lens on a Nikon APS-C camera at three focal lengths and four distances.

Or, if you prefer, a graphic based on the 24 mm focal length:

Everything within the DOF range will be sharp, with sharpness falling off gradually until the image becomes a useless blur. You can prove this to yourself with the help of three volunteers and a tape measure.
Prime versus Zoom Lenses
Today's cameras are almost invariably purchased with a general purpose zoom lens but this was not always the case. If you've got room in your kit and your budget, it's worth carry a couple of old fashioned primes.


Two good zooms for Nikon APS-C cameras are the 16 - 80 f/2.8 - 4 VR and the 18 - 140 f/3.5 - 5.6 VR. These modern lenses lack a depth of field scale, a hard infinity stop and an infrared focusing mark.

I still own and use three relics from the film era, a Nikon 24 mm f/2.8 AF-D, a Nikon 35 mm f/2 AF-D, and a Nikon 50 mm f/1.4 AF-D. These lenses introduced in the mid-1980s are still available new from B&H. They have fast apertures, hard infinity stops, depth of field scales and infrared focusing marks, all useful to the advanced evidence photographer. Photos courtesy kenrockwell.com.
Timing is Everything
This picture was taken at our local saddle club arena with a Nikon D70 and the 18 - 70 mm kit lens. Manual focus. Auto exposure. Continuous mode at three frames per second. ISO 200, 1/320th of a second at f/9. I zoomed in to a marked focal length of 35 mm, equal to 50 mm on a full frame camera. The picture was cropped to fit the page.

Shooting action, timing is everything. A D70 is not the fastest camera in the world so I manually focused on the barrel and started shooting a second or two before the rider reached the barrel and continued for a second or two after she made her turn. You need a responsive camera for action events when you can't anticipate the critical moment.
A Nikon D7200, a Nikon D500 or a Canon 7D Mark II will put older cameras like the D70 to shame. Buy the best you can afford.
Picture Quality Matters
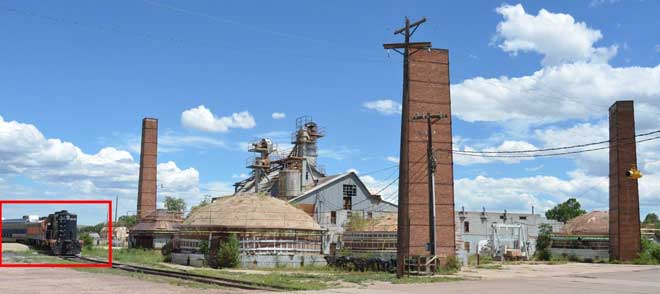
A view of the railroad maintenance siding adjacent to an abandoned brick plant in Canon City, Colorado. The photo was cropped to fit the page and eliminate a distracting foreground. Note the box outlined in red.

A crop from the sixteen megapixel original enlarged to 20 x 30 inches at 300 pixels per inch. The engine number is clearly visible. Nikon D7000 with an 18 - 70 mm lens at 18 mm, the equivalent of 28 mm on a full frame camera. Any DSLR with 16 to 24 megapixels and a good lens will give you a decent 20 x 30 print if your focus and exposure are spot on.
 Exposure Basics Copyright: © 2016 by Bob McMicken. Copyright for this article is retained by the author, with publication rights granted to the Crime Scene Investigation Network. This is an Open Access article distributed under the terms of the Creative Commons Attribution-NonCommercial-NoDerivatives 4.0 International License which permits
unrestricted noncommercial use, distribution, and reproduction, provided the original work is
properly cited and not changed in any way.
Exposure Basics Copyright: © 2016 by Bob McMicken. Copyright for this article is retained by the author, with publication rights granted to the Crime Scene Investigation Network. This is an Open Access article distributed under the terms of the Creative Commons Attribution-NonCommercial-NoDerivatives 4.0 International License which permits
unrestricted noncommercial use, distribution, and reproduction, provided the original work is
properly cited and not changed in any way.
About the Book
The information presented in this article is from the e-book
Practical Police Photography © 2016 by Bob McMicken.
Article submitted by the Author
Article posted: March 23, 2016