

Experimental Detection of Blood Under Painted Surfaces
Thomas W. Adair
Introduction
In August of 2005 the author was contacted by an investigator with the State Attorney General’s office in Denver regarding a three year old homicide case. The suspect(s) were believed to have painted over the bloodstained walls in the crime scene shortly after the murder. The author was asked to investigate the possibility of detecting blood under painted surfaces and recommend a method of searching for and detecting blood under these conditions. To assist with this experiment the investigator was able to search the crime scene residence and recover the original paint buckets utilized for the paint on the walls at the time of the homicide. The investigators went to a local paint store where a fresh gallon of similar paint and color formula was obtained.
A search of the forensic literature resulted in few references describing this type of research. Vandenberg and van Oorschot 1 reported on finding blood under paint using the Polilight™ PL500 at about 415nm. In their experiments it appears that blood was deposited directly on wood, plaster, brick, and metal and then painted over with various colors of light colored water based paint and white acrylic paint. Blood was visible under three coats of paint. From the photographs it appeared that the blood absorbed the ultraviolet light giving it a dark appearance. The authors also reported that blood could be detected under wallpaper using the Polilight™. The authors reported that a full DNA profile was obtained from blood samples under paint. Samples were subjected to Chelex™ DNA extraction and then amplified using Profiler Plus™. No attempt was made to scrape or separate the blood from the paint samples. Ray 2 also reported limited success in visualizing blood under painted surfaces 2. In her experiment the author placed both single blood drops and blood swipes on wood and then painted over the stains with up to three coats of a latex paint. An Omniprint™ 1000 and Polilight™ (150 watt model) were used to examine the stains under paint. Both units were set at 530nm. No statement was made regarding the type of filter used. The author reported that the bloodstains were “visible” to “barely visible” with the use of an alternate light source after two coats of paint were applied. The third coat of paint made the bloodstains either not visible or “questionable” in appearance with the light sources. None of the authors discussed methods for paint removal.
Experiment Design
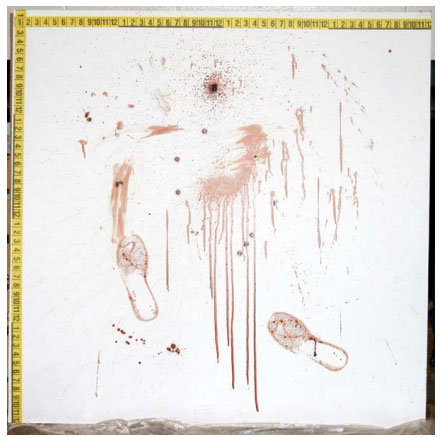
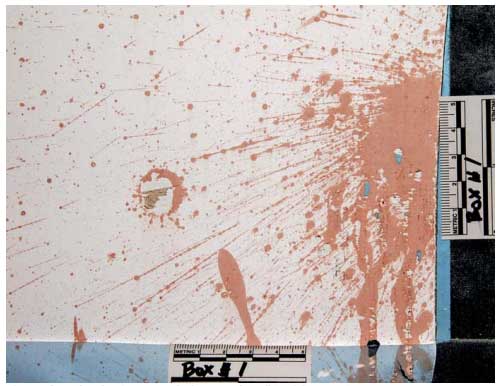
A 4 ft. by 4 ft. section of half inch drywall was obtained for the experiment. No texture was applied to the wallboard. The wall was first painted with two coats of Glidden Speed-Wall interior PVA Primer #GL 1050-1200 white. The coats were allowed to completely dry at least 12 hours. After drying, two coats of Glidden Speed-Wall interior latex flat paint #GL 1251-0110 white paint were applied. All paint was applied using a clean paint pad. The wall was then allowed to dry overnight. Once dried, several different types of bloodstain patterns were produced on the wall (Figure 1). Bloodstain patterns included those not likely to be seen on vertical surfaces (such as blood dripping into blood). Blood droplets ranged in size from less than 1mm to over 12mm in diameter. The wall also contained partial bloody shoe impressions and vertical blood flow. Horse blood was used to create all bloodstains in the experiment. The blood was photographed and allowed to dry approximately 12 hours.
 |
A fresh gallon of similar paint, Ace Royal Hi Gloss 100% acrylic latex paint #102A310 ultra white base tint (ACE# 1961531) was purchased. This paint color is best described as a slate blue. A total of four coats of paint were applied to the wall with at least a 12 hour drying time in between coats. In some cases the paint dried for over a week between examinations and subsequent coats of paint. After each coat of paint the wall was visually examined and photographed. Several alternate light sources were used to examine the wall after the second, third, and fourth coats of paint. Yellow, red, and orange filters were used at a variety of settings. Models used included the Omnichrome Omniprint™ 1000, Polilight™ PL-10, and SPEX™ models MCS-400 and CS16-500. A Krimesite™ reflective ultraviolet viewer from the Sirchie company was also used in the experiment.
Results of Examinations
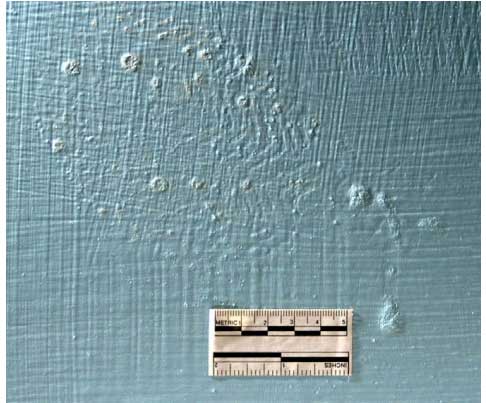
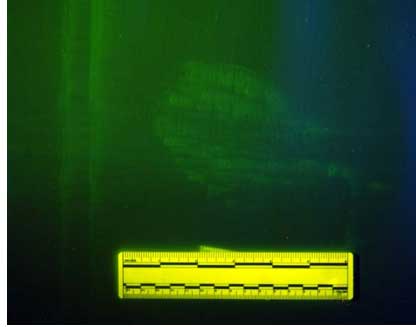
Faint patent blood was visible in areas up to two coats deep. Beneath two coats the blood appeared as a very light brown color. After the application of the third coat of paint the blood was no longer visible by color distinction. However, some blood patterns could be located with strong oblique lighting (Figure 2). This proved to be an excellent search method for larger impact spatters (greater than 4mm in diameter) but did not work well with swipe patterns and smaller blood droplets. By the application of the fourth coat of paint the patterns were no longer distinguishable using strong oblique lighting.
 |
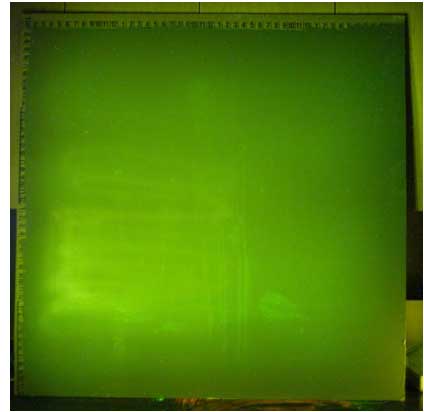
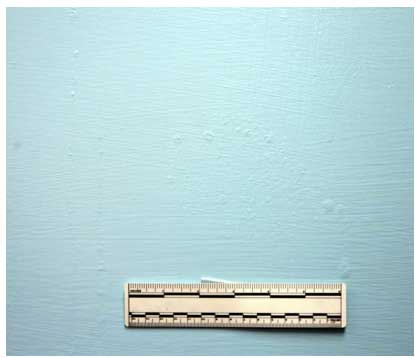
The use of an alternate light source was advantageous in that it is a non-destructive method of examination. The Omnichrome™, Polilight™, and reflective IR models yielded no usable results. The SPEX units, however, performed considerably better. Typically, blood will absorb ultraviolet light when viewed with an alternative light source. Unexplainably, the blood patterns in this experiment actually fluoresced a yellow color when viewed with a deep yellow filter at 445nm using both SPEX models (Figure 3). Blood was not detected with any other filters under any other wavelengths. Figures 4 and 5 show the same area photographed with visible light and then ultraviolet light under three coats of paint. Acceptable results were obtained under four coats of paint but the reaction was not as strong. The fluorescence of the blood is possibly the result of a combination of the blood and paint chemistry. Paint located in non-bloody areas as well as bloodstains located on the unpainted edges of the wall did not fluoresce when examined with the same filter and wavelength. Other paints may produce different results from absorption to varied fluorescence. At the investigator’s request, luminol was sprayed over the fourth coat of paint to see if a reaction occurred. The luminol did not react with the paint with underlying blood.
 |
 |
 |
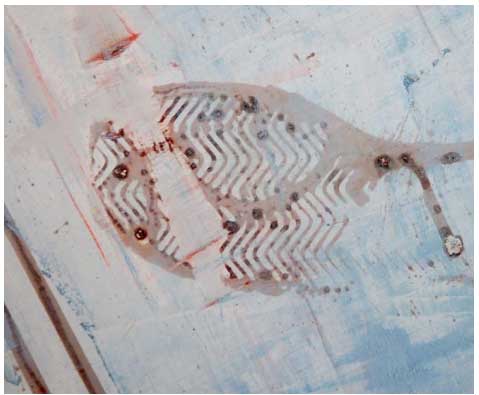
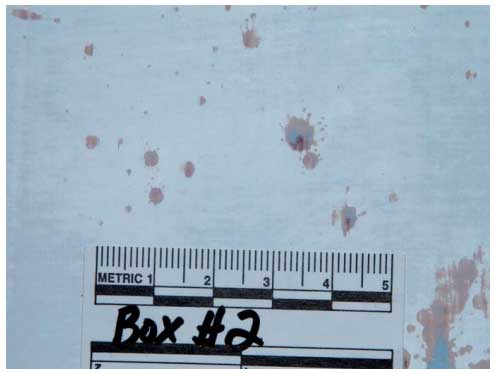
Once the bloodstains were visualized it became necessary to develop methods for removing the paint. This would facilitate a restoration of the blood patterns as well as allowing for sample collection. Since this is a destructive process three methods were tested. The wall was separated into four equal surfaces or units. Chemical aerosol paint strippers were applied to surfaces three and four (bottom half). As the strippers were applied, the other surfaces were protected from overspray by plastic sheeting. Citri-Strip™ #ECG73807 paint and varnish remover from the Barr corporation was used on surface #4 Several strippers from the Klean-Strip corporation and the Jasco Corporation were tried on surface #3. The Citri-Strip™ product produced acceptable results with a single application (Figure 6). Once the product reacted, a plastic hand scraper was used to remove the paint. Care should be observed when using this technique to insure that the underlying layer of paint containing the bloodstains is not removed as well. This product was also advantageous in that it could be applied indoors without harsh fumes. The Klean-strip and Jasco products produced very poor results in that the paint was not removed after numerous applications. Surface #2 was sanded with a Ryobi™ S605D hand held finish sander. Initial sanding was done with a 60 grit paper. This was used until the white paint from the initial coats began to be revealed. A 150 grit sandpaper was then used to remove paint until the individual bloodstains became visible. At this point a 220 grit sandpaper was used to clean around the bloodstains. This approach minimized the amount of damage done to the underlying bloodstains. The sanding approach produced acceptable results (Figure 7). This method is also desirable in that the analyst has more control in paint removal than with chemical strippers. Care should be taken, however, to ensure that the bloodstain areas are not over sanded. Surface #1 was scraped with a razor blade. The first step in the process was making a cut around three sides of the suspect area with a razor blade. Care was then taken to separate the overlying blue colored latex paint from the underlying white colored paint. This proved to be very easy in this particular project. The overlying paint was then carefully peeled back along the edge applying a straight razor when needed. This processed yielded the best results of the three approaches. The paint was surprisingly easy to separate and this process resulted in the least damage to the underlying bloodstains (Figure 8). Bloodstains from all three surfaces were tested with the phenolphthalein reagent after each process. All stains tested positive using the reagent.
 |
 |
 |
Discussion
The detection of bloodstains under painted surfaces is an uncommon task for criminal investigators. However, this strategy may be employed to cover up evidence of a crime. This research focused on two main objectives; detection and restoration. Within the parameters of this project, the results are deemed a success. It is unclear how certain variables such as paint type, cleanup, bloodstain pattern types, wall texture, and time may affect the success of these techniques. In spite of that, several recommendations can be made as a starting point. Analysts are encouraged to work from a non-destructive process towards the more damaging restoration processes. Strong oblique lighting in a darkened environment seems to be the best place to begin. While clean-up efforts, bloodstain pattern types, and wall texture may all influence the success of this technique it should not be overlooked. The second stage recommended is the use of an effective alternate light source. The SPEX ALS units provided the best results when set at 445nm while using a deep yellow filter. This approach allowed for the visualization of bloodstains under at least four coats of paint. Other authors have reported success using various Polilight™ models as well. For this reason, it may be advisable to examine suspected areas with more than one type of ALS if possible. Obviously, investigators who can identify suspicious areas are at an advantage in terms of planning an efficient restoration process. After areas are identified, the analysts must choose a restoration process. In this experiment, scraping the paint with a razor blade provided the best results. This technique may not be as effective on textured walls however. In such cases, using a chemical stripper or sanding the wall with a hand sander may be a better alternative. The analyst may wish to employ two or more techniques depending on the conditions present at the crime scene. In any event, it is recommended that the analyst test the proposed restoration process in an inconspicuous area, not thought to contain evidence. In the best case scenario, the analyst may wish to “reconstruct” the wall conditions using the same paint so that the effectiveness of each process can be thoroughly tested. Similar research, or success at crime scenes, should be reported so that a comprehensive approach can be developed for varied conditions.
Acknowledgements
The author would like to thank members of the Broomfield, Lakewood, and Denver Police Departments as well as the Arapahoe County Sheriff’s Office for the use of various light sources for this project.
Request for Additional Information
-
Thomas W. Adair
Senior Criminalist
Westminster Police Department
9110 Yates Street
Westminster, CO 80031
tadair@ci.westminster.co.us
References
- Vendenberg, N. and van Oorschot, R. 2004. Locating Blood and Saliva Stains Using Polilight™. 17th International Symposium on the Forensic Sciences, Australian and New Zealand Forensic Science Society (poster presentation). http://www.anzfss2004.org.nz/cgibin/ViewAbstracts.cgi?paperid=178
- Ray, B. 1992. Use of Alternate Light Sources for Detection of Body Fluids. Journal of the Southwestern Association of Forensic Scientists. 14(1):30-33.
Article submitted by the author
Article posted: May 18, 2010