

Crime Scene and Evidence Photography — Camera and Lighting
Steven Staggs
© 2014 from the book Crime Scene and Evidence Photography, 2nd Edition
Overview
As mentioned in the first chapter, a standard for photographs of crime scenes and evidence is that the photographs must be of sufficient quality to be admissible in a court of law. Crime scene photographers must understand how to get the correct results when using their cameras and lighting equipment for a variety of subjects and in a variety of lighting conditions.
See also the instructional videos on "Crime Scene and Evidence Photography"
The Camera
The camera used most often in crime scene investigations is the Digital SLR (single lens reflex) camera. Digital cameras which have twelve megapixel, or greater, image sensors and manual exposure settings (in addition to any automatic or programmed exposure modes) are usually suitable for crime scene and evidence photography.
One of the most important considerations in selecting digital cameras is the quality of the image sensor. Most image sensors that are twelve megapixels or greater can produce photographs capable of enlargement to 16" x 20" for court exhibits. There are many other factors involved in the quality of digital photographs that also must be considered when selecting digital photography equipment, such as close-up capabilities, availability of accessories and even the printer used to print the digital photograph.
Automatic vs. manual photography
Most modern cameras have dependable automatic exposure systems built right in the camera. Ninety percent or more of the photographs taken at most crime scenes can be accomplished with a camera set in an automatic mode. It does become necessary, however, to know when the automatic functions of the camera will result in poor photographs so you can make adjustments or change techniques (more information about exposure adjustments and techniques are presented in the next section of this chapter).
Technical Photography
The type or style of photography used in photographing crime scenes and evidence is called technical photography. Crime scene photographers must take high quality technical photographs to insure the photographs can be used in the investigation and ultimately in court.
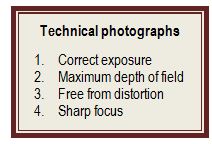
Technical photographs are photographs that show as much detail or information about the view or object pictured as possible. The best technical photographs have four characteristics. They are correctly exposed, have maximum depth of field, are free from distortion, and are in sharp focus. While frequently there are conditions that make this difficult or impossible (e.g., close-up photographs will always have shallow depth of field), crime scene and evidence photographers must strive to take photographs with these characteristics.
Correct exposure
Technical photographs must be correctly exposed. Correct exposures are necessary for the film to capture detail in all parts of a scene, including highlight areas and shadows. Underexposed photographs lose detail in the shadows while overexposed photographs lose detail in the highlight areas.
Exposure is controlled by the shutter speed and lens aperture. Most cameras can be operated in manual and automatic modes. Automatic systems and automatic flash units produce adequate results in most normal situations. However, in some situations the automatic exposure systems may produce incorrect exposures. Some common problem lighting situations to be aware of include highly reflective scenes, bright sun lighted scenes with deep shadows, and back lighting. In these situations you should consider metering off an 18 percent gray card, bracketing exposures, or flash fill.
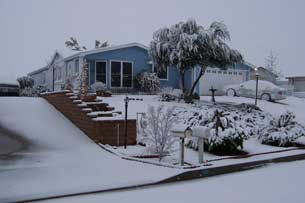
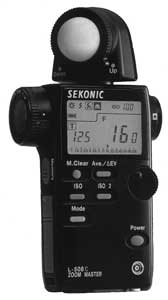
Ambient light (existing light) exposures can often be metered with the camera's internal exposure meter or an external exposure meter. However, before relying on any reflected light exposure meter, you should determine if the meter will be providing an accurate reading due to the subject or background about to be photographed. Exposure meters use 18 percent reflectance in determining exposure. If you are photographing a scene that does not have 18 percent reflectance, the exposure reading can be in error. For example, when photographing a crime scene in the snow, an exposure meter will, as always, base its exposure settings on 18 percent reflectance. Since the subject matter in the photograph is almost all white, the meter will provide exposure settings that result in an underexposed photograph. Much of the detail in the photograph will be lost. A second example would be a dark area of a scene, such as a section of charred wall at an arson scene. The exposure meter will base its settings on 18 percent reflectance and would provide exposure setting that result in an overexposed photograph. Much of the detail in the charred wall will be lost.
 |
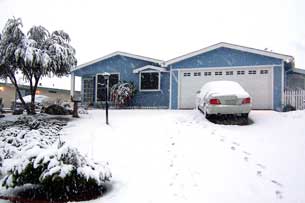 |
When using ambient light for crime scene photographs you can insure accurate exposures by using an 18 percent gray card. Position the 18 percent gray card in front of the exposure meter, or in front of the camera lens if you are using the camera's exposure meter, to obtain the correct exposure settings. Be sure the ambient light is falling on the 18 percent gray card the same as it is falling on your scene. Use the settings indicated by the exposure meter for the photograph. If you are using a camera in an automatic exposure mode press the "automatic exposure lock" (AEL) button on the camera while pointing the lens at the gray card to lock the exposure settings for the photograph.
Bracketing
Our eyes can perceive a great range of contrast (we can see highlights and at the same time we can see details in shadow areas), far greater than any digital camera sensor or film can capture. When we try to photograph detail in the shadows the brighter areas will be over exposed. In this type of lighting situation, bracketing exposures should be considered. Bracketing will provide a series of photographs at different exposures.
 |
 |
Bracketing involves making a series of exposures of the same subject at different exposures, usually at one stop or one-half stop intervals. Some cameras can be set to automatically bracket at selected exposure differences from the metered exposure.
High Dynamic Range Photography
With bracketing you may have two or more photographs to look at to see all the detail in the highlights and shadows in the view. A way to reduce the two or more photographs to one photograph is to use High Dynamic Range (HDR) photography.
High-dynamic-range photographs are generally achieved by capturing multiple bracketed photographs, and then merging them into a single HDR image.
 |
 |
 |
To show detail in highlight and shadow areas in one final HDR photograph you can take two photographs, one exposed for the highlight area and one exposed for the shadow area. Then the two images are merged, or "fused," using a computer program such as HDRsoft® Photomatix® or Adobe® Photoshop®.
Flash Fill
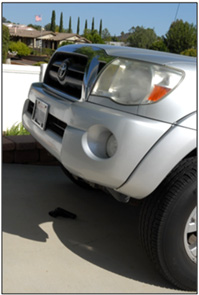
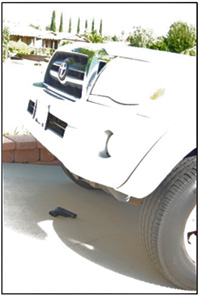
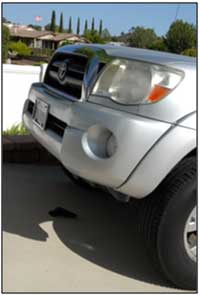
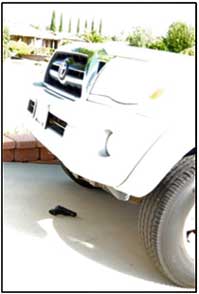
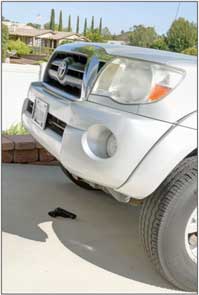
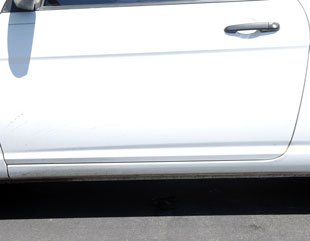
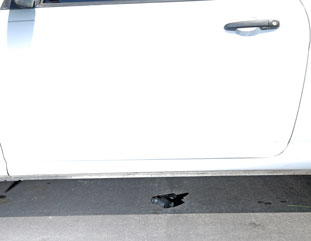
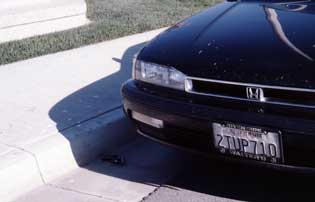
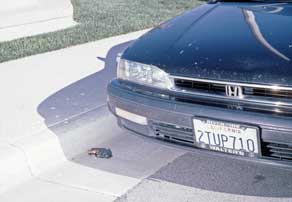
One more valuable technique for insuring accurate exposures, especially for scenes with deep shadows, is flash fill. In scenes illuminated by bright sunlight there will usually be dark shadow areas. Sometimes evidence is located in the shadows. Detail in the deep shadow areas may be lost when the exposure is based on the overall brightness of the scene. With the use of flash fill, the brightness level in the shadow areas can be raised to the overall brightness of the scene.
 |
 |
 Many cameras with dedicated TTL (through-the-lens) flash systems can provide automatic flash fill. If you have a dedicated TTL flash system consult the equipment instruction manual for instructions on using flash fill in the camera's automatic exposure mode.
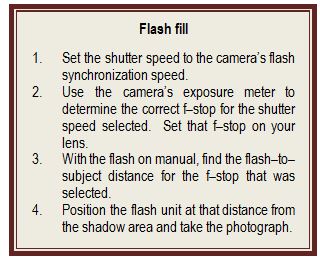
You can also use a camera and an electronic flash unit in manual modes for flash fill. First you must set the camera's shutter speed to the camera's flash synchronization speed (usually 1/60 or 1/125 second). Then use the camera's exposure meter to determine the correct f-stop for the shutter speed selected. Set that f-stop on your lens. With the flash on manual, find the flash-to-subject distance for the f-stop that was selected (the flash-to-subject distance for each f-stop is usually displayed in a chart on the back of the electronic flash). Position the flash unit at that distance from the shadow area and take the photograph.
 |
 |
You may wish to use a flash remote cord so you can have more flexibility in choosing the proper angle to direct the electronic flash into the shadows.
Maximum depth of field
Technical photographs must have maximum depth of field. Depth of field, often called the plane of sharpness, is the area in a photograph where objects are in sharp focus. Crime scene and evidence photographs should have as much in focus as possible (a deep plane of sharpness). This is because out of focus areas of a photograph can become issues in court. An opposing attorney could suggest that you purposely caused an area to be out of focus in a photograph to obscure some additional evidence that could have been clearly visible if properly photographed.
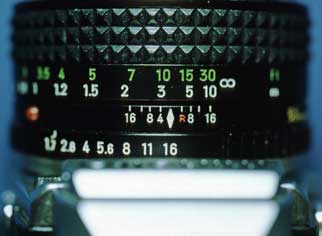
There are three factors that affect depth of field. They are the focal length of the lens on the camera, the camera-to-subject distance, and the lens aperture (f-stop) selected.
In crime scene and evidence photography you usually do not have much control over the first two factors that affect depth of field. While long focal length lenses (e.g., 135mm) produce shallow planes of sharpness and short focal length lenses (e.g., 28mm) produce deep planes of sharpness, you will usually be using a 50mm lens (on a 35mm camera) because it provides the best visual perspective (lens selection and perspective will be discussed in more detail later). And while short camera-to-subject distances produce shallower planes of focus than longer camera-to-subject distances, the distance between the camera and your subject will depend on what needs to be shown in the photograph. For example, close-up photographs require positioning the camera close to the subject resulting in shallow planes of sharpness.
 |
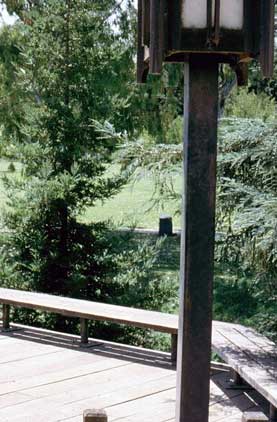 |
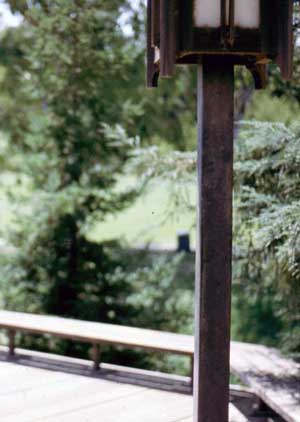
In crime scene and evidence photography, you usually control depth of field by lens aperture (f-stop) selection. Smaller lens openings (e.g., f/22) will give you deeper planes of focus while larger lens openings (e.g., f/1.8) will give you shallower planes of focus.
It is often helpful to be able to determine the area that will be in focus before you take a photograph. For example, at a homicide scene you may want to take a photograph showing the relationship between a gun on the floor and the victim's body. You have determined that the body is seven feet from the camera and the gun is 30 feet from the camera. How can you be sure that both the gun and the body will be in sharp focus? Fortunately, there are three methods to determine the depth of field before you take the photograph.
One method used to determine depth of field is to use the "depth of field preview lever" or button on most 35mm cameras. Pressing the depth of field preview lever allows you to manually "stop down" the lens aperture. As you look in the camera's viewfinder with the lens stopped down you will be able to see the area that will be in focus.
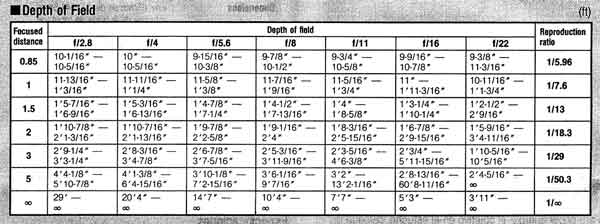
A second method to determine depth of field is to use the depth of field chart that is located in the owner's guide that came with your lens. The chart will show at what distances sharpness begins and ends for different f-stops and focused distances.
 |
 |
 |
Free from distortion
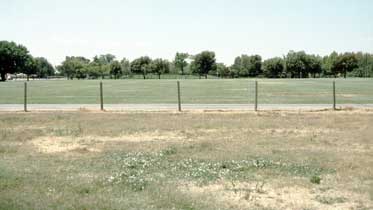
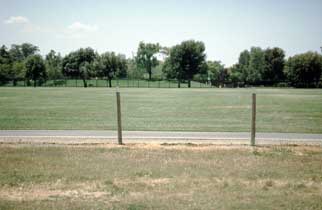
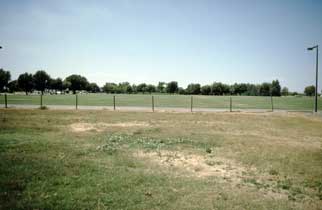
Technical photographs must be as free from distortion as possible and must have good perspective. The most common cause of distortion in photographs is improper lens selection. The lens that will provide the least distortion, and will provide photographs that look similar to what you see at the scene, is the "normal focal length lens." You should use a normal focal length lens whenever possible (a 50mm lens is considered the normal lens for a 35mm camera). Long focal length lenses give a telephoto effect, and short focal length lenses produce wide-angle distortion. Distances in photographs taken with long and short focal lenses will be deceiving-the viewer will think distances are shorter or longer than they actually were at the scene. This could create discrepancies in court when a witness testifies to a distance that appears in error when compared with a wide-angle photograph on display.
 |
 |
 |
Technical photographs must also have good perspective. To insure you have good perspective you should hold the camera level and at eye level (between 4 1/2 and 6 feet above the ground) whenever possible. This provides views in photographs that are easier for others to understand. Of course there are many times that you cannot hold the camera level or at eye level–for example, you will point the camera straight down to photograph a footwear impression or position the camera near the ground to photograph evidence under a parked vehicle—but hold the camera level and at eye level when you are able.
Sharp Focus
Technical photographs must be in sharp focus. To insure your photographs are in sharp focus keep the camera steady during the exposure. You should mount the camera on a tripod if the shutter speed is less than 1/60 second and focus carefully. Also, maximizing depth of field will result in sharpness in a larger area of the photograph.
Flash Illumination
Types of flash illumination
Manual flash — When you use a manual flash set the lens f-stop for the flash-to-subject distance (the f-stop for each distance is usually displayed in a chart on the back of the electronic flash).
Automatic flash — Automatic flash units use distance ranges. Each range has a minimum and maximum distance. An f-stop is assigned to each range. Changing to a new range requires a change in f-stop. When in automatic flash, make sure the camera shutter speed dial is set to the flash synchronization speed. When photographing a high key scene (light or reflective background) bracket exposures by opening up one or two f-stops.
Dedicated flash — The basic dedicated flash unit sets the correct flash synchronization speed when the flash is in operation. It uses an automatic sensor and distance ranges. You must set the appropriate f-stop for the distance range. More advanced dedicated flash units may set both the correct flash synchronization speed and f-stop for the automatic range selected.
Dedicated TTL flash — The dedicated TTL (through-the-lens) flash uses a sensor inside the camera to control the duration of the flash. Use smaller lens apertures for short distances and larger lens apertures for long distances. A "confidence light" or a "warning light" will indicate whether a useable f-stop was selected. If the equipment indicates there was not enough light, select a larger lens aperture and rephotograph. Dedicated TTL flash units can usually be used in manual and automatic modes, as well as TTL.
Problems with electronic flash photography
Distances — Light produced by an electronic flash falls off quickly. This effect is the inverse square law of light (if the distance between the flash and subject is doubled, the illumination will drop to one quarter of the original) and results in bright foregrounds and dark backgrounds. This can be a significant problem with flash photographs outdoors at night. It may be necessary to use an automatic flash distance range that is twice the actual flash-to-subject distance or use manual flash settings (open up 2 f-stops). Other solutions include using a different lighting technique such as multiple flash, painting with light, or available light (utilizing existing light without electronic flash).
Reflective Surfaces — Automatic flash units can shut off too soon due to reflected light from surfaces such as tile, white walls, or chrome. To avoid an underexposed photograph you may bracket to larger lens openings, diffuse the flash, angle the flash, or use manual flash.
Bounce flash
You can use bounce lighting for less contrast, softer lighting, reducing the intensity of the light, or to increase the angle of flash coverage. Bounce lighting is accomplished by angling the flash to reflect the flash off a white or light colored surface, usually a ceiling. With manual flash add the distance up and down for the flash-to-subject distance, and then add in the absorbance loss (one to three f-stops). For bounce lighting utilizing an automatic flash with the flash sensor facing the subject, use a range for two or more times the actual flash-to-subject distance.
Multiple flash
To illuminate large areas you can get good results by using several flash units positioned around the scene. The flash units can be triggered simultaneously by connecting them with sync cords or using photocell devices that remotely trigger the flash units when the camera-mounted flash fires. To balance the intensity of each of the flash units, distance the flash units from the subject to provide the same f-stop value for each flash.
Painting With Light
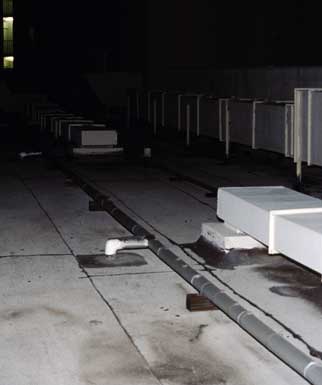
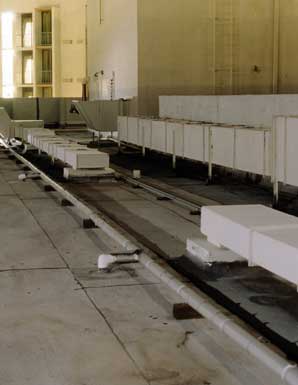
Painting with light is especially useful for lighting large crime scenes at night when a single flash will not provide adequate lighting coverage. Painting with light is also used at night traffic collision scenes to provide lighting for large areas.
Painting with light is accomplished by opening the camera's shutter for an extended period of time while a light source is moved around until the entire scene is properly illuminated. The light source can be a flashlight or a spotlight, but the most effective light source is usually an electronic flash unit with a "test fire" button.
 |
 |
Painting with light is done with both the camera and electronic flash in their manual modes. First you mount the camera on a sturdy tripod. Attach a locking cable release to the camera (some cameras require an electronic cable release or have an extended time function built in to the camera-see your camera's instruction manual for further information). Set the shutter speed to the "B" (bulb) setting. 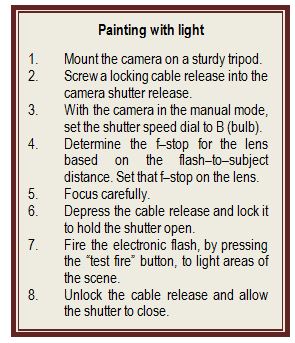 Determine the f-stop needed for the exposure based on the flash-to-subject distance (not the camera-to-subject distance) you will be using. For example, if you plan to position the flash about 20 feet away from each area you intend to illuminate, you will be using. For example, if you plan to position the flash about 20 feet away from each area you intend to illuminate, select the f-stop for that distance (the f-stop for each distance is usually displayed in a chart on the back of the electronic flash). Focus carefully. Depress the cable release and lock it to hold the shutter open. Fire the electronic flash, by pressing the "test fire" button, to light areas of the scene. The number of flashes and angle of the flashes will depend on the size and character of the scene. Do not point the flash directly at the camera and keep yourself out of the view of the camera. When you finish lighting the scene, unlock the cable release allowing the shutter to close.
If there will be vehicle traffic through the scene during the painting with light exposure, the streaking of headlights and taillights will record in the photograph. In such situations you may wish to cover the camera lens between flashes to block out the lights from vehicle traffic.
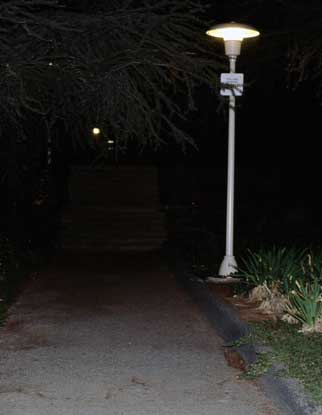
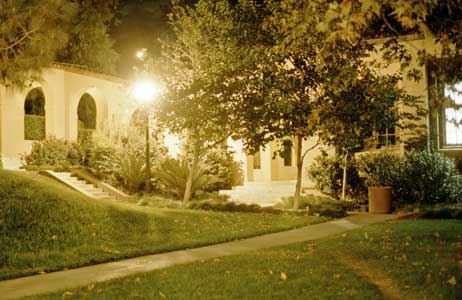
Available Light Photography
Available light photography is especially useful for large crime scenes at night when a single flash will not provide adequate coverage. Lighting for the photograph may be from street lamps, parking lot lamps, or even moonlight. Available light from street lamps is frequently used at night traffic collision scenes to provide lighting for large areas.
You may be able to get an adequate exposure meter reading to operate your camera in manual settings. Automatic cameras may also operate in low-light conditions. Many supplementary exposure meters provide accurate readings in very low-light conditions.
 |
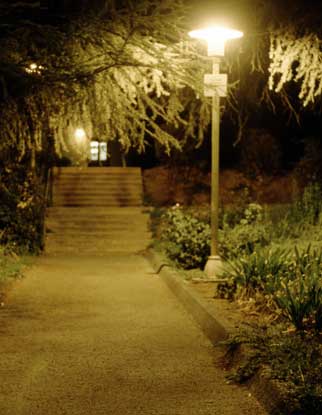 |
When obtaining an exposure meter reading do not point the exposure meter directly at lights in your scene, or the photograph you take will be underexposed. Since lighting is usually contrasty at night (light sources are many times brighter than shadow areas), determine which area of the scene is most important and aim the exposure meter in that area. Use a tripod and cable release to avoid camera movement during the exposure. Bracketing exposures will help to insure a good photograph.
 |
 |
Summary
As the saying goes, "practice makes perfect." In photography practice is essential not only in learning how to operate your camera equipment, but is essential in reaching and maintaining the skill levels necessary to become a crime scene photographer. Reading instructions and looking at example photographs is usually not enough. You must try the techniques and keep practicing them because practice does make perfect.
 Crime Scene and Evidence Photography — Camera and Lighting Copyright: © 2014 by Steven Staggs. Copyright for this article is retained by the author, with publication rights granted to the Crime Scene Investigation Network. This is an Open Access article distributed under the terms of the Creative Commons Attribution-NonCommercial-NoDerivatives 4.0 International License which permits unrestricted noncommercial use, distribution, and reproduction, provided the original work is properly cited and not changed in any way.
About the Book
The information presented in this article is from the book
Crime Scene and Evidence Photography, 2nd Edition © 2014 by Steven Staggs.
About the Author
 For 34 years Steven Staggs was a forensic photography instructor and trained more than 4,000 crime scene technicians and investigators for police and sheriff departments, district attorney offices, and federal agencies. He was also a guest speaker for investigator associations, appeared as a crime scene investigation expert on Discovery Channel's Unsolved History, and provided consulting to law enforcement agencies.
Steve has extensive experience in crime scene photography and identification. He has testified in superior court concerning his crime scene, evidence, and autopsy photography and has handled high profile cases including a nationally publicized serial homicide case.
Steve is the author of two books on crime scene and evidence photography, the text book Crime Scene and Evidence Photography and the Crime Scene and Evidence Photographer's Guide. The guide is a field handbook for crime scene and evidence photography, which sold over 10,000 copies and has been in use by investigators in more than 2,000 law enforcement agencies.
Steve retired in 2004 after 32 years in law enforcement, but continued to teach forensic photography and crime scene investigations at a university in Southern California.
Article submitted by the Author
Article posted: July 1, 2104