

Lighting Methods for Copy and Evidence Close-up Photography
Steven Staggs
© 2014 from the book Crime Scene and Evidence Photography, 2nd Edition
Since most laboratory photography is made with steady burning lights (quartz lamps, photoflood lamps, fluorescent lamps, etc.) it is relatively easy to choose the best lighting method for photographing a specific item of evidence. All you need to do is try different lighting methods while looking in the camera’s viewfinder, and select the method that gives the best results. The following lighting methods are effective for photographing various evidence subjects.
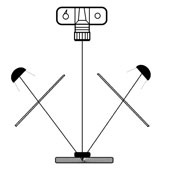
45 degree lighting
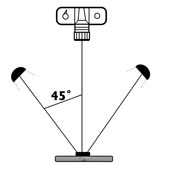 |
45–degree lighting uses one or more lights positioned at 45–degree angles. If only one light is used, a white or silver reflector can be placed on the opposite side of the evidence to reflect some of the light back toward the evidence, reducing shadows.
45–degree lighting is used for photographing the average item of evidence where the objective is to show the item’s shape and size.
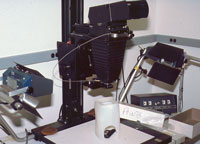
Direct reflective lighting
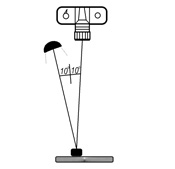 |
In direct reflective lighting the light is reflected directly off the subject into the lens. This is done by placing the subject at a 10–degree angle from the lens to film plane and placing the light source at a 10–degree angle from the subject. The light source reflects at a 20–degree angle into the lens.
Direct reflective lighting is used to minimize shadows within the evidence. However, this method creates very high contrast and does not show the dimensional shape or texture of the evidence. Also, the light source may need to be diffused to prevent hot spots.
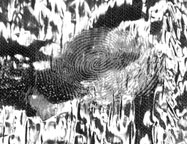
Oblique lighting
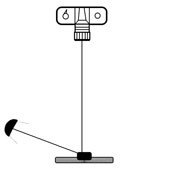 |
Oblique lighting uses a light source positioned at a low angle. Oblique lighting is usually used to show detail by creating shadows on the surface of the evidence.
Oblique lighting is commonly used when photographing impressions, tool marks and certain types of fingerprints. A very low oblique angle of lighting can be used to photograph dusty footwear impressions and indented writing.
Bounce lighting
 |
Bounce lighting uses light bounced off a white or reflective surface. The bounce surface may be positioned at different locations (above or to one side of the subject) to create the desired effect. This usually produces even non–glare lighting with low contrast.
Diffused lighting
 |
Diffused lighting uses an opaque material placed between the light source and the subject to soften the light. This usually results in even lighting with reduced reflections and hot spots. The opaque material can be as simple as a section of a white bed sheet or an empty water bottle, or can be a commercial device designed for laboratory photography.
Diffused lighting is usually used for photographing evidence with shiny or reflective surfaces.
 |
 |
 |
 |
Transmitted lighting
Transmitted lighting uses light that shines through the evidence toward the camera’s lens. The background becomes shadow–free. The angle of the transmitted lighting can be adjusted from 90–degrees to 45–degrees for the desired effect.
Transmitted lighting is used for photographing transparent or translucent subjects. It is effective in photographing evidence such as a fingerprint on a drinking glass.
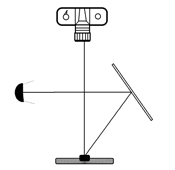
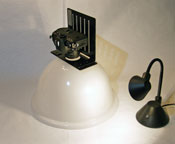
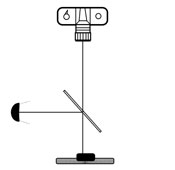
Front directional or axial lighting
 |
 |
Front directional lighting allows you to send light straight down onto the evidence. A clear piece of glass is placed between the subject and lens at a 45–degree angle. The light source is positioned parallel to the film plane and 45–degrees to the glass. While the light is transmitted through the glass, some is reflected downward directly on the subject.
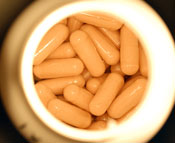
Front directional lighting is effective when photographing into hollow cavities, such as glasses or cups.
Other variations of lighting
Two or more of the lighting methods described above can be used together for lighting evidence. For example, when photographing a broken piece of glass you might use a combination of transmitted lighting and diffused 45–degree lighting.
Also, mirrors and white or silver reflector cards can be used to reflect light into shadow areas when using the lighting methods described above. Other devices, such as small spot lights and fiber optic lighting, can be utilized to light small areas.
 Lighting Methods for Copy and Evidence Close-up Photography Copyright: © 2014 by Steven Staggs. Copyright for this article is retained by the author, with publication rights granted to the Crime Scene Investigation Network. This is an Open Access article distributed under the terms of the Creative Commons Attribution-NonCommercial-NoDerivatives 4.0 International License which permits unrestricted noncommercial use, distribution, and reproduction, provided the original work is properly cited and not changed in any way.
About the Book
The information presented in this article is from the book Crime Scene and Evidence Photography, 2nd Edition © 2014 by Steven Staggs.
About the Author
 For 34 years Steven Staggs was a forensic photography instructor and trained more than 4,000 crime scene technicians and investigators for police and sheriff departments, district attorney offices, and federal agencies. He was also a guest speaker for investigator associations, appeared as a crime scene investigation expert on Discovery Channel's Unsolved History, and provided consulting to law enforcement agencies.
Steve has extensive experience in crime scene photography and identification. He has testified in superior court concerning his crime scene, evidence, and autopsy photography and has handled high profile cases including a nationally publicized serial homicide case.
Steve is the author of two books on crime scene and evidence photography, the text book Crime Scene and Evidence Photography and the Crime Scene and Evidence Photographer's Guide. The guide is a field handbook for crime scene and evidence photography, which sold over 10,000 copies and has been in use by investigators in more than 2,000 law enforcement agencies.
Steve retired in 2004 after 32 years in law enforcement, but continued to teach forensic photography and crime scene investigations at a university in Southern California.