

Preservation Methods and the Degradation of Dust Print Lifts
Marcy Hendricks
MS Crime Scene Investigation candidate
at The George Washington University, Washington, DC
Abstract
In this study, the author examined the different types of physical preservation methods for dust print lifts. Dust impressions were collected with Kinderprint's electrostatic dust print lifter and documented at one week intervals with examination quality photography. Results indicated that storing dust print lifts taped to the top of cardboard mailing boxes produced the least amount of degradation to the print. Further, examination quality photography is widely heralded as the only sure method to maintain the detail of a freshly lifted dust impression. Therefore, the results of this study also illustrated the damaging effects of short term storage on dust print lifts and therefore highlighted the importance of immediate photography upon collection of dust impressions.
See also the instructional videos on "Footwear Impression Evidence"
Introduction
By providing law enforcement and investigation agencies with a method in which to collect dust print impressions, the development of the electrostatic dust print lifter (ESDL) has significantly improved the ability to document and collect dust impression evidence during crime scene processing [1]. In the field of crime scene investigation and footwear impression evidence, it is widely recognized that photography is the only certain method for preserving the detail of a electrostatic lifted dust impression [2].
Photographing dust print lifts immediately is especially important because they inherently degrade over time; one of the largest problems investigators have encountered with the use of the ESDL is the fragile nature of the dust print lift [3]. Anything brushing against the impression could obscure the image or remove parts of it, which also remains a problem throughout the life of the print in storage [3]. Further, the Mylar film used to collect the impression naturally attracts excess dust [3].
Despite the consensus that the most beneficial way to preserve the quality of dust print lifts for future examination purposes is immediate photography, there has been minimal research to suggest the best physical storage methods [2]. Arrowhead Forensics recommends storing the dust print lift in an A-5031-F manila lift folder, as provided in their Arrowhead Stat-Lift Kit. Evident Crime Scene Products suggests using one of their film and cast boxes for preserving dust print lifts, which they sell separately. Recommendations from footwear impression evidence professionals include the use of folders and shallow boxes [4].
The Scientific Working Group for Shoeprint and Tire Tread Evidence (SWGTREAD) has published standards as a guide for lifting footwear impression evidence. They maintain that because electrostatic lifts retain a charge, packaging lifts in cardboard boxes or plastic bags should not be utilized [5]. Instead, SWGTREAD recommends storing lifts in individual clean file folders [5]. In sum, professional opinions vary on the physical storage methods for lifted prints, but there is a general agreement that dust print lifts should be photographed prior to storage and plastic containers should not be utilized [4].
In order to determine the best physical storage method for dust print lifts, a 35-day study was conducted using four storage methods: folders, boxes, mailing tubes, and polyethylene plastic envelopes.
Materials and Methods
Law enforcement agencies are known for employing unused pizza boxes and other cardboard containers to store dust print lifts, despite SWGTREAD’s recommendation against the use of cardboard materials [5]. Evident Crime Scene Products sells pre-sized boxes, but generic cardboard boxes serve the same purpose. Manila folders are also widely used as a storage method for dust print lifts and recommended by SWGTREAD and other footwear impression evidence and crime scene professionals [5, 4, 6]. The folders should be of the quality of finished paper stock, like file folders, which can be purchased through Arrowhead Forensic Products or any office supply store [4].
Storage tubes are not generally used by law enforcement for shorter lifts (less than 12 in. long) because the rolling of the film inherently creates damage to the dust print lift [6]. However, for the purposes of this study and because research is so lacking on this topic, storage tubes were used to prove or dispel their lack of preservation performance.
Although plastic generally attracts more dust than cardboard and is discouraged as a storage method, the poly envelopes used in this study were branded as anti-static [4].
Materials List
- Electrostatic Dust Print Lifter manufactured by Kinderprint Co., Inc.
- Electrostatic Lifting Film manufactured by Evident Crime Scene Products
- Generic white uncoated computer paper
- Converse Chuck Taylor All-Star shoe, women’s size 8 (right)
- Scotch Magic transparent tape
- Generic duct tape
- Generic black poster board
- Black six-inch scale
- Avery white labels
- Maglite LED 3-cell D flashlight
- D3100 Nikon camera with 18-55 mm lens
- Tripod
- Storage materials:
- Heavyweight manila file folders manufactured by Staples
- White mailing tubes, 3 in. x 15 in. (7.6 cm x 38.1 cm), manufactured by Staples
- White corrugated document mailing boxes, 11.12 in x 8.75 in x 4 in (28 cm x 22 cm x 10 cm), manufactured by Staples
- Legal size poly envelopes manufactured by Staples
Dust Print Lifting Methods
A total of eight dust print lift samples were created, two for each of the four storage methods employed. A white piece of plain, uncoated computer paper was laid on the floor and stepped on by a right shoe. For each application, to generate the dust, several strides were taken with the shoe before making contact with the paper. The paper was then placed onto a working surface and covered by the Mylar film, with the aluminum side facing up [5]. A black positive charge lead was placed approximately two inches adjacent to the dust impression before turning on the ESDL to full capacity and then the red negative charge lead was placed on the bottom left corner of the Mylar film [1]. A clear static charge was observed throughout the film. The film was then rolled with a 4 in (10 cm) roller from the center out. The ESDL was then turned off and the film was removed from the surface. This process was repeated for each of the eight samples.
Dust Print Photography Methods
The samples were photographed weekly for five consecutive weeks after the original photographs were taken in week 1. The dust print lift was immediately photographed in a dark room setting upon collection [5]. The print was secured to a black board using transparent tape, which was then secured to a wall using duct tape. The black board was utilized to prevent light from striking the scale and creating an overexposed image [1]. A labeled six-inch scale was placed parallel to the print, approximately one inch below [7]. The camera was set up on a tripod, with the film plane parallel to the print [1]. Using a bracketing method of 6 s, 2 s, 2.5 s, and 3 s shutter speeds, the individual print was photographed eight times at ISO 100 and an f/stop of 11. The prints were photographed at each shutter speed, lit at an angle once from the left and once from the right with the flashlight [1]. The flashlight was held parallel to the print at a consistent distance of three feet and fanned across the print in a lateral motion to create equal lighting, while being careful to avoid overexposing the scale [5]. The process was repeated for each of the eight samples.
Dust Print Film Storage Methods
Immediately after photographing the print, the Mylar film was returned to its respective storage container. Samples 1 and 2 were placed in manila folders for preservation. Samples 3 and 4 were placed in Staples brand cardboard mailing tubes for preservation.
Sample 3 was rolled shiny side out, toe to heel and Sample 4 was rolled shiny side out, heel to toe. Samples 5 and 6 were placed in generic cardboard mailing boxes. Sample 5 was taped with transparent tape, at the corners of the print, to the bottom of the box with the dust print side facing up. Sample 6 was taped with transparent tape at the corners, to the top of the box with the dust print side facing down [8]. Samples 7 and 8 were placed into separate poly envelopes.
Photographic Analysis Methods
To rate the quality of the photographs for each week, a point system for quality and negative aspects was adapted from a table created by Adams, et al. [8]. The contrast, detail, and negative aspects categories were each assigned a rating between +2 and -2 for each week; the points for each category were totaled for each week to develop an overall rating [8]. The point system is as follows (note that the dust print lifts were photographed and analyzed independently by the author. The author does not claim to be a footwear impression evidence professional. Ratings were made subjectively based on educational experience with photography and dust print lifts):
A +2 rating is very good and is based on the subsequent criteria for the three individual categories. Contrast: The photograph of the dust print shows great contrast, distinguishing it greatly from the black Mylar film. Detail: The impression edges are observed in great detail. Negative Aspects: Stray hairs, fibers, and dust particles do not detract from the photograph. No markings or scratches are apparent.
A +1 is good and is based on the subsequent criteria. Contrast: The photograph shows good contrast levels, allowing you to distinguish it from the Mylar film. Detail: The dust impression edges are observed in good detail but not as abundant as +2. Negative Aspects: Stray hairs, fibers, and dust particles may exist but do not disrupt the print to a great extent. Markings and scratches are minimal and do not affect the print itself.
A zero rating is average and is based on the subsequent criteria. Contrast: The photograph shows average contrast levels. It is able to be distinguished from the Mylar film but not greatly. Detail: The dust impression edges show average detail. Negative Aspects: Stray hairs, fibers, and dust particles may exist on the edges of the print itself but do not disrupt the heel and toe area of the print. Scratches and markings may exist on the edges of the print but do not affect the quality of the print significantly.
A -1 is poor and is based on the subsequent criteria. Contrast: The photograph shows poor contrast levels. It is more difficult to distinguish the print from the Mylar film. Detail: The dust impression edges show poor levels of detail, making the areas of the heel and toe harder to distinguish. Negative Aspects: Stray hairs, fibers, and dust particles may exist on the middle of the print but do not impede heel and toe areas. Scratches and markings may exist on the print but do not touch the impression.
A -2 is very poor and is based on the subsequent criteria. Contrast: The photograph shows very poor contrast levels making it very difficult to view the print on the Mylar film. Detail: The dust impression edges show very poor levels of detail, making points of comparison very hard to distinguish. Negative Aspects: Stray hairs, fibers, and dust particles may exist in the middle of the print, disrupting the heel and toe areas. Scratches and markings may run through the heel and toe areas.
Results
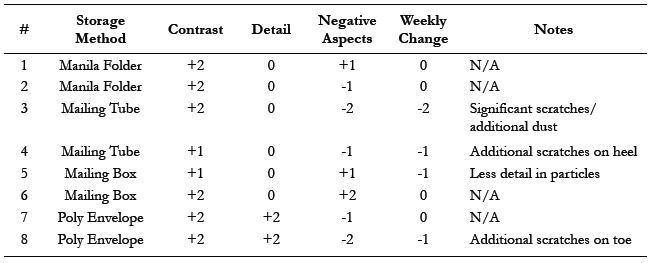
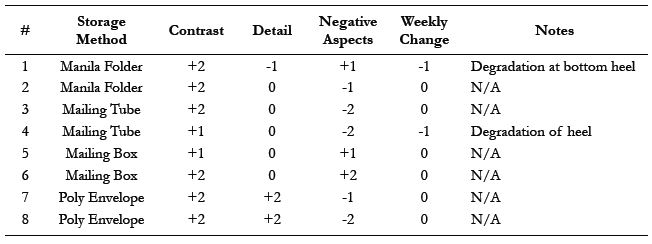
Using the previously listed rating method, the samples resulted in the following overall ratings across the 35-day period (Table 1). The overall week one rating comes from contrast, detail, and negative aspect ratings, added together for a maximum rating of +6. The table also includes a ranking based on the least amount of overall change and highest week six rating. Storage methods that tied were given the same ranking number.
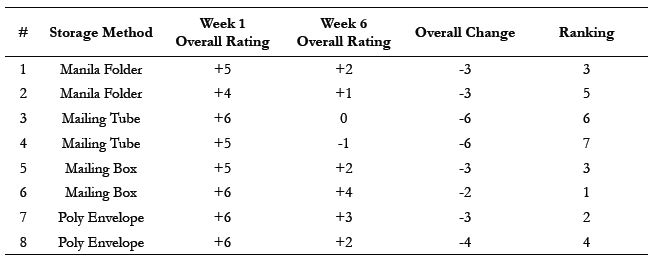
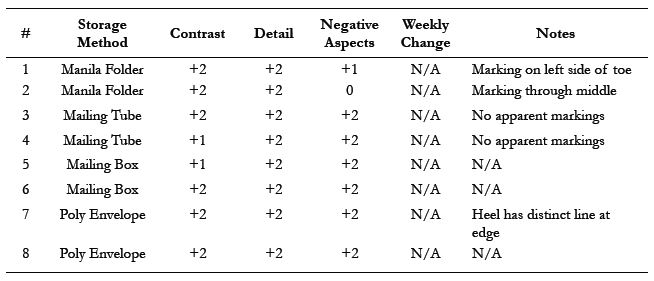
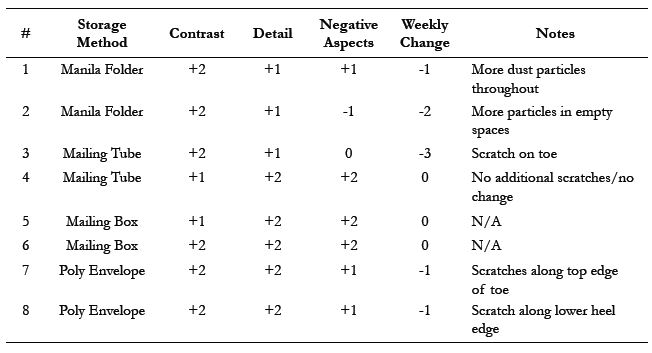
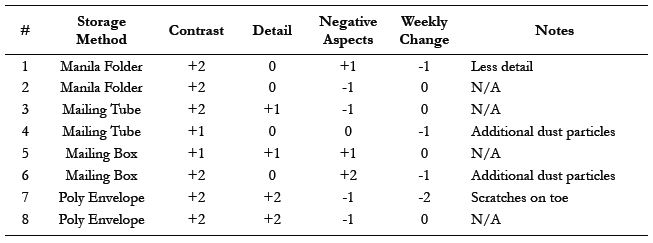
Tables 2 to 7 document the contrast, detail, negative aspects, and change ratings for each of the eight samples over the entire 35-day period. The weekly change column documents the change made from the previous week, not overall.

Sample 6 showed the least amount of change overall, earning the best rating at the end of the 35-day period. Figure 1 and figure 2 show photographs of sample 6 at week one and week six of the study, respectively. All the photographs documenting the dust lifts depict a right to left reversal of an impression made by a right shoe.
Sample 4 showed the most amount of change overall, earning the worst rating at the end of the 35-day period. Figure 3 and figure 4 show photographs of sample 4 at week one and week six of the study, respectively.
While the samples stored in manila folders did not result in the best rating overall, they were the most consistent with both sample 1 and sample 2 resulting in an overall -3 change throughout the 35-day study. Figures 5 and 6 show the sample 1 at one and six weeks, respectively. Figures 7 and 8 show sample 2 at one and six weeks, respectively.
Although the poly envelopes were not rated best overall, as they rated low in the negative aspects category, it is important to note that those samples experienced no significant change in the contrast and detail categories. Figures 9 and 10 show sample 7 at week one and week six of storage, respectively.
In addition to the changes noted between week one and week six, the degradation levels present in week two illustrate the importance of immediate photography. The week two photographs represent the conclusion of the dust print lifts’ first seven days in storage, without interruption. Figure 11 and figure 12 show sample 1 at week one and week two of the study.
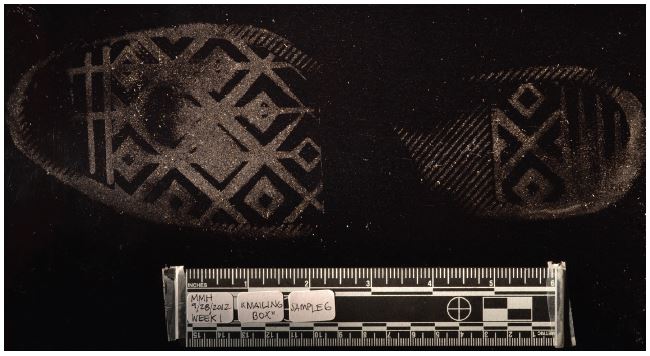
Figure 1
Dust lift sample 6 at week 1 before being placed into a mailing box for storage.
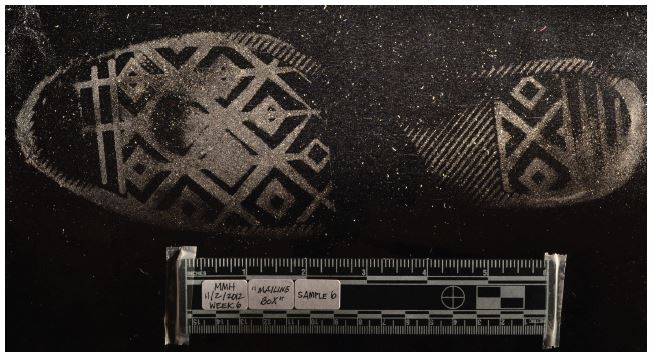
Figure 2
Dust lift sample 6 at week 6 of documentation (35 days in storage).
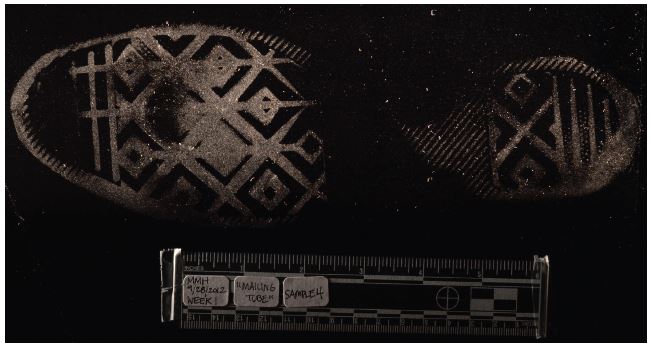
Figure 3
Dust lift sample 4 at week 1 before being stored in a mailing tube.
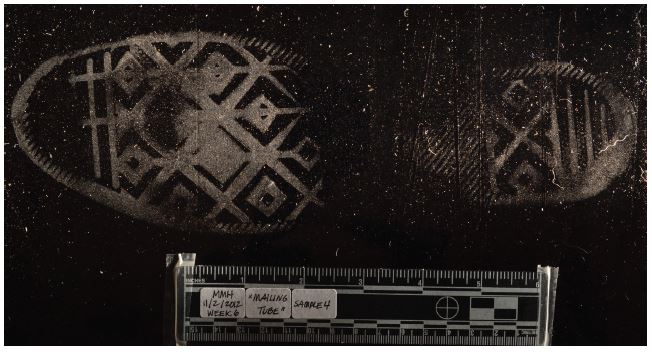
Figure 4
Dust lift sample 4 at week 6 of documentation (35 days in storage).

Figure 5
Dust lift sample 1 at week 1 before being stored in a manila folder.

Figure 6
Dust lift sample 1 at week 6 of documentation (35 days in storage).
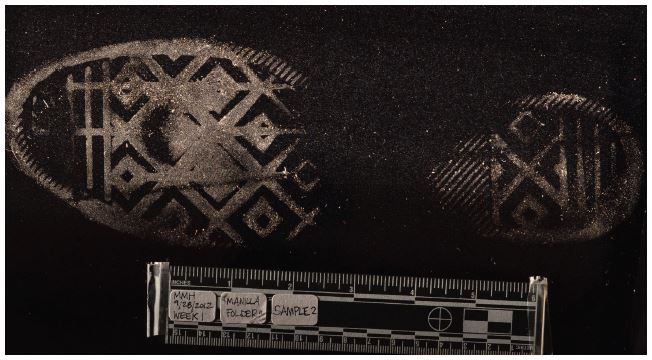
Figure 7
Dust lift sample 2 at week 1 before being stored in a manila folder.
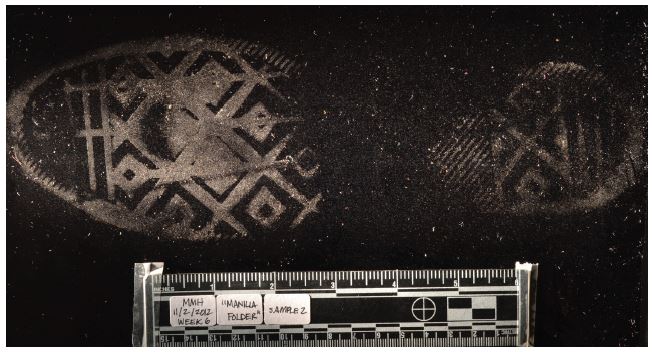
Figure 8
Dust lift sample 2 at week 6 of documentation (35 days in storage).
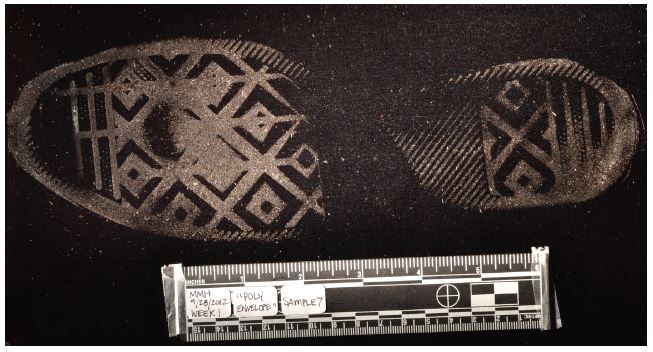
Figure 9
Dust lift sample 7 at week 1 before being stored in a poly envelope.
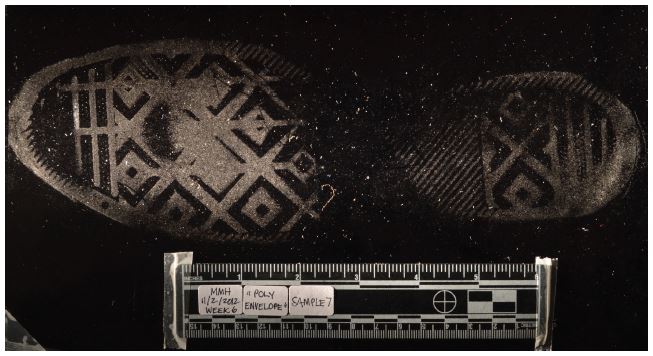
Figure 10
Dust lift sample 7 at week 6 of documentation (35 days in storage).
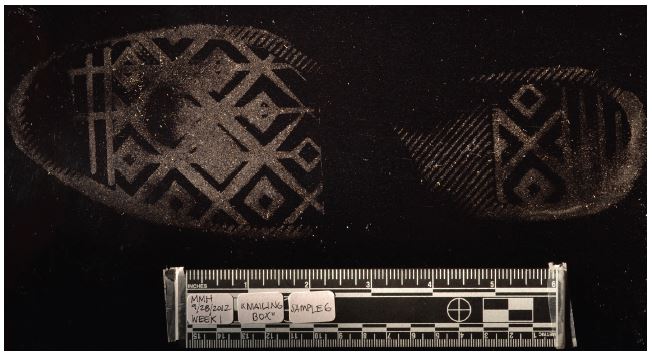
Figure 11
Dust lift sample 1 at week 1 before being stored in a manila folder.
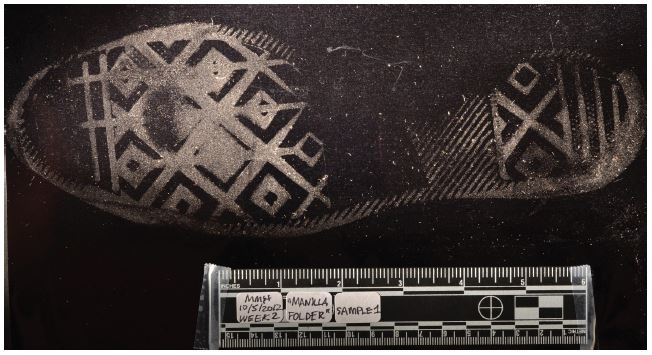
Figure 12
Dust lift sample 1 at week 2 of documentation (7 days in storage).
Discussion
The sample stored in a mailing box, taped to the top of the inside of the box, print side facing down, resulted in the best rating over the 35-day period. Contrast and detail loss for this sample was very minimal, although some additional dust particles were seen at the conclusion of the study. This result is significant because both Bodziak and Gardner recommend storing the prints facing up [4, 6]. However, this study concluded that the same mailing box produced a weaker result when the dust print lift was taped to the bottom, lift facing up. Prolonged research is needed, without interruption, to reach a more definite conclusion for the two mailing box methods. Documenting the prints at the three-month, six-month, and one-year stages of storage is recommended to obtain more definitive results.
The results differed from those found by Adams, et al., which concluded that there was no significant difference between storing the lifts in mailing boxes versus manila folders, noting that no deleterious effects were apparent [8]. This study concluded that the mailing box method (print side out, facing down) rated better than the folders. But the methods used in this study differ greatly from those employed by Adams, et al., leaving a comparison between the two results less useful. It can be stated that observable changes were made over the short, 35-day period in storage, which resulted in a distinction between the mailing box and manila folder storage methods.
In turn, the samples stored in mailing tubes resulted in the worst overall ratings. As expected, there were significant scratches made when the dust print was rolled onto itself to fit into the tube. The Mylar film also attracted a considerable amount of additional dust particles by the end of the study period. This result confirms the hypothesis that storing dust print lifts in mailing tubes results in significant degradation. This study used lifts that were less than 12 inches in width, therefore no conclusion can be made about the recommendation for storing longer lifts in tubes [6]. Further research is also needed to definitely prove or disprove SWGTREAD’s recommendation for rolling the Mylar film for longer lifts and taping together, without the use of any container [5].
Dust lifts stored in manila folders were shown to have the most consistent results overall compared to the other storage methods. While the overall rating change for the two manila folder samples was the same, a significant amount of dust particles contributed to a loss of detail in the dust print lifts by the end of the 35-day period. Further research with longer, uninterrupted study periods is needed to produce a more conclusive result of the effect of manila folders on the degradation of dust print lifts. Future research could also vary the method to include pieces of paper between the dust print lift itself as a barrier from the folder, as recommended by Gardner [6].
The dust print lifts stored in poly envelopes showed both negative and positive results worth considering. There were significant scratches to the impressions, some through the middle. However, these scratches seem to be created from human error. The poly envelopes have a rivet in the front as a part of the closure device, which by further inspection continued through to the inside of the envelope. Therefore, when the prints were stored with the impression facing the front part of the envelope, the rivet scratched the impression. On the other hand, dust print lifts stored in poly envelopes resulted in no noteworthy loss to both contrast and detail. Dust particles did not increase significantly across the print.
Because no research has shown anti-static poly envelopes to be a good or poor method in the preservation of dust print lifts, additional research can only enhance the results found during this study. The use of poly envelopes needs to be studied for a longer period of time to produce a more conclusive result. The human error that occurred in this research study can also be eliminated in the future. Despite the negatives aspects that were produced by this storage method, the positive results warrant future study.
When analyzing the prints between week one and week two, additional dust particles and stray hairs and fibers were observed after just seven days in storage. This observation clearly illustrates the importance of immediate, examination quality photography upon collection of the dust impressions. Dust print lifts inherently degrade over time and the results from this study show that this degradation occurs in as little as one week in storage.
Conclusion
Based on the results produced in this study, preserving dust print lifts in mailing boxes, taped to the inside of the top with the print side down, can be conditionally recommended. This method has shown to produce the least degradation overall. With additional research, this preservation method can be named more conclusively as the least degrading. Additional research is needed for the three other methods as well, to prove them useful for preservation or discredit their asserted advantages. The research found in this study does show that mailing tubes produce harmful results as a preservation method. Additionally, the construction of the poly envelope produced a harmful result that could be avoided in future research.
Because dust print lifts inherently degrade over time, as illustrated in this study, the most important method of preservation is immediate, examination quality photography upon collection. This study illustrated this importance by showing that the original lift is altered by additional dust particle and fiber accumulation after just seven days in storage. Results produced in this study can not only be used as a starting point for future research regarding physical storage of dust print lifts, but as an illustrative way to maintain that photography is the best long term preservation method.
References
- Hilderbrand DS. Footwear, The Missed Evidence. 2nd ed. Wildomar, CA: Staggs Publishing; 2007.
- Cassidy MJ. Footwear Identification. 1st ed. Ottawa, Ontario: Public Relations Branch for the Royal Canadian Mounted Police; 1980.
- Craig CL, Hornsby BM, Riles M. Evaluation and Comparison of the Electrostatic Dust Print Lifter and the Electrostatic Detection Apparatus on the Development of Footwear Impression on Paper. J Foren Sci. 2006;51(4):819-826.
- Bodziak WJ. Footwear Impression Evidence: Detection, Recovery and Examination. 2nd ed. Boca Raton, FL: CRC Press; 2000.
- Scientific Working Group for Shoeprint and Tire Tread Evidence. Guide for Lifting Footwear and Tire Impression Evidence. SWGTREAD; 2007. Available at: http://www.swgtread.org/standards/published-standards.
- Gardner RM. Practical Crime Scene Processing and Investigation. 2nd ed. Boca Raton, FL: CRC Press; 2012.
- Scientific Working Group for Shoeprint and Tire Tread Evidence. Guide for the Forensic Documentation and Photography of Footwear and Tire impressions at the Crime Scene. SWGTREAD; 2006. Available at: http://www.swgtread.org/standards/published-standards.
- Adams S, LeMay J, Stephen A. Validation of Vinyl Cling Film for the Collection and Preservation of Dust Impressions. J Foren Ident. 2011;61(4):317-332.
 Copyright: © 2013 Marcy Hendricks. Copyright for this article is retained by the author, with
publication rights granted to the Crime Scene Investigation Network. This is an Open
Access article distributed under the terms of the Creative Commons Attriution-Noncommercial-No Derivatives License (http://creativecommons.org/licenses/by-nc-nd/3.0/) which permits
unrestricted noncommercial use, distribution, and reproduction, provided the original work is
properly cited and not changed in any way.
Copyright: © 2013 Marcy Hendricks. Copyright for this article is retained by the author, with
publication rights granted to the Crime Scene Investigation Network. This is an Open
Access article distributed under the terms of the Creative Commons Attriution-Noncommercial-No Derivatives License (http://creativecommons.org/licenses/by-nc-nd/3.0/) which permits
unrestricted noncommercial use, distribution, and reproduction, provided the original work is
properly cited and not changed in any way.
Article submitted by the Author
Article posted: May 23, 2014