
Panoramas Simplified
Bob McMicken
Copyright ©2016
For our purposes, a panorama is a series of sequential photographs taken from the same position at the same time and stitched together to provide a wider image than can be taken with your widest wide angle lens. Panorama stitching software is embedded in all versions of Photoshop and Photoshop Elements going back at least fifteen years and appeared in Adobe Lightroom 6.0.
A number of other editors have embedded panorama stitching software. I've been working with Photoshop and Photoshop Elements for years so these are the devils that I know but they are not necessarily the best of all possible devils.
If you don't have a satisfactory panorama stitcher embedded in your editor, there are a number of free panorama stitchers available on the Internet. Of those that I've tried, the current version of Microsoft ICE is by far the best but I haven't tried every last one.
There are also two well-regarded commercial products worthy of serious consideration if you're looking for gallery-quality and mural-size enlargements. Check out the trial versions of Autopano Pro and PTgui.
There are two ways to approach creating a panorama. The first is to shoot handheld standing on your hind legs and pan from left to right with the camera more or less level, taking a series of overlapping shots. This works remarkably well even with a P&S camera if there is not too much detail in the foreground and the subject has plenty of detail. I've used this method with landscapes and architectural subjects.
The second method is to mount the camera on tripod with the head perfectly level (which requires a bubble level built into the head) using a nodal rail to position the optical center of the lens over the tripod's center of rotation. Using a nodal rail eliminates the parallax that you'll get shooting handheld or with the camera mounted on a tripod without a nodal rail.

Nodal rails and bases are manufactured by Nodal Ninja, Manfrotto, Kirk and Really Right Stuff to name only a few. Really Right Stuff has the best collection of premium gear plus some nice tutorials but their prices are a little too rich for my blood.
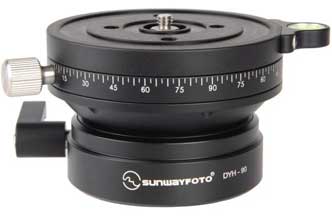
I'm using a Sunwayfoto DYM-90 leveling and rotating base and a Manfrotto 454 rail. The combination comes to around $230.00 at today's prices from bandh.com. On uneven ground, you really need a base that will both level and rotate so your camera does not weave up and down as it inevitably will if you're shooting handheld or on a tripod without a leveling and rotating base.
The ideal panorama scene is static, with no ocean waves or windblown grass in the foreground and a richly detailed subject so your software can find matching points of comparison in each picture.
Try to find a shooting position that is sufficiently far from the subject to avoid severe perspective distortion issues. Select your focal length with care. Remember, each photo must overlap the previous and following photos by at least twenty percent. Some tutorials suggest a thirty percent overlap. Best case, you'll be using 80% of your two end photos and 60% of your central photos.
Panorama photgraphy is strictly a manual focus and exposure proposition. Dial in an ISO number sufficient to let you shoot at a reasonable combination of shutter speed and aperture. Dial in an aperture that will give you sufficient depth of field to ensure that the subject and the foreground are in focus. Dial in a white balance that will suit the overall scene as a whole. Dial in a shutter speed that strikes a balance between the brightest and darkest elements of the total scene.
If you feel that bracketing is necessary, bracket every exposure by the same amount. You want the fewest shot-to-shot variations in your photos that you can manage so that the finished panorama looks like it was taken in a single exposure with a super-wide angle lens.
I create a panorama sub-folder in the main My Picture's folder and copy the JPEGs that I intend to use to this folder. Open your panorama software and add the photos in the order that they should be used to your software's shot list. From long habit, I work from left to right and counter-clockwise while I'm shooting so this is the order that I use when I'm populating the shot list.
Click the create or start button as described in the software tutorial or help menu. This differs somewhat from program to program but if you've got the hang of one program, you shouldn't have much trouble coming up to speed on the others.

For demonstration purposes, I used five photos of a derelict restaurant building, since demolished, taken handheld with a Panasonic ZS9 pocket camera. This is as sloppy as it gets but Photoshop CS6, Photoshop Elements 2, Photoshop Elements 11 and Microsoft ICE 2.0 produced near-identical results:
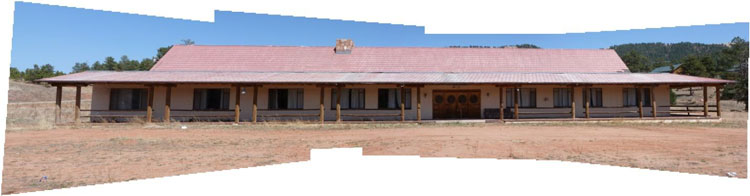
The first pass prior to cropping.

The final pass after cropping to eliminate the jaggies.

Hayden Baldwin submitted this panorama from a beach in Belize stitched in the current version of Microsoft ICE.

This panorama of Pikes Peak taken from ten miles away was stitched from seven shots taken with a 200 mm lens (300 mm effective focal length on an APS-C camera) using a tripod without a leveling base or focusing rail.

This pano was stitched in Microsoft ICE version 1.4.4 is probably true to the perspective that you'd have seen in a shot taken with an extreme wide angle lens without correction in Photoshop. I got a similar results using the pano stitcher in Irfanview.
GIMP's photo stitcher compiles to a GIF format rather than a JPEG so I didn't waste my time. A pano stitcher is one of the few applications not found in the current version of Faststone. Try what you've got before worrying about what you might want.
If you're not happy with the pano stitcher built into your current editing software, scout around for an early version of Photoshop Elements. I did the first demo using the Create Photomerge command in Elements 2.0, which came to me circa 2003 bundled with a long-defunct Epson printer. I used it with complete satisfaction for several years before upgrading to Photoshop CS2 in 2005.
Taking outdoor panoramas is not particularly difficult. You can even shoot a 360o circle from a central position to show lines of site to various locations where a witness might have been standing and possible sniper hides from which a shooter might have fired.
I've never tried shooting a panorama with flash, although no doubt it can be done.
I've never tried shooting an indoor panorama because, so far, I've been able to cover residential interiors with two or three shots using an 18 mm lens on an APS-C camera and a 28 mm lens on a full frame camera. However, a Google search turned up half a dozen Youtube tutorials on creating indoor panoramas in Photoshop.
Panoramas are not something that a crime scene investigator will use every day but the ability to produce a useful panorama on demand is a useful skill that should be mastered before you're confronted with an unexpected situation calling for a one panorama stitched from several individual shots.
Ezprints.com can print a panorama 6" high x 24" long for five dollars or a mural-size panorama 30" high by 156" long for $156.00. I'm not sure that I'd want to lug a 2½ x 13 foot photo into a courtroom but a six footer mounted on a foam-core backer board and displayed on an easel should be doable.
Panoramas are not rocket science. You don't need a special camera. You may be able to get by without a tripod. The necessary software may be built into your current editor or you can use a scrounged copy of Photoshop Elements or a free copy of Microsoft ICE.
Reality Check
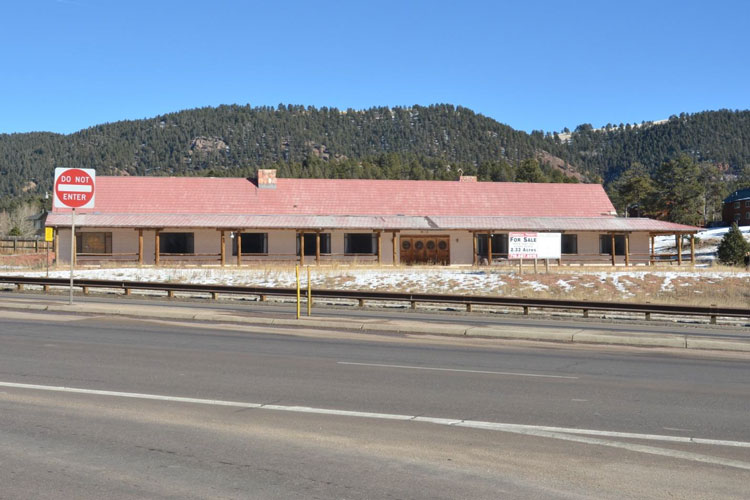
I had a choice of shooting the restaurant's frontage from across a four lane highway or shooting a five shot panorama standing at 50' more or less in the center of the building's 150' frontage. The slope of the terrain precluded getting a frontal shot below the fall-off towards the highway.
The panorama gave me far more detail. I took an insurance shot from across the highway because the only photo that I'm not prepared to explain is the one that I failed to take.
 Panoramas Simplified Copyright: © 2016 by Bob McMicken. Copyright for this article is retained by the author, with publication rights granted to the Crime Scene Investigation Network. This is an Open Access article distributed under the terms of the Creative Commons Attribution-NonCommercial-NoDerivatives 4.0 International License which permits
unrestricted noncommercial use, distribution, and reproduction, provided the original work is
properly cited and not changed in any way.
Panoramas Simplified Copyright: © 2016 by Bob McMicken. Copyright for this article is retained by the author, with publication rights granted to the Crime Scene Investigation Network. This is an Open Access article distributed under the terms of the Creative Commons Attribution-NonCommercial-NoDerivatives 4.0 International License which permits
unrestricted noncommercial use, distribution, and reproduction, provided the original work is
properly cited and not changed in any way.
About Bob McMicken's Book
Mike has written the e-book Practical Police Photography, a 280 page ebook covering everything that an entry level police photographer or forensic science student needs to know, with links to many sites providing additional information.
Article submitted by the Author
Article posted: April 5, 2016