
Footwear and Tire Track Impression Photography
Steven Staggs
© 2014 from the book Crime Scene and Evidence Photography, 2nd Edition
Footwear Impressions
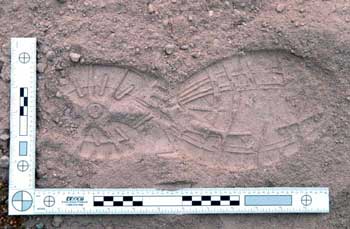
Footwear and tire impressions are perhaps the most overlooked evidence at a crime scene. When impressions are collected it is possible that identifications can be made linking a suspect or vehicle to the crime. Impression evidence can be collected by casting (filling the impression with a compound that hardens and retains the shape and characteristics of the impression) and with photography. Photographs of impressions are often used to make positive identifications, but casting of impressions provides the best evidence. This is because impressions are three–dimensional and casting preserves three–dimensional evidence. The depth of tread and imperfections on the sides of the tread are preserved with casting. At major crime scenes impressions should be photographed before they are casted. Photography is done first because casting the impression will destroy the original impression and eliminate the ability to photograph the impression afterward. Also, photographs of an impression are taken in case there is a problem with the cast. If the casting fails, the photograph may be used to make an identification.
At minor crime scenes impressions are usually photographed without casting. If the impression is properly photographed positive identification linking a suspect or vehicle to the crime is possible.
 |
 |
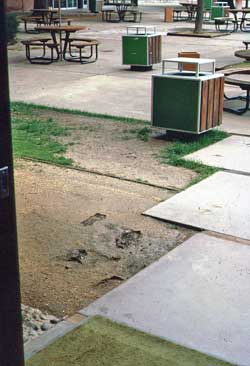
When taking photographs of footwear or tire impressions begin with a photograph to show where the impression is located in the crime scene. It is important to include a recognizable landmark in the photograph so the location of the impression is understood. If the impression is near a landmark, such as in a flowerbed at the corner of a house, a mid–range photograph probably would be adequate to show the location of the impression. If the impression is farther away from a recognizable landmark, such as an impression on a dirt driveway twenty yards from the house, additional photographs would be necessary. An overview photograph showing the driveway with the house in the background would be followed with a mid–range photograph of the impression on the driveway. It may be necessary to include an evidence marker in both the overview and mid–range photographs to clearly show the location of the impression in the photographs.
There may be times where it is not possible to show the exact location of an impression with photographs. The impression may be located in an area with no recognizable landmarks nearby, such as in an open area of the desert. In this case the use of a GPS device (to give location) and a compass (to indicate direction the evidence is oriented) may be the only way to document the exact position of the impression. In such a case you could record the GPS information in your notes, and in the photograph of the impression include an arrow that is oriented to indicate north.
 |
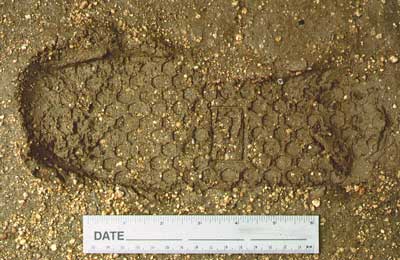
After photographically documenting the location of the impression you must take close–up photographs to show the detail of the impression. If you are using a film camera it is best to photograph impression evidence with black–and–white film. Black–and–white film provides more contrast and detail than most color films.
When photographing with a digital camera all photographs should be taken as RAW file images in color mode. RAW files are uncompressed and will capture more detail than JPG or TIF file images. By photographing in color, subtle tones that could be lost when photographing in black–and–white mode will be captured. Later the color digital photograph can be changed into grayscale in a program such as Adobe® Photoshop®.
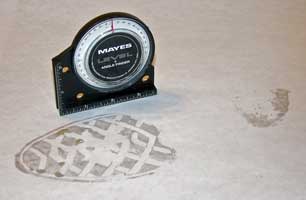
To take a close–up photograph of an impression, place the camera on a tripod and position the camera so the camera's film plane is parallel with the impression. This will minimize distortion in the photograph. An angle finder can be used to measure the angle of the impression and then, by placing the angle finder on the camera's eyepiece, the angle of the camera can be adjusted to match the angle of the impression. The film plane will then be parallel to the impression.
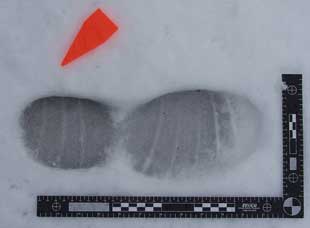
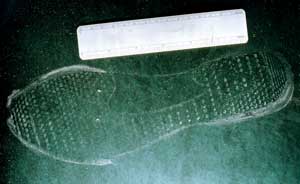
Next, place a scale alongside the impression. When photographing a footwear impression use an “L” shaped scale. When photographing a tire impression use a long straight scale alongside the impression. Place the scale approximately one inch away from the impression and on the same plane as the impression. If necessary, press the scale into the ground until it is the same depth as the impression.
 |
 |
Orientation of the impression is also important. The direction a footwear impression faces could be important to the investigation. For example, in a residential burglary it would be important to show that the footwear impressions in a flowerbed face the window that was used by the suspect to enter the residence. Showing the orientation can be accomplished with a mid–range photograph that includes the window and the impressions. If it is difficult to see the orientation of the impressions in the mid–range photograph, an arrow (indicating north) can be included in both the mid–range and close–up photographs.
In order to get as much detail recorded on the film as possible, your camera should be positioned so the frame of your viewfinder is filled with the impression and scale.
 |
Most of the detail recorded in an impression photograph will be visible due to the small shadows that appear within the impression. The existing shadowing from daylight does not always provide the best results. The position of the sun may actually provide the least desirable results. If you settle for the lighting provided by the sun you will usually have poor quality impression photographs. In fact, it is necessary to take several photographs of each impression, with the lighting from different angles, to show all the detail within an impression.
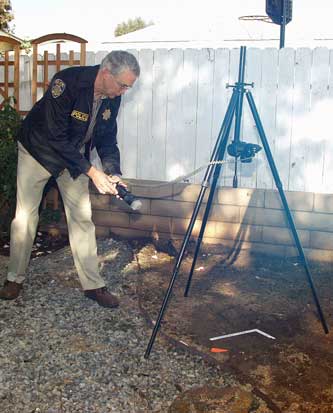
The most effective way to insure you are using the best angles of lighting is “preview the photograph” by looking at lighting from several different angles. To do this, shade the impression with a large piece of cardboard. Then, position a strong light source, such as a powerful flashlight, at different angles to find the light angles that show the best detail in the impression. As you move the lighting you will see the results you will get by looking into your viewfinder. Then position your electronic flash at the best angles for the photographs. You will usually need two people to help you with this technique—one to hold the cardboard and the other to move the flashlight and position the electronic flash.
Another lighting technique would be to take a series of photographs with the electronic flash or light source at six different angles. Two photographs would be taken from each of three directions, one with the electronic flash positioned at a 25 degree angle and the other positioned at a 45 degree angle. You will probably want to use a lower angle for impressions in dust and for very shallow impressions, and a higher angle for deep impressions.
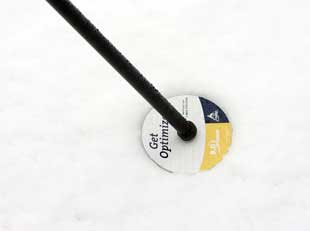
Impressions in snow are photographed with the same techniques detailed above. One additional issue with photographing impressions in the snow is exposure. Remember that the camera’s metering system provides settings for normal lighting which is 18 percent reflectance. Since the subject matter in the photograph is almost all white, the meter will provide exposure settings that result in an underexposed photograph. Much of the detail in the photograph will be lost. When using ambient light for photographs in the snow you can insure accurate exposures by using an 18 percent gray card. Position the 18 percent gray card in front of the camera lens to obtain the correct exposure settings. Be sure the ambient light is falling on the 18 percent gray card the same as it is falling on your evidence. Use the settings indicated by the exposure meter for the photograph. In many cases, bracketing should also be considered. Bracketing will provide a series of photographs at different exposures. Later, the best exposures from the series of photographs can be used for the investigation. This applies to the overview, mid–range and close–up photographs of snow scenes and evidence.
 |
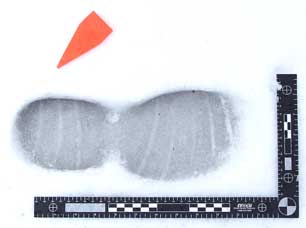 |
When using an electronic flash to photograph footwear impressions in the snow it is likely your photographs will be underexposed. This is because the automatic and TTL electronic flash systems are designed to control the duration of the flash by reading the light reflected off normal subjects. Since the snow will reflect more light than a normal subject the automatic and TTL systems will usually shut off the flash before an adequate exposure is made. The resulting photographs can be underexposed by about two f–stops.
You can adjust your camera to gain back the two f–stops of exposure. When using an automatic camera adjust the camera’s exposure control setting to a setting of +2. When using a manual camera close down the lens aperture by two f–stops (e.g. if a normal flash photograph requires a f/11, change the aperture to f/5.6). In many cases, bracketing should also be considered. Bracketing will provide a series of photographs at different exposures. Later, the best exposures from the series of photographs can be used for the investigation.
 |
 |
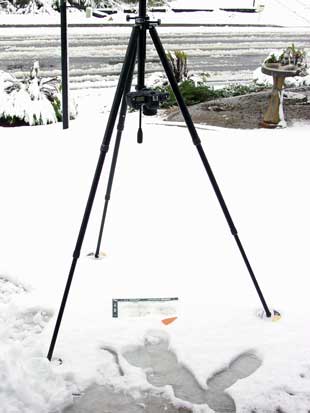
When working with a tripod in the snow it is sometimes difficult to steady the tripod when it tends to sink into the snow. Placing computer or audio compact disks under the tripod legs will help stabilize the tripod. This same technique works when using tripods on mud or sand.
 |
Dusty footwear impressions are sometimes found at crime scenes. They can sometimes be detected by shining a strong light source at low oblique angles across surfaces such as floors, doors (e.g., suspect kicked open a door) and victims’ bodies (e.g., victim was stomped to death). This type of footwear impression is best photographed with light from a low oblique angle.
Dusty footwear impressions can also be collected with gelatin lifters, static dust lifting materials, and electrostatic dust lifters. Each of these techniques causes the dust to adhere to the lifting medium. Once the dust impression has been lifted, the impression is usually preserved with photography. When photographing a lifted dust impression position the camera with its film plane parallel to the dust impression, place a scale on the same plane as the impression, and photograph with light from a low oblique angle.
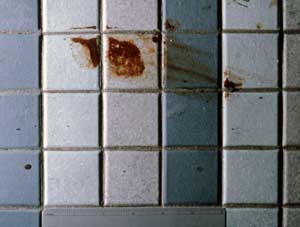 |
Impressions in materials such as blood, grease and oil, which are visible with existing light, may be photographed with ambient (existing) light or with indirect electronic flash (the flash is not pointed directly at the impression). However, it is always best to “preview the photograph” by looking at lighting from several different angles as well as the result of ambient light. To do this, position a strong light source, such as a powerful flashlight, at different angles to find the light angles that show the best detail in the impression. As you move the flashlight you will see the results you will get by looking into your viewfinder.
Tire Impressions
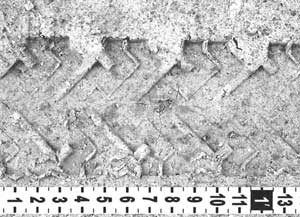 |
The technique for photographing a tire impression is similar to photographing footwear impressions. However, you must photograph tire impressions in enough sections to show one circumference of the tire. Place a long scale or tape measure alongside the tire impression. The numbers on the scale must be large enough to be clearly seen in the photograph. Take three or four overlapping photographs to show enough tire impression for one full circumference of the tire. Do not move the scale while taking the photographs. Later, the series of overlapping photo-graphs can be pieced together by matching the scale in the photographs.
When photographing tire impressions remember to use the same techniques of lighting and camera and scale placement as discussed earlier for footwear impressions.
 Footwear and Tire Track Impression Photography Copyright: © 2014 by Steven Staggs. Copyright for this article is retained by the author, with publication rights granted to the Crime Scene Investigator Network. This is an Open Access article distributed under the terms of the Creative Commons Attribution-NonCommercial-NoDerivatives 4.0 International License which permits unrestricted noncommercial use, distribution, and reproduction, provided the original work is properly cited and not changed in any way.
About the Book
The information presented in this article is from the book
Crime Scene and Evidence Photography, 2nd Edition © 2014 by Steven Staggs.
About the Author
 For 34 years Steven Staggs was a forensic photography instructor and trained more than 4,000 crime scene technicians and investigators for police and sheriff departments, district attorney offices, and federal agencies. He was also a guest speaker for investigator associations, appeared as a crime scene investigation expert on Discovery Channel's Unsolved History, and provided consulting to law enforcement agencies.
Steve has extensive experience in crime scene photography and identification. He has testified in superior court concerning his crime scene, evidence, and autopsy photography and has handled high profile cases including a nationally publicized serial homicide case.
Steve is the author of two books on crime scene and evidence photography, the text book Crime Scene and Evidence Photography and the Crime Scene and Evidence Photographer's Guide. The guide is a field handbook for crime scene and evidence photography, which sold over 10,000 copies and has been in use by investigators in more than 2,000 law enforcement agencies.
Steve retired in 2004 after 32 years in law enforcement, but continued to teach forensic photography and crime scene investigations at a university in Southern California. He is the President of Crime Scene Resources and Webmaster of the Crime Scene Investigator Network, the world's most popular Crime Scene Investigation and Forensic Science website (www.crime-scene-investigator.net).
Article submitted by the Author
Article posted: October 2, 2014