
Faststone Workflow
Bob McMicken
Copyright ©2016
I included this chapter on the assumption that anyone buying an introductory level book on evidence photography needs an introductory chapter on photo editing. Even if department technicians handle your official evidence photos, you need to know how to process your personal and practice photos to get the most out of your camera.
Faststone is a viewer, editor and file manager for JPEG and TIFF files, free to home users, $34.95 to business and government users. The viewer will let you view up to forty thumbnails on a 24" monitor to select files for editing and printing. The editor will let you adjust files to yield a high quality print, slide show or email attachment. The file manager will let you create, rename, copy, move and delete files and folders.
I use Faststone as my primary editor because Faststone does more things faster than any other editor tried to date. I have the Faststone "edit with external" option set to call Photoshop CS6, Adobe Lightroom, Gimp, Irfanview, Microsoft ICE and Photoshop Elements.
- Irfanview has a ruler and it can open files that the others can't.
- Gimp has a ruler and a Levels screen with eyedroppers.
- Microsoft ICE is a good panorama stitcher.
I use Faststone and the pre-subscription version of Photoshop CS6 because they cover all of my bases. However, I could live with the combi nation of Faststone, Gimp, Irfanview and Microsoft ICE. These are free downloads and capable of doing everything that you'll find in Photoshop with the exception of editing RAW files and Fast Fourier Transformations.
I could live with the standalone version of Lightroom for editing RAW files in lieu of paying $120.00 a year for the subscription version of Photoshop. And what, you might ask, is a Fast Fourier Transformations? Forensic specialists use Fast Fourier Transformations to bring out detail in low contrast fingerprints. If you want to know how to do a Fast Fourier Transformations, purchase Photoshop CS3 for Forensics Professionals.
The Bottleneck
I'm using a $600 Dell desktop running Windows XP Professional Service Pack 3 purchased in 2009 and a $200 Samsung monitor purchased in 2011. I get by very nicely with a Brother HL-2320D monochrome laser and an Epson 1400 wide carriage inkjet. I take my big print jobs to Costco.
If you're a high volume photographer, you'll want a desktop with an Intel quad core processor, a 64-bit operating systems, 12 GB of RAM, a 500 GB SSD boot drive and a 1 TB HDD data drive.
Printing is the bottleneck in a high volume operation. If I had to propose a system for a small police department, I'd suggest:
- An Epson 4900 because it's the least expensive Epson inkjet using 200 ml ink cartridges and capable of printing photos on 8 x 10 up to 17 x 22 inch sheets and on rolls up to 17" wide and one hundred feet long. Less expensive printers use more expensive ink.
- The HiTi P720L event printer can spit out four hundred 4 x 6 inch prints an hour.
- A commercial monochrome laser such as the Brother HL-6250 for text documents.
- A commercial inkjet such as the HP Officejet Pro 8630 if you need to embed color photos in text documents.
Workflow
Workflow is the process by which digital image files are downloaded from your camera into your computer where:
- The camera-original files are used to create working copies and then moved to an archival folder where they can be preserved as required by your state's record retention law.
- The working copies are edited to produce prints, PowerPoints and email attachments as required by your end-users.
End users include instructors, supervisors, detectives, prosecutors and defense attorneys. Distribution methods include photographic prints, contact sheets, slide shows, email attachments, PowerPoints and physical media such as thumb drives and CDs.
Caveats
JPEG files are lossy. You will lose a little quality every time you save a JPEG. You can use Save As to create a new file with a new file name but this will soon clutter your hard drives with many near-duplicates.
Always save JPEGs using the highest quality setting. You will lose quality due to file compression but you will lose less quality than if you saved at a lower quality setting.
TIFF files are lossless. Once you save a JPEG as a TIFF, you can save the TIFF as often as you like without losing quality. TIFF files are approximately ten times larger than JPEGs.
Convert JPEGs to TIFFs to serve as your working masters. Once your TIFF masters are no longer needed, convert them back to JPEGs for long term storage. This is easy using Faststone's batch conversion option.
File Structure
If you're a police photographer, whoever set up your system created a file structure that made sense at the time. Unless you're the new big dog, you're stuck with the structure baked into your SOP.
I have three sub-folders under the My Pictures folder on my data drive: AA_JPEG, AB_TIFF and AC_MAIL.
I download my camera originals into AA_JPEG. I use a batch command to convert the JPEGs to TIFFs and save the TIFFs in my AB_TIFF folder.
The unmodified camera-originals are then moved to an appropriately named archival folder. I edit the TIFFs using Faststone, opening and closing the files as necessary, often over a period of several days. Once I'm satisfied with my TIFFs, I move them to an appropriately named archival folder, leaving my AA_JPEG and AB_TIFF folders empty to await the next batch of photos. TIFFs are batch-converted back to JPEGs to save disk space when I have no reason to do additional editing.
The system that you use doesn't matter as long as you archive your camera original files exactly as shot and you work with TIFF copies of your camera-originals during the editing process. Your folder structure should let you find any file quickly using a standard browser such as Faststone.
The Faststone Screen
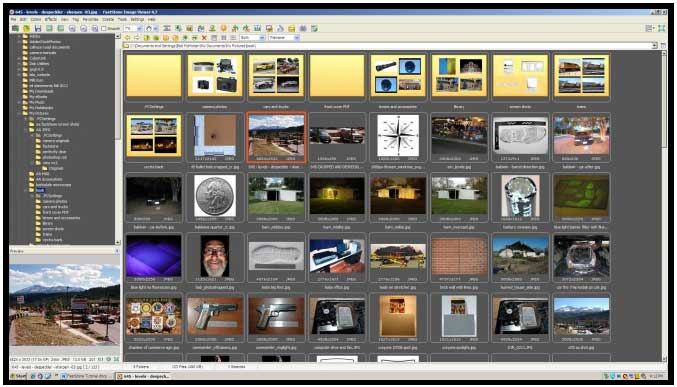
The Faststone screen consists of a menu bar, an icon bar, a directory tree, a preview window and a browse window displaying thumbnails of the files in the selected directory. The directory tree and browse windows are powerful tools for finding and selecting files, even if you prefer to do your editing in another program such as Gimp or Photoshop.
Step One — Download
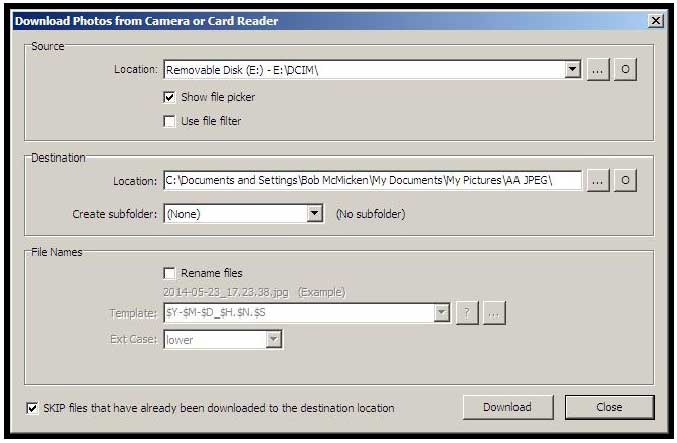
Connect your camera to the computer using a USB cable or card reader. Click on the camera icon. The following screen will appear showing the source location and destination folder.
Step Two — Batch Convert
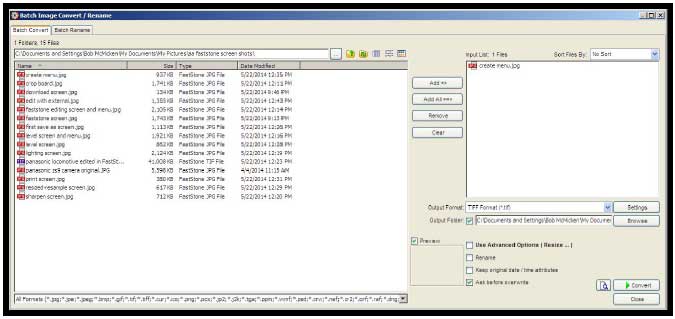
Once you've downloaded your camera original to the AA_JPEG folder, select Batch Convert Selected Images from the Tools menu. In one fell swoop, you can copy your JPEGs as TIFFs from your AA_JPEG folder to your AB_TIFF folder, optionally resizing and renaming files during the conversion process.
Once you're through with the TIFFs, you can use this same screen to convert your TIFFs back to space-saving JPEGs. This is a powerful tool that does not exist in Gimp or Photoshop.
Step Three — Select An Image
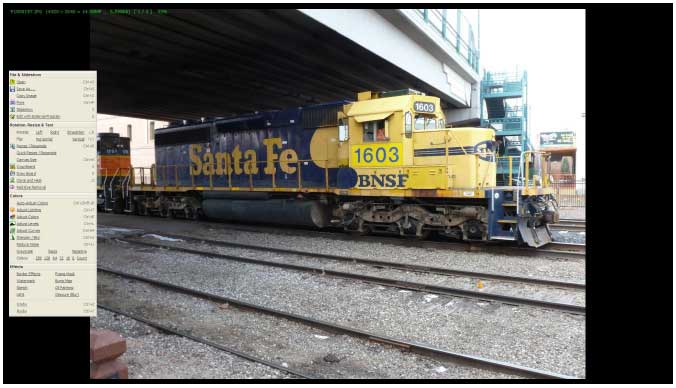
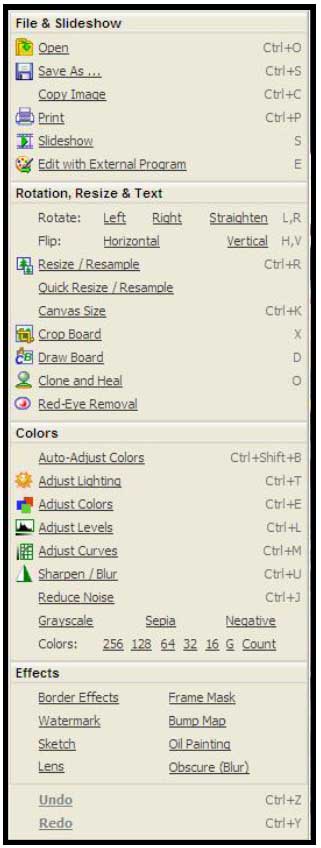
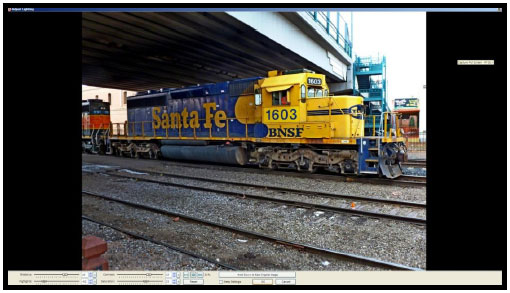
Use the directory tree to navigate to the folder containing the photo that you want to edit. In my case, this would be AB_TIFF. Highlight the thumbnail and hit the enter key. The image will appear full screen. Move the cursor to the extreme left of the screen and the edit menu panel that you see below will appear.
I do this with every photo that I intend to keep. If you're a police photographer shooting evidence photos at a felony crime scene, you're obliged to keep everything.
If you're shooting personal and practice photos on your own time, delete your mistakes. Don't waste time and disk space on obvious duds.
When you have two or more similar photos, use the Faststone "compare selected images" icon on the menu bar to compare the candidates side by side, saving the better of the two. This is a useful option not found in other editors.
The edit panel displays all of the options required to edit and print a photo in one place, along with commonly used keyboard shortcuts. Commonly used options are described below.
You'll find both a comprehensive list of keyboard shortcuts and a button to download a complete tutorial under the help option on the menu bar.
Faststone is by far the fastest and easiest editor that I've ever used and I've used a bunch. I attribute this to a good browse window and file management tools combined with all of the commonly used options concentrated on the edit panel.
Slide shows are a fast and easy way to distribute captioned photos to a wide audience via CDs, thumb drives or your department's intranet. I prefer slide shows to PowerPoints.
Step Four — Rotate and Straighten
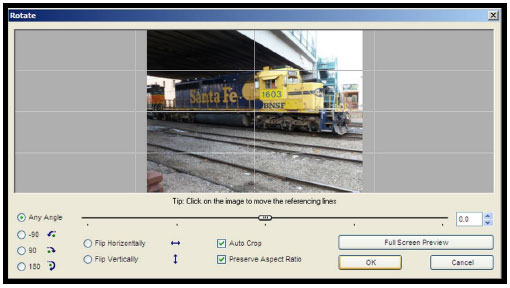
Occasionally, you'll take a picture with the camera canted. The rotate and straighten options give you a chance to correct these problems.
Step Five — Levels
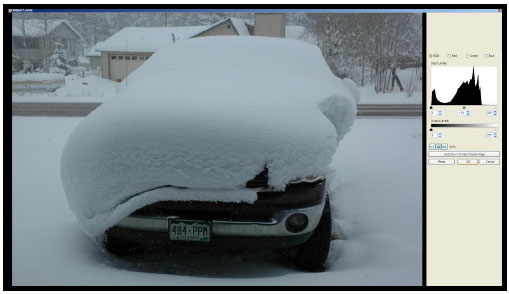
Always check the Levels screen. The sliders on the Levels histogram will correct many minor exposure problems. Move the black and the white sliders to bookend the histogram. Jiggle the gray slider to taste.
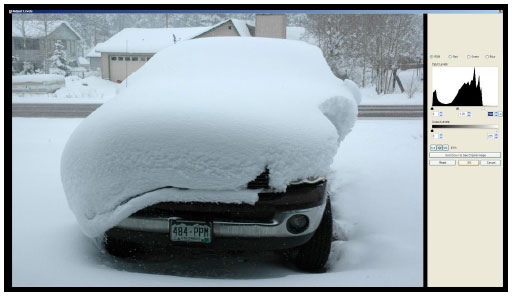
The photo ocorrected simply by moving the white slider in to the right edge of the histogram, a process taking no more than a few seconds. Don't make your life complicated. Always start with the easy fixes and work your way up from there. Levels is easy.
Step Six — Adjust Lighting

If you're not satisfied with a Levels adjustment, go to the Adjust Lighting option. Adjust Lighting gives you four sliders, Shadows, Highlights, Contrast and Saturation.
You can use the Shadows and Highlights sliders to fine-tune your highlight and shadow values. This is helpful when editing flash pictures. Highlights can tone down an overexposed foreground while Shadows can bring out extra detail in an underexposed background.
When highlight and shadow values are adjusted to your satisfaction, Contrast can often improve the overall tone of your picture while Saturation will sometimes perk up your colors.
I rarely need to use any of the editing options beyond Levels and Adjust Lighting. If you can't consistently produce a photo fit to print with these options, you need to evaluate your shooting disciplines.
Step Seven — Adjust Color

Faststone has two options (Adjust Color and Auto-Adjust Color) for adjusting colors if you failed to adjust your camera's White Balance to match the ambient illumination. Getting color right at the scene is easier than trying to correct problems after the fact.
The Brightness, Contrast, Hue, Saturation, Blue and Green sliders on the Adjust Color screen will give you the most control. Under difficult lighting conditions, setting your camera's White Balance to match the ambient lighting is easier than trying to make adjustments after the fact.
Step Eight — Sharpen
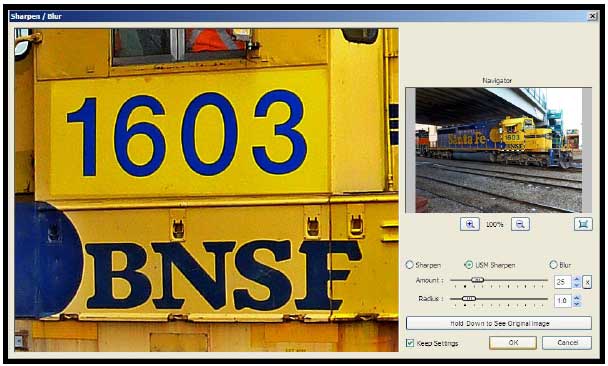
For technical reasons, digital cameras rarely give you an image that's critically sharp. Some cameras will let you add additional sharpening in the setup menu but the degree of required sharpening can vary from photo to photo, depending on how the photo is to be used. Hence, most photographers prefer to sharpen as the last step during the editing process.
Once you're satisfied with your previous adjustments, call up the Sharpen/Blur menu. Select the USM Sharpen radio button. Navigate to important detail such as lettering. Adjust the amount and radius sliders to taste.
If in doubt, start with the default, Amount 25 and Radius 1.0. More often than not, I end up using Amount 50, Radius 0.5. These values depend on both your camera and how you intend to use the photo.
Step Nine — Save As
Once your satisfied with your edits, hit Control-S or use the Save As command to save your TIFF with an _ok extension so you know that the photo needs no more work before printing. Once you've saved, you can print the picture at this point or clear the screen and go to the next photo.
You'll be presented with the Save As menu, which gives you an opportunity to select a destination folder, create a new folder, accept the default file name, enter a new file name and select a format if you don't like the original format.
Resize (As Required)
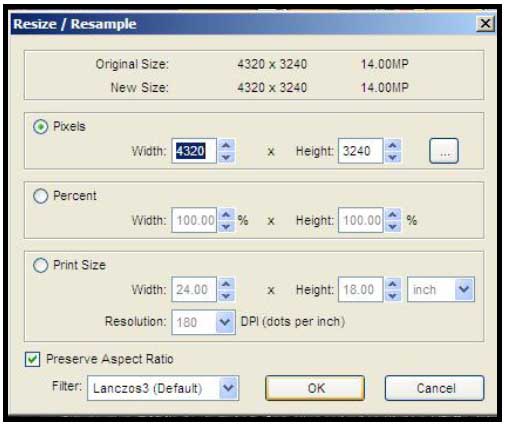
I save my edited TIFFs at the camera-original resolution. If resizing is necessary, I'll resize the TIFF and save it as a JPEG under a new file name with an _rs extension.
At one time, I believed that it was essential to adjust my print size and resolution before printing or inserting a photo into a PowerPoint or Word document. Today, I usually let my printer driver do the heavy lifting unless I'm making 12 x 18 or 20 x 30 enlargements.
Microsoft Word and PowerPoint have options for compressing JPEG photo inserts, avoiding the need to resize beforehand.
For emailing JPEGs, I use the Letter icon on the icon bar to resize JPEGs to 800 x 600 at the 75% quality setting. If you need to send photos at full camera-original resolution, use an FTP service such as emaillargefile.com, FTP = file transfer protocol.
Print (As Required)
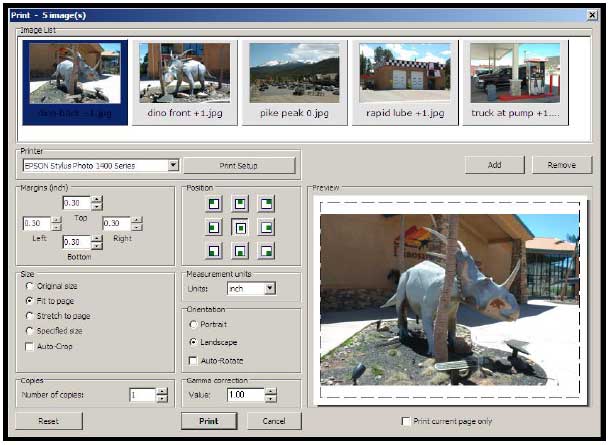
Call up the Faststone print screen by selecting Print on the edit panel or by hitting Control P. You'll be presented with the menu shown here.
You can print your photos one at a time or select any reasonable number of photos in a given folder and batch-print them. Batch-printing is a time-saver if you have a computer with sufficient horsepower and a printer with sufficient ink and paper capacity.
Other Options
At this point, you can crop a photo using the Crop Board to focus on important detail. By default, Faststone saves cropped images with a _cr extension. You can create slide shows and contact sheets using the Create menu. You can convert a color photo to B&W using the Greyscale option. You can use Reduce Noise to eliminate the grain caused by shooting at a high ISO.
Before and After — BNSF 1603

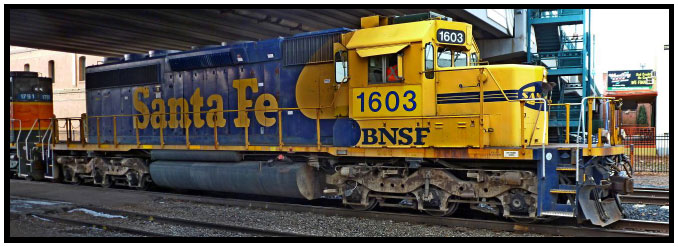
The top photo is camera-original JPEG shot with a Panasonic ZS9 pocket camera and cropped so that I could get before and after photos on the same page. The bottom photo was tweaked using the Faststone Adjust Lighting and Sharpen commands. This particular photo couldn't be improved in Adjust Levels.
The differences are easy to see when you compare 12 x 18 inch prints on premium glossy paper. I got comparable results using similar editing options in Photoshop, Photoshop Elements and Gimp. For my purposes, Faststone is just a little faster and more convenient. Your mileage may vary.
Before and After — Flash At Night
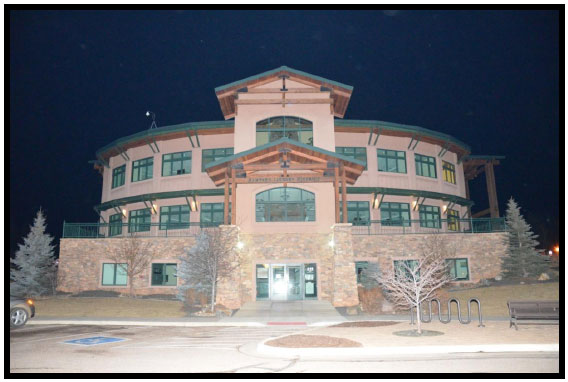
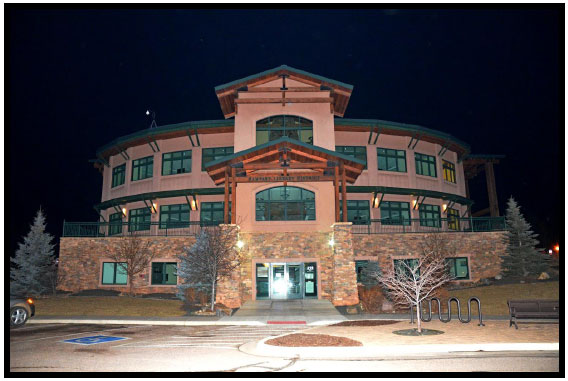
The Rampart Range library shot with a Nikon D7000 and an SB-800 flash at ISO 6400. The top photos is straight from the camera. The bottom photo was tweaked using Faststone's Adjust Lighting, Reduce Noise and Sharpen commands.
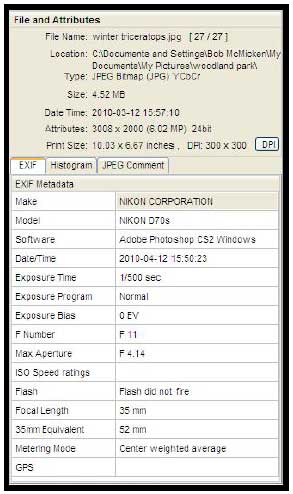
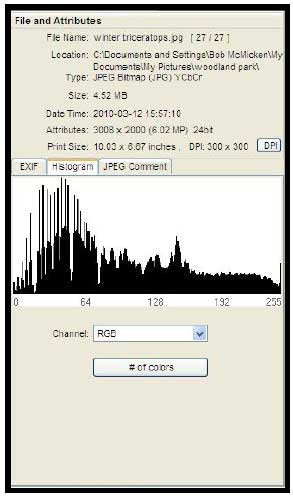
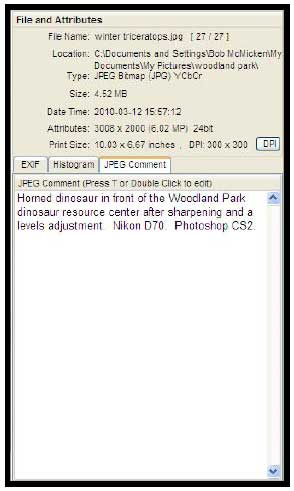
Faststone's EXIF Screens
Fastone has three EXIF screens. Select a photo in the browse window and press Control-H to pop up the EXIF screens. I used the Faststone Capture utility to capture the screens and save them as JPEGs to my hard drive. You can also send them directly to your printer.
 Faststone Workflow Copyright: © 2016 by Bob McMicken. Copyright for this article is retained by the author, with publication rights granted to the Crime Scene Investigation Network. This is an Open Access article distributed under the terms of the Creative Commons Attribution-NonCommercial-NoDerivatives 4.0 International License which permits
unrestricted noncommercial use, distribution, and reproduction, provided the original work is
properly cited and not changed in any way.
Faststone Workflow Copyright: © 2016 by Bob McMicken. Copyright for this article is retained by the author, with publication rights granted to the Crime Scene Investigation Network. This is an Open Access article distributed under the terms of the Creative Commons Attribution-NonCommercial-NoDerivatives 4.0 International License which permits
unrestricted noncommercial use, distribution, and reproduction, provided the original work is
properly cited and not changed in any way.
About the Book
The information presented in this article is from the e-book
Practical Police Photography © 2016 by Bob McMicken.
Article submitted by the Author
Article posted: March 24, 2016